> ## Documentation Index
> Fetch the complete documentation index at: https://modelcontextprotocol.io/llms.txt
> Use this file to discover all available pages before exploring further.
# Build an MCP client
> Get started building your own client that can integrate with all MCP servers.
In this tutorial, you'll learn how to build an LLM-powered chatbot client that connects to MCP servers.
Before you begin, it helps to have gone through our [Build an MCP Server](/docs/develop/build-server) tutorial so you can understand how clients and servers communicate.
[You can find the complete code for this tutorial here.](https://github.com/modelcontextprotocol/quickstart-resources/tree/main/mcp-client-python)
## System Requirements
Before starting, ensure your system meets these requirements:
* Mac or Windows computer
* Latest Python version installed
* Latest version of `uv` installed
## Setting Up Your Environment
First, create a new Python project with `uv`:
```bash macOS/Linux theme={null}
# Create project directory
uv init mcp-client
cd mcp-client
# Create virtual environment
uv venv
# Activate virtual environment
source .venv/bin/activate
# Install required packages
uv add mcp anthropic python-dotenv
# Remove boilerplate files
rm main.py
# Create our main file
touch client.py
```
```powershell Windows theme={null}
# Create project directory
uv init mcp-client
cd mcp-client
# Create virtual environment
uv venv
# Activate virtual environment
.venv\Scripts\activate
# Install required packages
uv add mcp anthropic python-dotenv
# Remove boilerplate files
del main.py
# Create our main file
new-item client.py
```
## Setting Up Your API Key
You'll need an Anthropic API key from the [Anthropic Console](https://console.anthropic.com/settings/keys).
Create a `.env` file to store it:
```bash theme={null}
echo "ANTHROPIC_API_KEY=your-api-key-goes-here" > .env
```
Add `.env` to your `.gitignore`:
```bash theme={null}
echo ".env" >> .gitignore
```
Make sure you keep your `ANTHROPIC_API_KEY` secure!
## Creating the Client
### Basic Client Structure
First, let's set up our imports and create the basic client class:
```python theme={null}
import asyncio
from typing import Optional
from contextlib import AsyncExitStack
from mcp import ClientSession, StdioServerParameters
from mcp.client.stdio import stdio_client
from anthropic import Anthropic
from dotenv import load_dotenv
load_dotenv() # load environment variables from .env
class MCPClient:
def __init__(self):
# Initialize session and client objects
self.session: Optional[ClientSession] = None
self.exit_stack = AsyncExitStack()
self.anthropic = Anthropic()
# methods will go here
```
### Server Connection Management
Next, we'll implement the method to connect to an MCP server:
```python theme={null}
async def connect_to_server(self, server_script_path: str):
"""Connect to an MCP server
Args:
server_script_path: Path to the server script (.py or .js)
"""
is_python = server_script_path.endswith('.py')
is_js = server_script_path.endswith('.js')
if not (is_python or is_js):
raise ValueError("Server script must be a .py or .js file")
command = "python" if is_python else "node"
server_params = StdioServerParameters(
command=command,
args=[server_script_path],
env=None
)
stdio_transport = await self.exit_stack.enter_async_context(stdio_client(server_params))
self.stdio, self.write = stdio_transport
self.session = await self.exit_stack.enter_async_context(ClientSession(self.stdio, self.write))
await self.session.initialize()
# List available tools
response = await self.session.list_tools()
tools = response.tools
print("\nConnected to server with tools:", [tool.name for tool in tools])
```
### Query Processing Logic
Now let's add the core functionality for processing queries and handling tool calls:
```python theme={null}
async def process_query(self, query: str) -> str:
"""Process a query using Claude and available tools"""
messages = [
{
"role": "user",
"content": query
}
]
response = await self.session.list_tools()
available_tools = [{
"name": tool.name,
"description": tool.description,
"input_schema": tool.inputSchema
} for tool in response.tools]
# Initial Claude API call
response = self.anthropic.messages.create(
model="claude-sonnet-4-20250514",
max_tokens=1000,
messages=messages,
tools=available_tools
)
# Process response and handle tool calls
final_text = []
assistant_message_content = []
for content in response.content:
if content.type == 'text':
final_text.append(content.text)
assistant_message_content.append(content)
elif content.type == 'tool_use':
tool_name = content.name
tool_args = content.input
# Execute tool call
result = await self.session.call_tool(tool_name, tool_args)
final_text.append(f"[Calling tool {tool_name} with args {tool_args}]")
assistant_message_content.append(content)
messages.append({
"role": "assistant",
"content": assistant_message_content
})
messages.append({
"role": "user",
"content": [
{
"type": "tool_result",
"tool_use_id": content.id,
"content": result.content
}
]
})
# Get next response from Claude
response = self.anthropic.messages.create(
model="claude-sonnet-4-20250514",
max_tokens=1000,
messages=messages,
tools=available_tools
)
final_text.append(response.content[0].text)
return "\n".join(final_text)
```
### Interactive Chat Interface
Now we'll add the chat loop and cleanup functionality:
```python theme={null}
async def chat_loop(self):
"""Run an interactive chat loop"""
print("\nMCP Client Started!")
print("Type your queries or 'quit' to exit.")
while True:
try:
query = input("\nQuery: ").strip()
if query.lower() == 'quit':
break
response = await self.process_query(query)
print("\n" + response)
except Exception as e:
print(f"\nError: {str(e)}")
async def cleanup(self):
"""Clean up resources"""
await self.exit_stack.aclose()
```
### Main Entry Point
Finally, we'll add the main execution logic:
```python theme={null}
async def main():
if len(sys.argv) < 2:
print("Usage: python client.py ")
sys.exit(1)
client = MCPClient()
try:
await client.connect_to_server(sys.argv[1])
await client.chat_loop()
finally:
await client.cleanup()
if __name__ == "__main__":
import sys
asyncio.run(main())
```
You can find the complete `client.py` file [here](https://github.com/modelcontextprotocol/quickstart-resources/blob/main/mcp-client-python/client.py).
## Key Components Explained
### 1. Client Initialization
* The `MCPClient` class initializes with session management and API clients
* Uses `AsyncExitStack` for proper resource management
* Configures the Anthropic client for Claude interactions
### 2. Server Connection
* Supports both Python and Node.js servers
* Validates server script type
* Sets up proper communication channels
* Initializes the session and lists available tools
### 3. Query Processing
* Maintains conversation context
* Handles Claude's responses and tool calls
* Manages the message flow between Claude and tools
* Combines results into a coherent response
### 4. Interactive Interface
* Provides a simple command-line interface
* Handles user input and displays responses
* Includes basic error handling
* Allows graceful exit
### 5. Resource Management
* Proper cleanup of resources
* Error handling for connection issues
* Graceful shutdown procedures
## Common Customization Points
1. **Tool Handling**
* Modify `process_query()` to handle specific tool types
* Add custom error handling for tool calls
* Implement tool-specific response formatting
2. **Response Processing**
* Customize how tool results are formatted
* Add response filtering or transformation
* Implement custom logging
3. **User Interface**
* Add a GUI or web interface
* Implement rich console output
* Add command history or auto-completion
## Running the Client
To run your client with any MCP server:
```bash theme={null}
uv run client.py path/to/server.py # python server
uv run client.py path/to/build/index.js # node server
```
If you're continuing [the weather tutorial from the server quickstart](https://github.com/modelcontextprotocol/quickstart-resources/tree/main/weather-server-python), your command might look something like this: `python client.py .../quickstart-resources/weather-server-python/weather.py`
The client will:
1. Connect to the specified server
2. List available tools
3. Start an interactive chat session where you can:
* Enter queries
* See tool executions
* Get responses from Claude
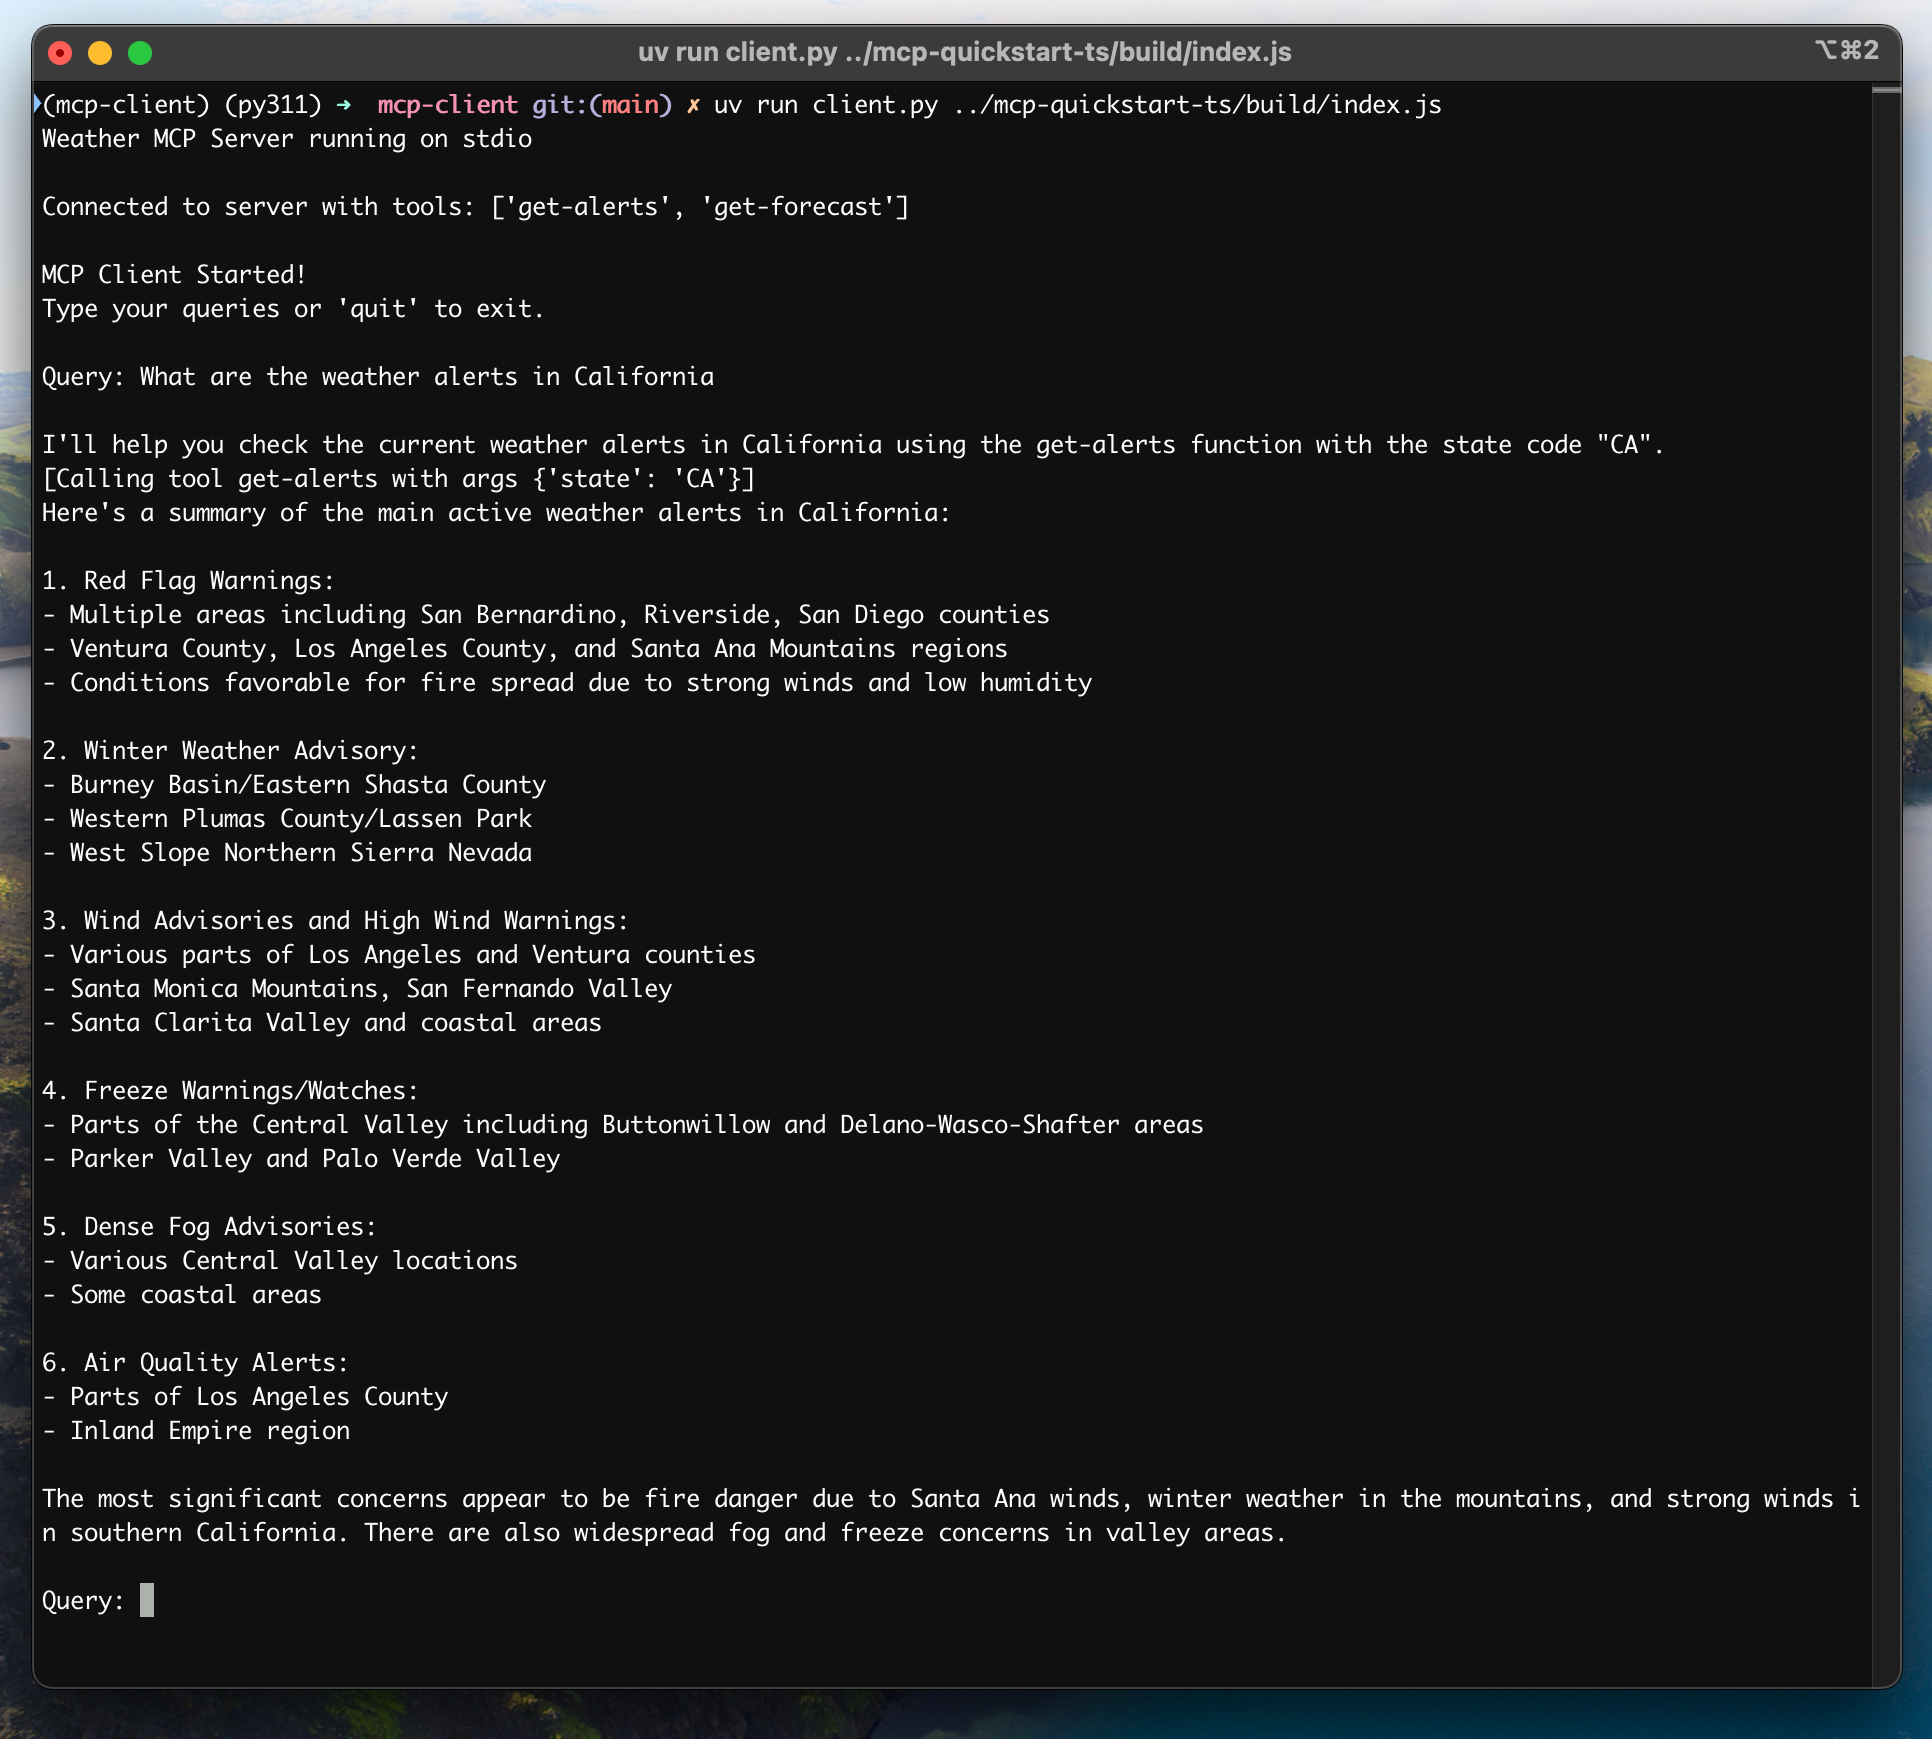
Here's an example of what it should look like if connected to the weather server from the server quickstart:
 ## How It Works
When you submit a query:
1. The client gets the list of available tools from the server
2. Your query is sent to Claude along with tool descriptions
3. Claude decides which tools (if any) to use
4. The client executes any requested tool calls through the server
5. Results are sent back to Claude
6. Claude provides a natural language response
7. The response is displayed to you
## Best practices
1. **Error Handling**
* Always wrap tool calls in try-catch blocks
* Provide meaningful error messages
* Gracefully handle connection issues
2. **Resource Management**
* Use `AsyncExitStack` for proper cleanup
* Close connections when done
* Handle server disconnections
3. **Security**
* Store API keys securely in `.env`
* Validate server responses
* Be cautious with tool permissions
4. **Tool Names**
* Tool names can be validated according to the format specified [here](/specification/draft/server/tools#tool-names)
* If a tool name conforms to the specified format, it should not fail validation by an MCP client
## Troubleshooting
### Server Path Issues
* Double-check the path to your server script is correct
* Use the absolute path if the relative path isn't working
* For Windows users, make sure to use forward slashes (/) or escaped backslashes (\\) in the path
* Verify the server file has the correct extension (.py for Python or .js for Node.js)
Example of correct path usage:
```bash theme={null}
# Relative path
uv run client.py ./server/weather.py
# Absolute path
uv run client.py /Users/username/projects/mcp-server/weather.py
# Windows path (either format works)
uv run client.py C:/projects/mcp-server/weather.py
uv run client.py C:\\projects\\mcp-server\\weather.py
```
### Response Timing
* The first response might take up to 30 seconds to return
* This is normal and happens while:
* The server initializes
* Claude processes the query
* Tools are being executed
* Subsequent responses are typically faster
* Don't interrupt the process during this initial waiting period
### Common Error Messages
If you see:
* `FileNotFoundError`: Check your server path
* `Connection refused`: Ensure the server is running and the path is correct
* `Tool execution failed`: Verify the tool's required environment variables are set
* `Timeout error`: Consider increasing the timeout in your client configuration
[You can find the complete code for this tutorial here.](https://github.com/modelcontextprotocol/quickstart-resources/tree/main/mcp-client-typescript)
## System Requirements
Before starting, ensure your system meets these requirements:
* Mac or Windows computer
* Node.js 17 or higher installed
* Latest version of `npm` installed
* Anthropic API key (Claude)
## Setting Up Your Environment
First, let's create and set up our project:
```bash macOS/Linux theme={null}
# Create project directory
mkdir mcp-client-typescript
cd mcp-client-typescript
# Initialize npm project
npm init -y
# Install dependencies
npm install @anthropic-ai/sdk @modelcontextprotocol/sdk dotenv
# Install dev dependencies
npm install -D @types/node typescript
# Create source file
touch index.ts
```
```powershell Windows theme={null}
# Create project directory
md mcp-client-typescript
cd mcp-client-typescript
# Initialize npm project
npm init -y
# Install dependencies
npm install @anthropic-ai/sdk @modelcontextprotocol/sdk dotenv
# Install dev dependencies
npm install -D @types/node typescript
# Create source file
new-item index.ts
```
Update your `package.json` to set `type: "module"` and a build script:
```json package.json theme={null}
{
"type": "module",
"scripts": {
"build": "tsc && chmod 755 build/index.js"
}
}
```
Create a `tsconfig.json` in the root of your project:
```json tsconfig.json theme={null}
{
"compilerOptions": {
"target": "ES2022",
"module": "Node16",
"moduleResolution": "Node16",
"outDir": "./build",
"rootDir": "./",
"strict": true,
"esModuleInterop": true,
"skipLibCheck": true,
"forceConsistentCasingInFileNames": true
},
"include": ["index.ts"],
"exclude": ["node_modules"]
}
```
## Setting Up Your API Key
You'll need an Anthropic API key from the [Anthropic Console](https://console.anthropic.com/settings/keys).
Create a `.env` file to store it:
```bash theme={null}
echo "ANTHROPIC_API_KEY=" > .env
```
Add `.env` to your `.gitignore`:
```bash theme={null}
echo ".env" >> .gitignore
```
Make sure you keep your `ANTHROPIC_API_KEY` secure!
## Creating the Client
### Basic Client Structure
First, let's set up our imports and create the basic client class in `index.ts`:
```typescript theme={null}
import { Anthropic } from "@anthropic-ai/sdk";
import {
MessageParam,
Tool,
} from "@anthropic-ai/sdk/resources/messages/messages.mjs";
import { Client } from "@modelcontextprotocol/sdk/client/index.js";
import { StdioClientTransport } from "@modelcontextprotocol/sdk/client/stdio.js";
import readline from "readline/promises";
import dotenv from "dotenv";
dotenv.config();
const ANTHROPIC_API_KEY = process.env.ANTHROPIC_API_KEY;
if (!ANTHROPIC_API_KEY) {
throw new Error("ANTHROPIC_API_KEY is not set");
}
class MCPClient {
private mcp: Client;
private anthropic: Anthropic;
private transport: StdioClientTransport | null = null;
private tools: Tool[] = [];
constructor() {
this.anthropic = new Anthropic({
apiKey: ANTHROPIC_API_KEY,
});
this.mcp = new Client({ name: "mcp-client-cli", version: "1.0.0" });
}
// methods will go here
}
```
### Server Connection Management
Next, we'll implement the method to connect to an MCP server:
```typescript theme={null}
async connectToServer(serverScriptPath: string) {
try {
const isJs = serverScriptPath.endsWith(".js");
const isPy = serverScriptPath.endsWith(".py");
if (!isJs && !isPy) {
throw new Error("Server script must be a .js or .py file");
}
const command = isPy
? process.platform === "win32"
? "python"
: "python3"
: process.execPath;
this.transport = new StdioClientTransport({
command,
args: [serverScriptPath],
});
await this.mcp.connect(this.transport);
const toolsResult = await this.mcp.listTools();
this.tools = toolsResult.tools.map((tool) => {
return {
name: tool.name,
description: tool.description,
input_schema: tool.inputSchema,
};
});
console.log(
"Connected to server with tools:",
this.tools.map(({ name }) => name)
);
} catch (e) {
console.log("Failed to connect to MCP server: ", e);
throw e;
}
}
```
### Query Processing Logic
Now let's add the core functionality for processing queries and handling tool calls:
```typescript theme={null}
async processQuery(query: string) {
const messages: MessageParam[] = [
{
role: "user",
content: query,
},
];
const response = await this.anthropic.messages.create({
model: "claude-sonnet-4-20250514",
max_tokens: 1000,
messages,
tools: this.tools,
});
const finalText = [];
for (const content of response.content) {
if (content.type === "text") {
finalText.push(content.text);
} else if (content.type === "tool_use") {
const toolName = content.name;
const toolArgs = content.input as { [x: string]: unknown } | undefined;
const result = await this.mcp.callTool({
name: toolName,
arguments: toolArgs,
});
finalText.push(
`[Calling tool ${toolName} with args ${JSON.stringify(toolArgs)}]`
);
messages.push({
role: "user",
content: result.content as string,
});
const response = await this.anthropic.messages.create({
model: "claude-sonnet-4-20250514",
max_tokens: 1000,
messages,
});
finalText.push(
response.content[0].type === "text" ? response.content[0].text : ""
);
}
}
return finalText.join("\n");
}
```
### Interactive Chat Interface
Now we'll add the chat loop and cleanup functionality:
```typescript theme={null}
async chatLoop() {
const rl = readline.createInterface({
input: process.stdin,
output: process.stdout,
});
try {
console.log("\nMCP Client Started!");
console.log("Type your queries or 'quit' to exit.");
while (true) {
const message = await rl.question("\nQuery: ");
if (message.toLowerCase() === "quit") {
break;
}
const response = await this.processQuery(message);
console.log("\n" + response);
}
} finally {
rl.close();
}
}
async cleanup() {
await this.mcp.close();
}
```
### Main Entry Point
Finally, we'll add the main execution logic:
```typescript theme={null}
async function main() {
if (process.argv.length < 3) {
console.log("Usage: node index.ts ");
return;
}
const mcpClient = new MCPClient();
try {
await mcpClient.connectToServer(process.argv[2]);
await mcpClient.chatLoop();
} catch (e) {
console.error("Error:", e);
await mcpClient.cleanup();
process.exit(1);
} finally {
await mcpClient.cleanup();
process.exit(0);
}
}
main();
```
## Running the Client
To run your client with any MCP server:
```bash theme={null}
# Build TypeScript
npm run build
# Run the client
node build/index.js path/to/server.py # python server
node build/index.js path/to/build/index.js # node server
```
If you're continuing [the weather tutorial from the server quickstart](https://github.com/modelcontextprotocol/quickstart-resources/tree/main/weather-server-typescript), your command might look something like this: `node build/index.js .../quickstart-resources/weather-server-typescript/build/index.js`
**The client will:**
1. Connect to the specified server
2. List available tools
3. Start an interactive chat session where you can:
* Enter queries
* See tool executions
* Get responses from Claude
## How It Works
When you submit a query:
1. The client gets the list of available tools from the server
2. Your query is sent to Claude along with tool descriptions
3. Claude decides which tools (if any) to use
4. The client executes any requested tool calls through the server
5. Results are sent back to Claude
6. Claude provides a natural language response
7. The response is displayed to you
## Best practices
1. **Error Handling**
* Use TypeScript's type system for better error detection
* Wrap tool calls in try-catch blocks
* Provide meaningful error messages
* Gracefully handle connection issues
2. **Security**
* Store API keys securely in `.env`
* Validate server responses
* Be cautious with tool permissions
## Troubleshooting
### Server Path Issues
* Double-check the path to your server script is correct
* Use the absolute path if the relative path isn't working
* For Windows users, make sure to use forward slashes (/) or escaped backslashes (\\) in the path
* Verify the server file has the correct extension (.js for Node.js or .py for Python)
Example of correct path usage:
```bash theme={null}
# Relative path
node build/index.js ./server/build/index.js
# Absolute path
node build/index.js /Users/username/projects/mcp-server/build/index.js
# Windows path (either format works)
node build/index.js C:/projects/mcp-server/build/index.js
node build/index.js C:\\projects\\mcp-server\\build\\index.js
```
### Response Timing
* The first response might take up to 30 seconds to return
* This is normal and happens while:
* The server initializes
* Claude processes the query
* Tools are being executed
* Subsequent responses are typically faster
* Don't interrupt the process during this initial waiting period
### Common Error Messages
If you see:
* `Error: Cannot find module`: Check your build folder and ensure TypeScript compilation succeeded
* `Connection refused`: Ensure the server is running and the path is correct
* `Tool execution failed`: Verify the tool's required environment variables are set
* `ANTHROPIC_API_KEY is not set`: Check your .env file and environment variables
* `TypeError`: Ensure you're using the correct types for tool arguments
* `BadRequestError`: Ensure you have enough credits to access the Anthropic API
This is a quickstart demo based on Spring AI MCP auto-configuration and boot starters.
To learn how to create sync and async MCP Clients manually, consult the [Java SDK Client](/sdk/java/mcp-client) documentation
This example demonstrates how to build an interactive chatbot that combines Spring AI's Model Context Protocol (MCP) with the [Brave Search MCP Server](https://github.com/modelcontextprotocol/servers-archived/tree/main/src/brave-search). The application creates a conversational interface powered by Anthropic's Claude AI model that can perform internet searches through Brave Search, enabling natural language interactions with real-time web data.
[You can find the complete code for this tutorial here.](https://github.com/spring-projects/spring-ai-examples/tree/main/model-context-protocol/web-search/brave-chatbot)
## System Requirements
Before starting, ensure your system meets these requirements:
* Java 17 or higher
* Maven 3.6+
* npx package manager
* Anthropic API key (Claude)
* Brave Search API key
## Setting Up Your Environment
1. Install npx (Node Package eXecute):
First, make sure to install [npm](https://docs.npmjs.com/downloading-and-installing-node-js-and-npm)
and then run:
```bash theme={null}
npm install -g npx
```
2. Clone the repository:
```bash theme={null}
git clone https://github.com/spring-projects/spring-ai-examples.git
cd model-context-protocol/web-search/brave-chatbot
```
3. Set up your API keys:
```bash theme={null}
export ANTHROPIC_API_KEY='your-anthropic-api-key-here'
export BRAVE_API_KEY='your-brave-api-key-here'
```
4. Build the application:
```bash theme={null}
./mvnw clean install
```
5. Run the application using Maven:
```bash theme={null}
./mvnw spring-boot:run
```
Make sure you keep your `ANTHROPIC_API_KEY` and `BRAVE_API_KEY` keys secure!
## How it Works
The application integrates Spring AI with the Brave Search MCP server through several components:
### MCP Client Configuration
1. Required dependencies in pom.xml:
```xml theme={null}
org.springframework.ai
spring-ai-starter-mcp-client
org.springframework.ai
spring-ai-starter-model-anthropic
```
2. Application properties (application.yml):
```yml theme={null}
spring:
ai:
mcp:
client:
enabled: true
name: brave-search-client
version: 1.0.0
type: SYNC
request-timeout: 20s
stdio:
root-change-notification: true
servers-configuration: classpath:/mcp-servers-config.json
toolcallback:
enabled: true
anthropic:
api-key: ${ANTHROPIC_API_KEY}
```
This activates the `spring-ai-starter-mcp-client` to create one or more `McpClient`s based on the provided server configuration.
The `spring.ai.mcp.client.toolcallback.enabled=true` property enables the tool callback mechanism, that automatically registers all MCP tool as spring ai tools.
It is disabled by default.
3. MCP Server Configuration (`mcp-servers-config.json`):
```json theme={null}
{
"mcpServers": {
"brave-search": {
"command": "npx",
"args": ["-y", "@modelcontextprotocol/server-brave-search"],
"env": {
"BRAVE_API_KEY": ""
}
}
}
}
```
### Chat Implementation
The chatbot is implemented using Spring AI's ChatClient with MCP tool integration:
```java theme={null}
var chatClient = chatClientBuilder
.defaultSystem("You are useful assistant, expert in AI and Java.")
.defaultToolCallbacks((Object[]) mcpToolAdapter.toolCallbacks())
.defaultAdvisors(new MessageChatMemoryAdvisor(new InMemoryChatMemory()))
.build();
```
Key features:
* Uses Claude AI model for natural language understanding
* Integrates Brave Search through MCP for real-time web search capabilities
* Maintains conversation memory using InMemoryChatMemory
* Runs as an interactive command-line application
### Build and run
```bash theme={null}
./mvnw clean install
java -jar ./target/ai-mcp-brave-chatbot-0.0.1-SNAPSHOT.jar
```
or
```bash theme={null}
./mvnw spring-boot:run
```
The application will start an interactive chat session where you can ask questions. The chatbot will use Brave Search when it needs to find information from the internet to answer your queries.
The chatbot can:
* Answer questions using its built-in knowledge
* Perform web searches when needed using Brave Search
* Remember context from previous messages in the conversation
* Combine information from multiple sources to provide comprehensive answers
### Advanced Configuration
The MCP client supports additional configuration options:
* Client customization through `McpSyncClientCustomizer` or `McpAsyncClientCustomizer`
* Multiple clients with multiple transport types: `STDIO` and `SSE` (Server-Sent Events)
* Integration with Spring AI's tool execution framework
* Automatic client initialization and lifecycle management
For WebFlux-based applications, you can use the WebFlux starter instead:
```xml theme={null}
org.springframework.ai
spring-ai-mcp-client-webflux-spring-boot-starter
```
This provides similar functionality but uses a WebFlux-based SSE transport implementation, recommended for production deployments.
[You can find the complete code for this tutorial here.](https://github.com/modelcontextprotocol/kotlin-sdk/tree/main/samples/kotlin-mcp-client)
## System Requirements
Before starting, ensure your system meets these requirements:
* Java 17 or higher
* Anthropic API key (Claude)
## Setting up your environment
First, let's install `java` and `gradle` if you haven't already.
You can download `java` from [official Oracle JDK website](https://www.oracle.com/java/technologies/downloads/).
Verify your `java` installation:
```bash theme={null}
java --version
```
Now, let's create and set up your project:
```bash macOS/Linux theme={null}
# Create a new directory for our project
mkdir kotlin-mcp-client
cd kotlin-mcp-client
# Initialize a new kotlin project
gradle init
```
```powershell Windows theme={null}
# Create a new directory for our project
md kotlin-mcp-client
cd kotlin-mcp-client
# Initialize a new kotlin project
gradle init
```
After running `gradle init`, you will be presented with options for creating your project.
Select **Application** as the project type, **Kotlin** as the programming language, and **Java 17** as the Java version.
Alternatively, you can create a Kotlin application using the [IntelliJ IDEA project wizard](https://kotlinlang.org/docs/jvm-get-started.html).
After creating the project, add the following dependencies:
```kotlin build.gradle.kts theme={null}
val mcpVersion = "0.4.0"
val slf4jVersion = "2.0.9"
val anthropicVersion = "0.8.0"
dependencies {
implementation("io.modelcontextprotocol:kotlin-sdk:$mcpVersion")
implementation("org.slf4j:slf4j-nop:$slf4jVersion")
implementation("com.anthropic:anthropic-java:$anthropicVersion")
}
```
```groovy build.gradle theme={null}
def mcpVersion = '0.3.0'
def slf4jVersion = '2.0.9'
def anthropicVersion = '0.8.0'
dependencies {
implementation "io.modelcontextprotocol:kotlin-sdk:$mcpVersion"
implementation "org.slf4j:slf4j-nop:$slf4jVersion"
implementation "com.anthropic:anthropic-java:$anthropicVersion"
}
```
Also, add the following plugins to your build script:
```kotlin build.gradle.kts theme={null}
plugins {
id("com.gradleup.shadow") version "8.3.9"
}
```
```groovy build.gradle theme={null}
plugins {
id 'com.gradleup.shadow' version '8.3.9'
}
```
## Setting up your API key
You'll need an Anthropic API key from the [Anthropic Console](https://console.anthropic.com/settings/keys).
Set up your API key:
```bash theme={null}
export ANTHROPIC_API_KEY='your-anthropic-api-key-here'
```
Make sure you keep your `ANTHROPIC_API_KEY` secure!
## Creating the Client
### Basic Client Structure
First, let's create the basic client class:
```kotlin theme={null}
class MCPClient : AutoCloseable {
private val anthropic = AnthropicOkHttpClient.fromEnv()
private val mcp: Client = Client(clientInfo = Implementation(name = "mcp-client-cli", version = "1.0.0"))
private lateinit var tools: List
// methods will go here
override fun close() {
runBlocking {
mcp.close()
anthropic.close()
}
}
```
### Server connection management
Next, we'll implement the method to connect to an MCP server:
```kotlin theme={null}
suspend fun connectToServer(serverScriptPath: String) {
try {
val command = buildList {
when (serverScriptPath.substringAfterLast(".")) {
"js" -> add("node")
"py" -> add(if (System.getProperty("os.name").lowercase().contains("win")) "python" else "python3")
"jar" -> addAll(listOf("java", "-jar"))
else -> throw IllegalArgumentException("Server script must be a .js, .py or .jar file")
}
add(serverScriptPath)
}
val process = ProcessBuilder(command).start()
val transport = StdioClientTransport(
input = process.inputStream.asSource().buffered(),
output = process.outputStream.asSink().buffered()
)
mcp.connect(transport)
val toolsResult = mcp.listTools()
tools = toolsResult?.tools?.map { tool ->
ToolUnion.ofTool(
Tool.builder()
.name(tool.name)
.description(tool.description ?: "")
.inputSchema(
Tool.InputSchema.builder()
.type(JsonValue.from(tool.inputSchema.type))
.properties(tool.inputSchema.properties.toJsonValue())
.putAdditionalProperty("required", JsonValue.from(tool.inputSchema.required))
.build()
)
.build()
)
} ?: emptyList()
println("Connected to server with tools: ${tools.joinToString(", ") { it.tool().get().name() }}")
} catch (e: Exception) {
println("Failed to connect to MCP server: $e")
throw e
}
}
```
Also create a helper function to convert from `JsonObject` to `JsonValue` for Anthropic:
```kotlin theme={null}
private fun JsonObject.toJsonValue(): JsonValue {
val mapper = ObjectMapper()
val node = mapper.readTree(this.toString())
return JsonValue.fromJsonNode(node)
}
```
### Query processing logic
Now let's add the core functionality for processing queries and handling tool calls:
```kotlin theme={null}
private val messageParamsBuilder: MessageCreateParams.Builder = MessageCreateParams.builder()
.model(Model.CLAUDE_SONNET_4_20250514)
.maxTokens(1024)
suspend fun processQuery(query: String): String {
val messages = mutableListOf(
MessageParam.builder()
.role(MessageParam.Role.USER)
.content(query)
.build()
)
val response = anthropic.messages().create(
messageParamsBuilder
.messages(messages)
.tools(tools)
.build()
)
val finalText = mutableListOf()
response.content().forEach { content ->
when {
content.isText() -> finalText.add(content.text().getOrNull()?.text() ?: "")
content.isToolUse() -> {
val toolName = content.toolUse().get().name()
val toolArgs =
content.toolUse().get()._input().convert(object : TypeReference>() {})
val result = mcp.callTool(
name = toolName,
arguments = toolArgs ?: emptyMap()
)
finalText.add("[Calling tool $toolName with args $toolArgs]")
messages.add(
MessageParam.builder()
.role(MessageParam.Role.USER)
.content(
"""
"type": "tool_result",
"tool_name": $toolName,
"result": ${result?.content?.joinToString("\n") { (it as TextContent).text ?: "" }}
""".trimIndent()
)
.build()
)
val aiResponse = anthropic.messages().create(
messageParamsBuilder
.messages(messages)
.build()
)
finalText.add(aiResponse.content().first().text().getOrNull()?.text() ?: "")
}
}
}
return finalText.joinToString("\n", prefix = "", postfix = "")
}
```
### Interactive chat
We'll add the chat loop:
```kotlin theme={null}
suspend fun chatLoop() {
println("\nMCP Client Started!")
println("Type your queries or 'quit' to exit.")
while (true) {
print("\nQuery: ")
val message = readLine() ?: break
if (message.lowercase() == "quit") break
val response = processQuery(message)
println("\n$response")
}
}
```
### Main entry point
Finally, we'll add the main execution function:
```kotlin theme={null}
fun main(args: Array) = runBlocking {
if (args.isEmpty()) throw IllegalArgumentException("Usage: java -jar /build/libs/kotlin-mcp-client-0.1.0-all.jar ")
val serverPath = args.first()
val client = MCPClient()
client.use {
client.connectToServer(serverPath)
client.chatLoop()
}
}
```
## Running the client
To run your client with any MCP server:
```bash theme={null}
./gradlew build
# Run the client
java -jar build/libs/.jar path/to/server.jar # jvm server
java -jar build/libs/.jar path/to/server.py # python server
java -jar build/libs/.jar path/to/build/index.js # node server
```
If you're continuing the weather tutorial from the server quickstart, your command might look something like this: `java -jar build/libs/kotlin-mcp-client-0.1.0-all.jar .../samples/weather-stdio-server/build/libs/weather-stdio-server-0.1.0-all.jar`
**The client will:**
1. Connect to the specified server
2. List available tools
3. Start an interactive chat session where you can:
* Enter queries
* See tool executions
* Get responses from Claude
## How it works
Here's a high-level workflow schema:
```mermaid theme={null}
---
config:
theme: neutral
---
sequenceDiagram
actor User
participant Client
participant Claude
participant MCP_Server as MCP Server
participant Tools
User->>Client: Send query
Client<<->>MCP_Server: Get available tools
Client->>Claude: Send query with tool descriptions
Claude-->>Client: Decide tool execution
Client->>MCP_Server: Request tool execution
MCP_Server->>Tools: Execute chosen tools
Tools-->>MCP_Server: Return results
MCP_Server-->>Client: Send results
Client->>Claude: Send tool results
Claude-->>Client: Provide final response
Client-->>User: Display response
```
When you submit a query:
1. The client gets the list of available tools from the server
2. Your query is sent to Claude along with tool descriptions
3. Claude decides which tools (if any) to use
4. The client executes any requested tool calls through the server
5. Results are sent back to Claude
6. Claude provides a natural language response
7. The response is displayed to you
## Best practices
1. **Error Handling**
* Leverage Kotlin's type system to model errors explicitly
* Wrap external tool and API calls in `try-catch` blocks when exceptions are possible
* Provide clear and meaningful error messages
* Handle network timeouts and connection issues gracefully
2. **Security**
* Store API keys and secrets securely in `local.properties`, environment variables, or secret managers
* Validate all external responses to avoid unexpected or unsafe data usage
* Be cautious with permissions and trust boundaries when using tools
## Troubleshooting
### Server Path Issues
* Double-check the path to your server script is correct
* Use the absolute path if the relative path isn't working
* For Windows users, make sure to use forward slashes (/) or escaped backslashes (\\) in the path
* Make sure that the required runtime is installed (java for Java, npm for Node.js, or uv for Python)
* Verify the server file has the correct extension (.jar for Java, .js for Node.js or .py for Python)
Example of correct path usage:
```bash theme={null}
# Relative path
java -jar build/libs/client.jar ./server/build/libs/server.jar
# Absolute path
java -jar build/libs/client.jar /Users/username/projects/mcp-server/build/libs/server.jar
# Windows path (either format works)
java -jar build/libs/client.jar C:/projects/mcp-server/build/libs/server.jar
java -jar build/libs/client.jar C:\\projects\\mcp-server\\build\\libs\\server.jar
```
### Response Timing
* The first response might take up to 30 seconds to return
* This is normal and happens while:
* The server initializes
* Claude processes the query
* Tools are being executed
* Subsequent responses are typically faster
* Don't interrupt the process during this initial waiting period
### Common Error Messages
If you see:
* `Connection refused`: Ensure the server is running and the path is correct
* `Tool execution failed`: Verify the tool's required environment variables are set
* `ANTHROPIC_API_KEY is not set`: Check your environment variables
[You can find the complete code for this tutorial here.](https://github.com/modelcontextprotocol/csharp-sdk/tree/main/samples/QuickstartClient)
## System Requirements
Before starting, ensure your system meets these requirements:
* .NET 8.0 or higher
* Anthropic API key (Claude)
* Windows, Linux, or macOS
## Setting up your environment
First, create a new .NET project:
```bash theme={null}
dotnet new console -n QuickstartClient
cd QuickstartClient
```
Then, add the required dependencies to your project:
```bash theme={null}
dotnet add package ModelContextProtocol --prerelease
dotnet add package Anthropic.SDK
dotnet add package Microsoft.Extensions.Hosting
dotnet add package Microsoft.Extensions.AI
```
## Setting up your API key
You'll need an Anthropic API key from the [Anthropic Console](https://console.anthropic.com/settings/keys).
```bash theme={null}
dotnet user-secrets init
dotnet user-secrets set "ANTHROPIC_API_KEY" ""
```
## Creating the Client
### Basic Client Structure
First, let's setup the basic client class in the file `Program.cs`:
```csharp theme={null}
using Anthropic.SDK;
using Microsoft.Extensions.AI;
using Microsoft.Extensions.Configuration;
using Microsoft.Extensions.Hosting;
using ModelContextProtocol.Client;
using ModelContextProtocol.Protocol.Transport;
var builder = Host.CreateApplicationBuilder(args);
builder.Configuration
.AddEnvironmentVariables()
.AddUserSecrets();
```
This creates the beginnings of a .NET console application that can read the API key from user secrets.
Next, we'll setup the MCP Client:
```csharp theme={null}
var (command, arguments) = GetCommandAndArguments(args);
var clientTransport = new StdioClientTransport(new()
{
Name = "Demo Server",
Command = command,
Arguments = arguments,
});
await using var mcpClient = await McpClient.CreateAsync(clientTransport);
var tools = await mcpClient.ListToolsAsync();
foreach (var tool in tools)
{
Console.WriteLine($"Connected to server with tools: {tool.Name}");
}
```
Add this function at the end of the `Program.cs` file:
```csharp theme={null}
static (string command, string[] arguments) GetCommandAndArguments(string[] args)
{
return args switch
{
[var script] when script.EndsWith(".py") => ("python", args),
[var script] when script.EndsWith(".js") => ("node", args),
[var script] when Directory.Exists(script) || (File.Exists(script) && script.EndsWith(".csproj")) => ("dotnet", ["run", "--project", script, "--no-build"]),
_ => throw new NotSupportedException("An unsupported server script was provided. Supported scripts are .py, .js, or .csproj")
};
}
```
This creates an MCP client that will connect to a server that is provided as a command line argument. It then lists the available tools from the connected server.
### Query processing logic
Now let's add the core functionality for processing queries and handling tool calls:
```csharp theme={null}
using var anthropicClient = new AnthropicClient(new APIAuthentication(builder.Configuration["ANTHROPIC_API_KEY"]))
.Messages
.AsBuilder()
.UseFunctionInvocation()
.Build();
var options = new ChatOptions
{
MaxOutputTokens = 1000,
ModelId = "claude-sonnet-4-20250514",
Tools = [.. tools]
};
Console.ForegroundColor = ConsoleColor.Green;
Console.WriteLine("MCP Client Started!");
Console.ResetColor();
PromptForInput();
while(Console.ReadLine() is string query && !"exit".Equals(query, StringComparison.OrdinalIgnoreCase))
{
if (string.IsNullOrWhiteSpace(query))
{
PromptForInput();
continue;
}
await foreach (var message in anthropicClient.GetStreamingResponseAsync(query, options))
{
Console.Write(message);
}
Console.WriteLine();
PromptForInput();
}
static void PromptForInput()
{
Console.WriteLine("Enter a command (or 'exit' to quit):");
Console.ForegroundColor = ConsoleColor.Cyan;
Console.Write("> ");
Console.ResetColor();
}
```
## Key Components Explained
### 1. Client Initialization
* The client is initialized using `McpClient.CreateAsync()`, which sets up the transport type and command to run the server.
### 2. Server Connection
* Supports Python, Node.js, and .NET servers.
* The server is started using the command specified in the arguments.
* Configures to use stdio for communication with the server.
* Initializes the session and available tools.
### 3. Query Processing
* Leverages [Microsoft.Extensions.AI](https://learn.microsoft.com/dotnet/ai/ai-extensions) for the chat client.
* Configures the `IChatClient` to use automatic tool (function) invocation.
* The client reads user input and sends it to the server.
* The server processes the query and returns a response.
* The response is displayed to the user.
## Running the Client
To run your client with any MCP server:
```bash theme={null}
dotnet run -- path/to/server.csproj # dotnet server
dotnet run -- path/to/server.py # python server
dotnet run -- path/to/server.js # node server
```
If you're continuing the weather tutorial from the server quickstart, your command might look something like this: `dotnet run -- path/to/QuickstartWeatherServer`.
The client will:
1. Connect to the specified server
2. List available tools
3. Start an interactive chat session where you can:
* Enter queries
* See tool executions
* Get responses from Claude
4. Exit the session when done
Here's an example of what it should look like if connected to the weather server quickstart:
## How It Works
When you submit a query:
1. The client gets the list of available tools from the server
2. Your query is sent to Claude along with tool descriptions
3. Claude decides which tools (if any) to use
4. The client executes any requested tool calls through the server
5. Results are sent back to Claude
6. Claude provides a natural language response
7. The response is displayed to you
## Best practices
1. **Error Handling**
* Always wrap tool calls in try-catch blocks
* Provide meaningful error messages
* Gracefully handle connection issues
2. **Resource Management**
* Use `AsyncExitStack` for proper cleanup
* Close connections when done
* Handle server disconnections
3. **Security**
* Store API keys securely in `.env`
* Validate server responses
* Be cautious with tool permissions
4. **Tool Names**
* Tool names can be validated according to the format specified [here](/specification/draft/server/tools#tool-names)
* If a tool name conforms to the specified format, it should not fail validation by an MCP client
## Troubleshooting
### Server Path Issues
* Double-check the path to your server script is correct
* Use the absolute path if the relative path isn't working
* For Windows users, make sure to use forward slashes (/) or escaped backslashes (\\) in the path
* Verify the server file has the correct extension (.py for Python or .js for Node.js)
Example of correct path usage:
```bash theme={null}
# Relative path
uv run client.py ./server/weather.py
# Absolute path
uv run client.py /Users/username/projects/mcp-server/weather.py
# Windows path (either format works)
uv run client.py C:/projects/mcp-server/weather.py
uv run client.py C:\\projects\\mcp-server\\weather.py
```
### Response Timing
* The first response might take up to 30 seconds to return
* This is normal and happens while:
* The server initializes
* Claude processes the query
* Tools are being executed
* Subsequent responses are typically faster
* Don't interrupt the process during this initial waiting period
### Common Error Messages
If you see:
* `FileNotFoundError`: Check your server path
* `Connection refused`: Ensure the server is running and the path is correct
* `Tool execution failed`: Verify the tool's required environment variables are set
* `Timeout error`: Consider increasing the timeout in your client configuration
[You can find the complete code for this tutorial here.](https://github.com/modelcontextprotocol/quickstart-resources/tree/main/mcp-client-typescript)
## System Requirements
Before starting, ensure your system meets these requirements:
* Mac or Windows computer
* Node.js 17 or higher installed
* Latest version of `npm` installed
* Anthropic API key (Claude)
## Setting Up Your Environment
First, let's create and set up our project:
```bash macOS/Linux theme={null}
# Create project directory
mkdir mcp-client-typescript
cd mcp-client-typescript
# Initialize npm project
npm init -y
# Install dependencies
npm install @anthropic-ai/sdk @modelcontextprotocol/sdk dotenv
# Install dev dependencies
npm install -D @types/node typescript
# Create source file
touch index.ts
```
```powershell Windows theme={null}
# Create project directory
md mcp-client-typescript
cd mcp-client-typescript
# Initialize npm project
npm init -y
# Install dependencies
npm install @anthropic-ai/sdk @modelcontextprotocol/sdk dotenv
# Install dev dependencies
npm install -D @types/node typescript
# Create source file
new-item index.ts
```
Update your `package.json` to set `type: "module"` and a build script:
```json package.json theme={null}
{
"type": "module",
"scripts": {
"build": "tsc && chmod 755 build/index.js"
}
}
```
Create a `tsconfig.json` in the root of your project:
```json tsconfig.json theme={null}
{
"compilerOptions": {
"target": "ES2022",
"module": "Node16",
"moduleResolution": "Node16",
"outDir": "./build",
"rootDir": "./",
"strict": true,
"esModuleInterop": true,
"skipLibCheck": true,
"forceConsistentCasingInFileNames": true
},
"include": ["index.ts"],
"exclude": ["node_modules"]
}
```
## Setting Up Your API Key
You'll need an Anthropic API key from the [Anthropic Console](https://console.anthropic.com/settings/keys).
Create a `.env` file to store it:
```bash theme={null}
echo "ANTHROPIC_API_KEY=" > .env
```
Add `.env` to your `.gitignore`:
```bash theme={null}
echo ".env" >> .gitignore
```
Make sure you keep your `ANTHROPIC_API_KEY` secure!
## Creating the Client
### Basic Client Structure
First, let's set up our imports and create the basic client class in `index.ts`:
```typescript theme={null}
import { Anthropic } from "@anthropic-ai/sdk";
import {
MessageParam,
Tool,
} from "@anthropic-ai/sdk/resources/messages/messages.mjs";
import { Client } from "@modelcontextprotocol/sdk/client/index.js";
import { StdioClientTransport } from "@modelcontextprotocol/sdk/client/stdio.js";
import readline from "readline/promises";
import dotenv from "dotenv";
dotenv.config();
const ANTHROPIC_API_KEY = process.env.ANTHROPIC_API_KEY;
if (!ANTHROPIC_API_KEY) {
throw new Error("ANTHROPIC_API_KEY is not set");
}
class MCPClient {
private mcp: Client;
private anthropic: Anthropic;
private transport: StdioClientTransport | null = null;
private tools: Tool[] = [];
constructor() {
this.anthropic = new Anthropic({
apiKey: ANTHROPIC_API_KEY,
});
this.mcp = new Client({ name: "mcp-client-cli", version: "1.0.0" });
}
// methods will go here
}
```
### Server Connection Management
Next, we'll implement the method to connect to an MCP server:
```typescript theme={null}
async connectToServer(serverScriptPath: string) {
try {
const isJs = serverScriptPath.endsWith(".js");
const isPy = serverScriptPath.endsWith(".py");
if (!isJs && !isPy) {
throw new Error("Server script must be a .js or .py file");
}
const command = isPy
? process.platform === "win32"
? "python"
: "python3"
: process.execPath;
this.transport = new StdioClientTransport({
command,
args: [serverScriptPath],
});
await this.mcp.connect(this.transport);
const toolsResult = await this.mcp.listTools();
this.tools = toolsResult.tools.map((tool) => {
return {
name: tool.name,
description: tool.description,
input_schema: tool.inputSchema,
};
});
console.log(
"Connected to server with tools:",
this.tools.map(({ name }) => name)
);
} catch (e) {
console.log("Failed to connect to MCP server: ", e);
throw e;
}
}
```
### Query Processing Logic
Now let's add the core functionality for processing queries and handling tool calls:
```typescript theme={null}
async processQuery(query: string) {
const messages: MessageParam[] = [
{
role: "user",
content: query,
},
];
const response = await this.anthropic.messages.create({
model: "claude-sonnet-4-20250514",
max_tokens: 1000,
messages,
tools: this.tools,
});
const finalText = [];
for (const content of response.content) {
if (content.type === "text") {
finalText.push(content.text);
} else if (content.type === "tool_use") {
const toolName = content.name;
const toolArgs = content.input as { [x: string]: unknown } | undefined;
const result = await this.mcp.callTool({
name: toolName,
arguments: toolArgs,
});
finalText.push(
`[Calling tool ${toolName} with args ${JSON.stringify(toolArgs)}]`
);
messages.push({
role: "user",
content: result.content as string,
});
const response = await this.anthropic.messages.create({
model: "claude-sonnet-4-20250514",
max_tokens: 1000,
messages,
});
finalText.push(
response.content[0].type === "text" ? response.content[0].text : ""
);
}
}
return finalText.join("\n");
}
```
### Interactive Chat Interface
Now we'll add the chat loop and cleanup functionality:
```typescript theme={null}
async chatLoop() {
const rl = readline.createInterface({
input: process.stdin,
output: process.stdout,
});
try {
console.log("\nMCP Client Started!");
console.log("Type your queries or 'quit' to exit.");
while (true) {
const message = await rl.question("\nQuery: ");
if (message.toLowerCase() === "quit") {
break;
}
const response = await this.processQuery(message);
console.log("\n" + response);
}
} finally {
rl.close();
}
}
async cleanup() {
await this.mcp.close();
}
```
### Main Entry Point
Finally, we'll add the main execution logic:
```typescript theme={null}
async function main() {
if (process.argv.length < 3) {
console.log("Usage: node index.ts ");
return;
}
const mcpClient = new MCPClient();
try {
await mcpClient.connectToServer(process.argv[2]);
await mcpClient.chatLoop();
} catch (e) {
console.error("Error:", e);
await mcpClient.cleanup();
process.exit(1);
} finally {
await mcpClient.cleanup();
process.exit(0);
}
}
main();
```
## Running the Client
To run your client with any MCP server:
```bash theme={null}
# Build TypeScript
npm run build
# Run the client
node build/index.js path/to/server.py # python server
node build/index.js path/to/build/index.js # node server
```
If you're continuing [the weather tutorial from the server quickstart](https://github.com/modelcontextprotocol/quickstart-resources/tree/main/weather-server-typescript), your command might look something like this: `node build/index.js .../quickstart-resources/weather-server-typescript/build/index.js`
**The client will:**
1. Connect to the specified server
2. List available tools
3. Start an interactive chat session where you can:
* Enter queries
* See tool executions
* Get responses from Claude
## How It Works
When you submit a query:
1. The client gets the list of available tools from the server
2. Your query is sent to Claude along with tool descriptions
3. Claude decides which tools (if any) to use
4. The client executes any requested tool calls through the server
5. Results are sent back to Claude
6. Claude provides a natural language response
7. The response is displayed to you
## Best practices
1. **Error Handling**
* Use TypeScript's type system for better error detection
* Wrap tool calls in try-catch blocks
* Provide meaningful error messages
* Gracefully handle connection issues
2. **Security**
* Store API keys securely in `.env`
* Validate server responses
* Be cautious with tool permissions
## Troubleshooting
### Server Path Issues
* Double-check the path to your server script is correct
* Use the absolute path if the relative path isn't working
* For Windows users, make sure to use forward slashes (/) or escaped backslashes (\\) in the path
* Verify the server file has the correct extension (.js for Node.js or .py for Python)
Example of correct path usage:
```bash theme={null}
# Relative path
node build/index.js ./server/build/index.js
# Absolute path
node build/index.js /Users/username/projects/mcp-server/build/index.js
# Windows path (either format works)
node build/index.js C:/projects/mcp-server/build/index.js
node build/index.js C:\\projects\\mcp-server\\build\\index.js
```
### Response Timing
* The first response might take up to 30 seconds to return
* This is normal and happens while:
* The server initializes
* Claude processes the query
* Tools are being executed
* Subsequent responses are typically faster
* Don't interrupt the process during this initial waiting period
### Common Error Messages
If you see:
* `Error: Cannot find module`: Check your build folder and ensure TypeScript compilation succeeded
* `Connection refused`: Ensure the server is running and the path is correct
* `Tool execution failed`: Verify the tool's required environment variables are set
* `ANTHROPIC_API_KEY is not set`: Check your .env file and environment variables
* `TypeError`: Ensure you're using the correct types for tool arguments
* `BadRequestError`: Ensure you have enough credits to access the Anthropic API
This is a quickstart demo based on Spring AI MCP auto-configuration and boot starters.
To learn how to create sync and async MCP Clients manually, consult the [Java SDK Client](/sdk/java/mcp-client) documentation
This example demonstrates how to build an interactive chatbot that combines Spring AI's Model Context Protocol (MCP) with the [Brave Search MCP Server](https://github.com/modelcontextprotocol/servers-archived/tree/main/src/brave-search). The application creates a conversational interface powered by Anthropic's Claude AI model that can perform internet searches through Brave Search, enabling natural language interactions with real-time web data.
[You can find the complete code for this tutorial here.](https://github.com/spring-projects/spring-ai-examples/tree/main/model-context-protocol/web-search/brave-chatbot)
## System Requirements
Before starting, ensure your system meets these requirements:
* Java 17 or higher
* Maven 3.6+
* npx package manager
* Anthropic API key (Claude)
* Brave Search API key
## Setting Up Your Environment
1. Install npx (Node Package eXecute):
First, make sure to install [npm](https://docs.npmjs.com/downloading-and-installing-node-js-and-npm)
and then run:
```bash theme={null}
npm install -g npx
```
2. Clone the repository:
```bash theme={null}
git clone https://github.com/spring-projects/spring-ai-examples.git
cd model-context-protocol/web-search/brave-chatbot
```
3. Set up your API keys:
```bash theme={null}
export ANTHROPIC_API_KEY='your-anthropic-api-key-here'
export BRAVE_API_KEY='your-brave-api-key-here'
```
4. Build the application:
```bash theme={null}
./mvnw clean install
```
5. Run the application using Maven:
```bash theme={null}
./mvnw spring-boot:run
```
Make sure you keep your `ANTHROPIC_API_KEY` and `BRAVE_API_KEY` keys secure!
## How it Works
The application integrates Spring AI with the Brave Search MCP server through several components:
### MCP Client Configuration
1. Required dependencies in pom.xml:
```xml theme={null}
org.springframework.ai
spring-ai-starter-mcp-client
org.springframework.ai
spring-ai-starter-model-anthropic
```
2. Application properties (application.yml):
```yml theme={null}
spring:
ai:
mcp:
client:
enabled: true
name: brave-search-client
version: 1.0.0
type: SYNC
request-timeout: 20s
stdio:
root-change-notification: true
servers-configuration: classpath:/mcp-servers-config.json
toolcallback:
enabled: true
anthropic:
api-key: ${ANTHROPIC_API_KEY}
```
This activates the `spring-ai-starter-mcp-client` to create one or more `McpClient`s based on the provided server configuration.
The `spring.ai.mcp.client.toolcallback.enabled=true` property enables the tool callback mechanism, that automatically registers all MCP tool as spring ai tools.
It is disabled by default.
3. MCP Server Configuration (`mcp-servers-config.json`):
```json theme={null}
{
"mcpServers": {
"brave-search": {
"command": "npx",
"args": ["-y", "@modelcontextprotocol/server-brave-search"],
"env": {
"BRAVE_API_KEY": ""
}
}
}
}
```
### Chat Implementation
The chatbot is implemented using Spring AI's ChatClient with MCP tool integration:
```java theme={null}
var chatClient = chatClientBuilder
.defaultSystem("You are useful assistant, expert in AI and Java.")
.defaultToolCallbacks((Object[]) mcpToolAdapter.toolCallbacks())
.defaultAdvisors(new MessageChatMemoryAdvisor(new InMemoryChatMemory()))
.build();
```
Key features:
* Uses Claude AI model for natural language understanding
* Integrates Brave Search through MCP for real-time web search capabilities
* Maintains conversation memory using InMemoryChatMemory
* Runs as an interactive command-line application
### Build and run
```bash theme={null}
./mvnw clean install
java -jar ./target/ai-mcp-brave-chatbot-0.0.1-SNAPSHOT.jar
```
or
```bash theme={null}
./mvnw spring-boot:run
```
The application will start an interactive chat session where you can ask questions. The chatbot will use Brave Search when it needs to find information from the internet to answer your queries.
The chatbot can:
* Answer questions using its built-in knowledge
* Perform web searches when needed using Brave Search
* Remember context from previous messages in the conversation
* Combine information from multiple sources to provide comprehensive answers
### Advanced Configuration
The MCP client supports additional configuration options:
* Client customization through `McpSyncClientCustomizer` or `McpAsyncClientCustomizer`
* Multiple clients with multiple transport types: `STDIO` and `SSE` (Server-Sent Events)
* Integration with Spring AI's tool execution framework
* Automatic client initialization and lifecycle management
For WebFlux-based applications, you can use the WebFlux starter instead:
```xml theme={null}
org.springframework.ai
spring-ai-mcp-client-webflux-spring-boot-starter
```
This provides similar functionality but uses a WebFlux-based SSE transport implementation, recommended for production deployments.
[You can find the complete code for this tutorial here.](https://github.com/modelcontextprotocol/kotlin-sdk/tree/main/samples/kotlin-mcp-client)
## System Requirements
Before starting, ensure your system meets these requirements:
* Java 17 or higher
* Anthropic API key (Claude)
## Setting up your environment
First, let's install `java` and `gradle` if you haven't already.
You can download `java` from [official Oracle JDK website](https://www.oracle.com/java/technologies/downloads/).
Verify your `java` installation:
```bash theme={null}
java --version
```
Now, let's create and set up your project:
```bash macOS/Linux theme={null}
# Create a new directory for our project
mkdir kotlin-mcp-client
cd kotlin-mcp-client
# Initialize a new kotlin project
gradle init
```
```powershell Windows theme={null}
# Create a new directory for our project
md kotlin-mcp-client
cd kotlin-mcp-client
# Initialize a new kotlin project
gradle init
```
After running `gradle init`, you will be presented with options for creating your project.
Select **Application** as the project type, **Kotlin** as the programming language, and **Java 17** as the Java version.
Alternatively, you can create a Kotlin application using the [IntelliJ IDEA project wizard](https://kotlinlang.org/docs/jvm-get-started.html).
After creating the project, add the following dependencies:
```kotlin build.gradle.kts theme={null}
val mcpVersion = "0.4.0"
val slf4jVersion = "2.0.9"
val anthropicVersion = "0.8.0"
dependencies {
implementation("io.modelcontextprotocol:kotlin-sdk:$mcpVersion")
implementation("org.slf4j:slf4j-nop:$slf4jVersion")
implementation("com.anthropic:anthropic-java:$anthropicVersion")
}
```
```groovy build.gradle theme={null}
def mcpVersion = '0.3.0'
def slf4jVersion = '2.0.9'
def anthropicVersion = '0.8.0'
dependencies {
implementation "io.modelcontextprotocol:kotlin-sdk:$mcpVersion"
implementation "org.slf4j:slf4j-nop:$slf4jVersion"
implementation "com.anthropic:anthropic-java:$anthropicVersion"
}
```
Also, add the following plugins to your build script:
```kotlin build.gradle.kts theme={null}
plugins {
id("com.gradleup.shadow") version "8.3.9"
}
```
```groovy build.gradle theme={null}
plugins {
id 'com.gradleup.shadow' version '8.3.9'
}
```
## Setting up your API key
You'll need an Anthropic API key from the [Anthropic Console](https://console.anthropic.com/settings/keys).
Set up your API key:
```bash theme={null}
export ANTHROPIC_API_KEY='your-anthropic-api-key-here'
```
Make sure you keep your `ANTHROPIC_API_KEY` secure!
## Creating the Client
### Basic Client Structure
First, let's create the basic client class:
```kotlin theme={null}
class MCPClient : AutoCloseable {
private val anthropic = AnthropicOkHttpClient.fromEnv()
private val mcp: Client = Client(clientInfo = Implementation(name = "mcp-client-cli", version = "1.0.0"))
private lateinit var tools: List
// methods will go here
override fun close() {
runBlocking {
mcp.close()
anthropic.close()
}
}
```
### Server connection management
Next, we'll implement the method to connect to an MCP server:
```kotlin theme={null}
suspend fun connectToServer(serverScriptPath: String) {
try {
val command = buildList {
when (serverScriptPath.substringAfterLast(".")) {
"js" -> add("node")
"py" -> add(if (System.getProperty("os.name").lowercase().contains("win")) "python" else "python3")
"jar" -> addAll(listOf("java", "-jar"))
else -> throw IllegalArgumentException("Server script must be a .js, .py or .jar file")
}
add(serverScriptPath)
}
val process = ProcessBuilder(command).start()
val transport = StdioClientTransport(
input = process.inputStream.asSource().buffered(),
output = process.outputStream.asSink().buffered()
)
mcp.connect(transport)
val toolsResult = mcp.listTools()
tools = toolsResult?.tools?.map { tool ->
ToolUnion.ofTool(
Tool.builder()
.name(tool.name)
.description(tool.description ?: "")
.inputSchema(
Tool.InputSchema.builder()
.type(JsonValue.from(tool.inputSchema.type))
.properties(tool.inputSchema.properties.toJsonValue())
.putAdditionalProperty("required", JsonValue.from(tool.inputSchema.required))
.build()
)
.build()
)
} ?: emptyList()
println("Connected to server with tools: ${tools.joinToString(", ") { it.tool().get().name() }}")
} catch (e: Exception) {
println("Failed to connect to MCP server: $e")
throw e
}
}
```
Also create a helper function to convert from `JsonObject` to `JsonValue` for Anthropic:
```kotlin theme={null}
private fun JsonObject.toJsonValue(): JsonValue {
val mapper = ObjectMapper()
val node = mapper.readTree(this.toString())
return JsonValue.fromJsonNode(node)
}
```
### Query processing logic
Now let's add the core functionality for processing queries and handling tool calls:
```kotlin theme={null}
private val messageParamsBuilder: MessageCreateParams.Builder = MessageCreateParams.builder()
.model(Model.CLAUDE_SONNET_4_20250514)
.maxTokens(1024)
suspend fun processQuery(query: String): String {
val messages = mutableListOf(
MessageParam.builder()
.role(MessageParam.Role.USER)
.content(query)
.build()
)
val response = anthropic.messages().create(
messageParamsBuilder
.messages(messages)
.tools(tools)
.build()
)
val finalText = mutableListOf()
response.content().forEach { content ->
when {
content.isText() -> finalText.add(content.text().getOrNull()?.text() ?: "")
content.isToolUse() -> {
val toolName = content.toolUse().get().name()
val toolArgs =
content.toolUse().get()._input().convert(object : TypeReference>() {})
val result = mcp.callTool(
name = toolName,
arguments = toolArgs ?: emptyMap()
)
finalText.add("[Calling tool $toolName with args $toolArgs]")
messages.add(
MessageParam.builder()
.role(MessageParam.Role.USER)
.content(
"""
"type": "tool_result",
"tool_name": $toolName,
"result": ${result?.content?.joinToString("\n") { (it as TextContent).text ?: "" }}
""".trimIndent()
)
.build()
)
val aiResponse = anthropic.messages().create(
messageParamsBuilder
.messages(messages)
.build()
)
finalText.add(aiResponse.content().first().text().getOrNull()?.text() ?: "")
}
}
}
return finalText.joinToString("\n", prefix = "", postfix = "")
}
```
### Interactive chat
We'll add the chat loop:
```kotlin theme={null}
suspend fun chatLoop() {
println("\nMCP Client Started!")
println("Type your queries or 'quit' to exit.")
while (true) {
print("\nQuery: ")
val message = readLine() ?: break
if (message.lowercase() == "quit") break
val response = processQuery(message)
println("\n$response")
}
}
```
### Main entry point
Finally, we'll add the main execution function:
```kotlin theme={null}
fun main(args: Array) = runBlocking {
if (args.isEmpty()) throw IllegalArgumentException("Usage: java -jar /build/libs/kotlin-mcp-client-0.1.0-all.jar ")
val serverPath = args.first()
val client = MCPClient()
client.use {
client.connectToServer(serverPath)
client.chatLoop()
}
}
```
## Running the client
To run your client with any MCP server:
```bash theme={null}
./gradlew build
# Run the client
java -jar build/libs/.jar path/to/server.jar # jvm server
java -jar build/libs/.jar path/to/server.py # python server
java -jar build/libs/.jar path/to/build/index.js # node server
```
If you're continuing the weather tutorial from the server quickstart, your command might look something like this: `java -jar build/libs/kotlin-mcp-client-0.1.0-all.jar .../samples/weather-stdio-server/build/libs/weather-stdio-server-0.1.0-all.jar`
**The client will:**
1. Connect to the specified server
2. List available tools
3. Start an interactive chat session where you can:
* Enter queries
* See tool executions
* Get responses from Claude
## How it works
Here's a high-level workflow schema:
```mermaid theme={null}
---
config:
theme: neutral
---
sequenceDiagram
actor User
participant Client
participant Claude
participant MCP_Server as MCP Server
participant Tools
User->>Client: Send query
Client<<->>MCP_Server: Get available tools
Client->>Claude: Send query with tool descriptions
Claude-->>Client: Decide tool execution
Client->>MCP_Server: Request tool execution
MCP_Server->>Tools: Execute chosen tools
Tools-->>MCP_Server: Return results
MCP_Server-->>Client: Send results
Client->>Claude: Send tool results
Claude-->>Client: Provide final response
Client-->>User: Display response
```
When you submit a query:
1. The client gets the list of available tools from the server
2. Your query is sent to Claude along with tool descriptions
3. Claude decides which tools (if any) to use
4. The client executes any requested tool calls through the server
5. Results are sent back to Claude
6. Claude provides a natural language response
7. The response is displayed to you
## Best practices
1. **Error Handling**
* Leverage Kotlin's type system to model errors explicitly
* Wrap external tool and API calls in `try-catch` blocks when exceptions are possible
* Provide clear and meaningful error messages
* Handle network timeouts and connection issues gracefully
2. **Security**
* Store API keys and secrets securely in `local.properties`, environment variables, or secret managers
* Validate all external responses to avoid unexpected or unsafe data usage
* Be cautious with permissions and trust boundaries when using tools
## Troubleshooting
### Server Path Issues
* Double-check the path to your server script is correct
* Use the absolute path if the relative path isn't working
* For Windows users, make sure to use forward slashes (/) or escaped backslashes (\\) in the path
* Make sure that the required runtime is installed (java for Java, npm for Node.js, or uv for Python)
* Verify the server file has the correct extension (.jar for Java, .js for Node.js or .py for Python)
Example of correct path usage:
```bash theme={null}
# Relative path
java -jar build/libs/client.jar ./server/build/libs/server.jar
# Absolute path
java -jar build/libs/client.jar /Users/username/projects/mcp-server/build/libs/server.jar
# Windows path (either format works)
java -jar build/libs/client.jar C:/projects/mcp-server/build/libs/server.jar
java -jar build/libs/client.jar C:\\projects\\mcp-server\\build\\libs\\server.jar
```
### Response Timing
* The first response might take up to 30 seconds to return
* This is normal and happens while:
* The server initializes
* Claude processes the query
* Tools are being executed
* Subsequent responses are typically faster
* Don't interrupt the process during this initial waiting period
### Common Error Messages
If you see:
* `Connection refused`: Ensure the server is running and the path is correct
* `Tool execution failed`: Verify the tool's required environment variables are set
* `ANTHROPIC_API_KEY is not set`: Check your environment variables
[You can find the complete code for this tutorial here.](https://github.com/modelcontextprotocol/csharp-sdk/tree/main/samples/QuickstartClient)
## System Requirements
Before starting, ensure your system meets these requirements:
* .NET 8.0 or higher
* Anthropic API key (Claude)
* Windows, Linux, or macOS
## Setting up your environment
First, create a new .NET project:
```bash theme={null}
dotnet new console -n QuickstartClient
cd QuickstartClient
```
Then, add the required dependencies to your project:
```bash theme={null}
dotnet add package ModelContextProtocol --prerelease
dotnet add package Anthropic.SDK
dotnet add package Microsoft.Extensions.Hosting
dotnet add package Microsoft.Extensions.AI
```
## Setting up your API key
You'll need an Anthropic API key from the [Anthropic Console](https://console.anthropic.com/settings/keys).
```bash theme={null}
dotnet user-secrets init
dotnet user-secrets set "ANTHROPIC_API_KEY" ""
```
## Creating the Client
### Basic Client Structure
First, let's setup the basic client class in the file `Program.cs`:
```csharp theme={null}
using Anthropic.SDK;
using Microsoft.Extensions.AI;
using Microsoft.Extensions.Configuration;
using Microsoft.Extensions.Hosting;
using ModelContextProtocol.Client;
using ModelContextProtocol.Protocol.Transport;
var builder = Host.CreateApplicationBuilder(args);
builder.Configuration
.AddEnvironmentVariables()
.AddUserSecrets();
```
This creates the beginnings of a .NET console application that can read the API key from user secrets.
Next, we'll setup the MCP Client:
```csharp theme={null}
var (command, arguments) = GetCommandAndArguments(args);
var clientTransport = new StdioClientTransport(new()
{
Name = "Demo Server",
Command = command,
Arguments = arguments,
});
await using var mcpClient = await McpClient.CreateAsync(clientTransport);
var tools = await mcpClient.ListToolsAsync();
foreach (var tool in tools)
{
Console.WriteLine($"Connected to server with tools: {tool.Name}");
}
```
Add this function at the end of the `Program.cs` file:
```csharp theme={null}
static (string command, string[] arguments) GetCommandAndArguments(string[] args)
{
return args switch
{
[var script] when script.EndsWith(".py") => ("python", args),
[var script] when script.EndsWith(".js") => ("node", args),
[var script] when Directory.Exists(script) || (File.Exists(script) && script.EndsWith(".csproj")) => ("dotnet", ["run", "--project", script, "--no-build"]),
_ => throw new NotSupportedException("An unsupported server script was provided. Supported scripts are .py, .js, or .csproj")
};
}
```
This creates an MCP client that will connect to a server that is provided as a command line argument. It then lists the available tools from the connected server.
### Query processing logic
Now let's add the core functionality for processing queries and handling tool calls:
```csharp theme={null}
using var anthropicClient = new AnthropicClient(new APIAuthentication(builder.Configuration["ANTHROPIC_API_KEY"]))
.Messages
.AsBuilder()
.UseFunctionInvocation()
.Build();
var options = new ChatOptions
{
MaxOutputTokens = 1000,
ModelId = "claude-sonnet-4-20250514",
Tools = [.. tools]
};
Console.ForegroundColor = ConsoleColor.Green;
Console.WriteLine("MCP Client Started!");
Console.ResetColor();
PromptForInput();
while(Console.ReadLine() is string query && !"exit".Equals(query, StringComparison.OrdinalIgnoreCase))
{
if (string.IsNullOrWhiteSpace(query))
{
PromptForInput();
continue;
}
await foreach (var message in anthropicClient.GetStreamingResponseAsync(query, options))
{
Console.Write(message);
}
Console.WriteLine();
PromptForInput();
}
static void PromptForInput()
{
Console.WriteLine("Enter a command (or 'exit' to quit):");
Console.ForegroundColor = ConsoleColor.Cyan;
Console.Write("> ");
Console.ResetColor();
}
```
## Key Components Explained
### 1. Client Initialization
* The client is initialized using `McpClient.CreateAsync()`, which sets up the transport type and command to run the server.
### 2. Server Connection
* Supports Python, Node.js, and .NET servers.
* The server is started using the command specified in the arguments.
* Configures to use stdio for communication with the server.
* Initializes the session and available tools.
### 3. Query Processing
* Leverages [Microsoft.Extensions.AI](https://learn.microsoft.com/dotnet/ai/ai-extensions) for the chat client.
* Configures the `IChatClient` to use automatic tool (function) invocation.
* The client reads user input and sends it to the server.
* The server processes the query and returns a response.
* The response is displayed to the user.
## Running the Client
To run your client with any MCP server:
```bash theme={null}
dotnet run -- path/to/server.csproj # dotnet server
dotnet run -- path/to/server.py # python server
dotnet run -- path/to/server.js # node server
```
If you're continuing the weather tutorial from the server quickstart, your command might look something like this: `dotnet run -- path/to/QuickstartWeatherServer`.
The client will:
1. Connect to the specified server
2. List available tools
3. Start an interactive chat session where you can:
* Enter queries
* See tool executions
* Get responses from Claude
4. Exit the session when done
Here's an example of what it should look like if connected to the weather server quickstart:
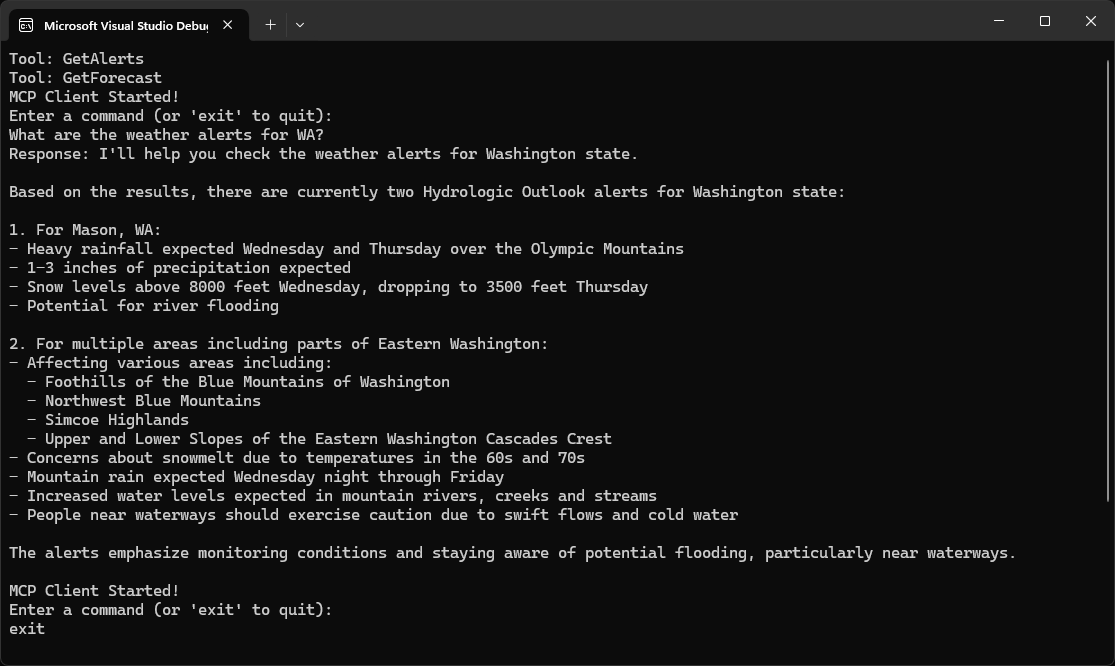 ## Next steps
Check out our gallery of official MCP servers and implementations
View the list of clients that support MCP integrations
## Next steps
Check out our gallery of official MCP servers and implementations
View the list of clients that support MCP integrations