> ## Documentation Index
> Fetch the complete documentation index at: https://modelcontextprotocol.io/llms.txt
> Use this file to discover all available pages before exploring further.
# Build an MCP server
> Get started building your own server to use in Claude for Desktop and other clients.
In this tutorial, we'll build a simple MCP weather server and connect it to a host, Claude for Desktop.
### What we'll be building
We'll build a server that exposes two tools: `get_alerts` and `get_forecast`. Then we'll connect the server to an MCP host (in this case, Claude for Desktop):
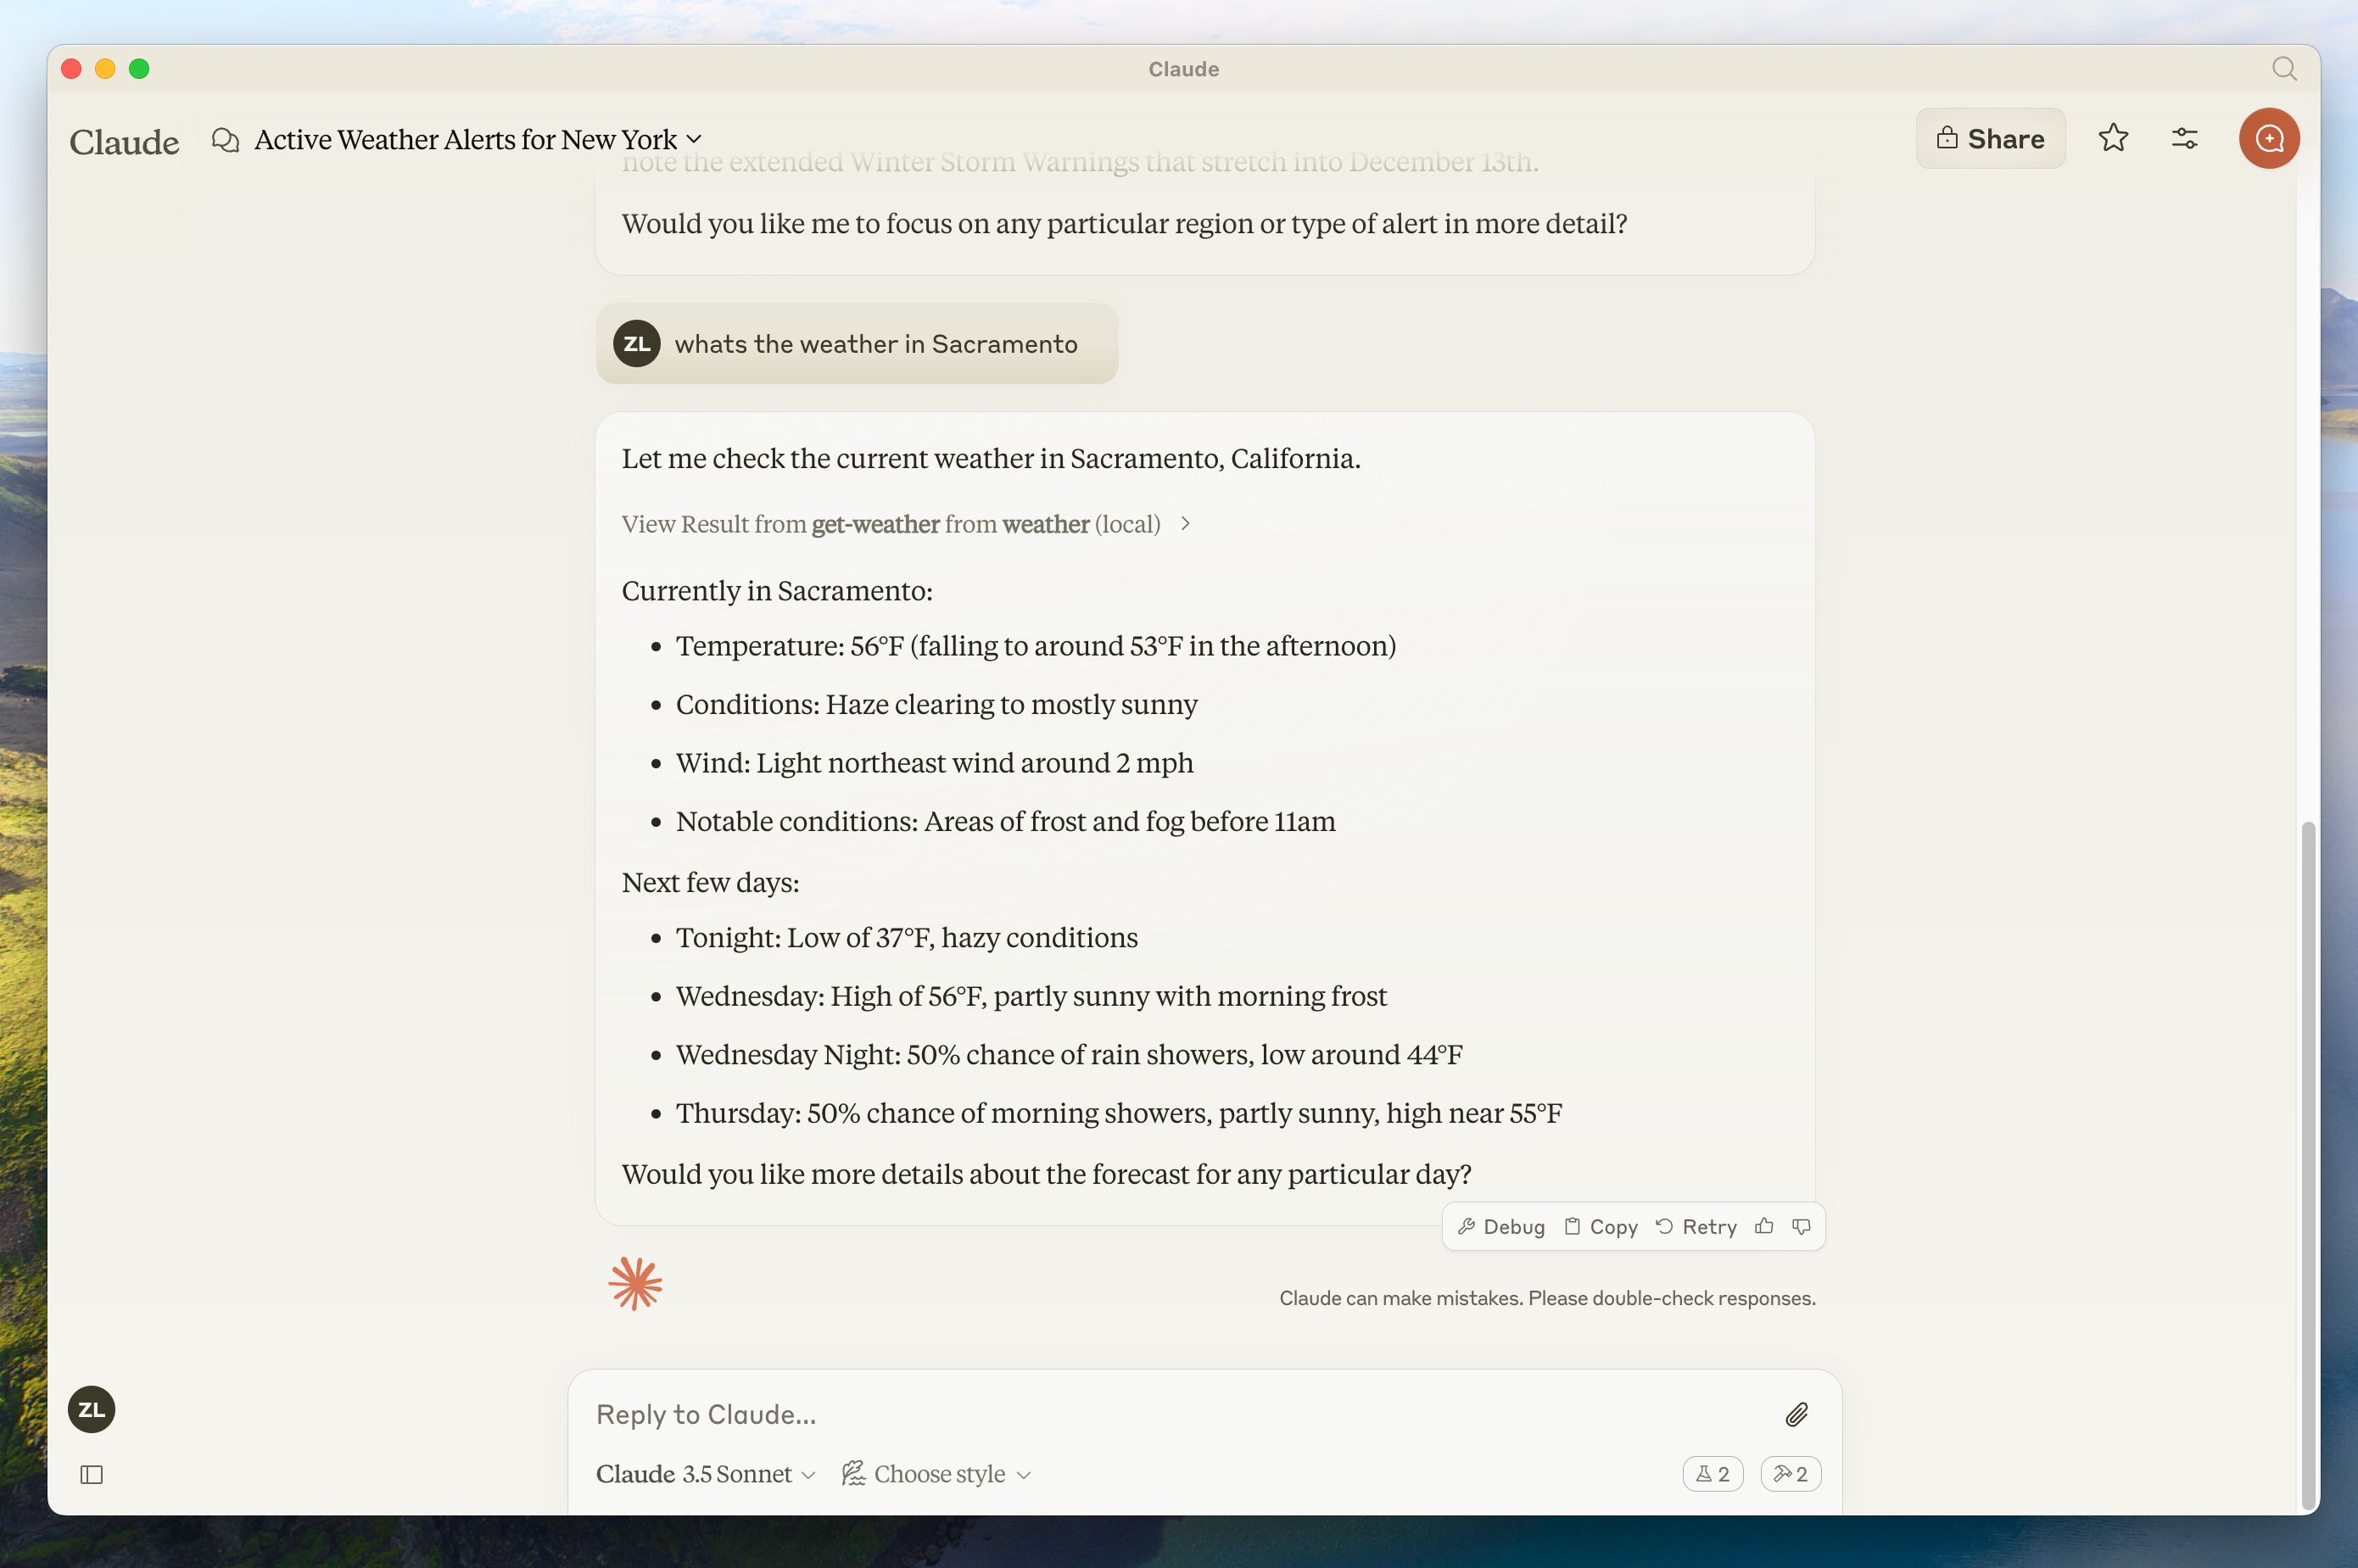 Servers can connect to any client. We've chosen Claude for Desktop here for simplicity, but we also have guides on [building your own client](/docs/develop/build-client) as well as a [list of other clients here](/clients).
### Core MCP Concepts
MCP servers can provide three main types of capabilities:
1. **[Resources](/docs/learn/server-concepts#resources)**: File-like data that can be read by clients (like API responses or file contents)
2. **[Tools](/docs/learn/server-concepts#tools)**: Functions that can be called by the LLM (with user approval)
3. **[Prompts](/docs/learn/server-concepts#prompts)**: Pre-written templates that help users accomplish specific tasks
This tutorial will primarily focus on tools.
Let's get started with building our weather server! [You can find the complete code for what we'll be building here.](https://github.com/modelcontextprotocol/quickstart-resources/tree/main/weather-server-python)
### Prerequisite knowledge
This quickstart assumes you have familiarity with:
* Python
* LLMs like Claude
### Logging in MCP Servers
When implementing MCP servers, be careful about how you handle logging:
**For STDIO-based servers:** Never write to stdout. Writing to stdout will corrupt the JSON-RPC messages and break your server. The `print()` function writes to stdout by default, but can be used safely with `file=sys.stderr`.
**For HTTP-based servers:** Standard output logging is fine since it doesn't interfere with HTTP responses.
### Best Practices
* Use a logging library that writes to stderr or files.
### Quick Examples
```python theme={null}
import sys
import logging
# ❌ Bad (STDIO)
print("Processing request")
# ✅ Good (STDIO)
print("Processing request", file=sys.stderr)
# ✅ Good (STDIO)
logging.info("Processing request")
```
### System requirements
* Python 3.10 or higher installed.
* You must use the Python MCP SDK 1.2.0 or higher.
### Set up your environment
First, let's install `uv` and set up our Python project and environment:
```bash macOS/Linux theme={null}
curl -LsSf https://astral.sh/uv/install.sh | sh
```
```powershell Windows theme={null}
powershell -ExecutionPolicy ByPass -c "irm https://astral.sh/uv/install.ps1 | iex"
```
Make sure to restart your terminal afterwards to ensure that the `uv` command gets picked up.
Now, let's create and set up our project:
```bash macOS/Linux theme={null}
# Create a new directory for our project
uv init weather
cd weather
# Create virtual environment and activate it
uv venv
source .venv/bin/activate
# Install dependencies
uv add "mcp[cli]" httpx
# Create our server file
touch weather.py
```
```powershell Windows theme={null}
# Create a new directory for our project
uv init weather
cd weather
# Create virtual environment and activate it
uv venv
.venv\Scripts\activate
# Install dependencies
uv add mcp[cli] httpx
# Create our server file
new-item weather.py
```
Now let's dive into building your server.
## Building your server
### Importing packages and setting up the instance
Add these to the top of your `weather.py`:
```python theme={null}
from typing import Any
import httpx
from mcp.server.fastmcp import FastMCP
# Initialize FastMCP server
mcp = FastMCP("weather")
# Constants
NWS_API_BASE = "https://api.weather.gov"
USER_AGENT = "weather-app/1.0"
```
The FastMCP class uses Python type hints and docstrings to automatically generate tool definitions, making it easy to create and maintain MCP tools.
### Helper functions
Next, let's add our helper functions for querying and formatting the data from the National Weather Service API:
```python theme={null}
async def make_nws_request(url: str) -> dict[str, Any] | None:
"""Make a request to the NWS API with proper error handling."""
headers = {"User-Agent": USER_AGENT, "Accept": "application/geo+json"}
async with httpx.AsyncClient() as client:
try:
response = await client.get(url, headers=headers, timeout=30.0)
response.raise_for_status()
return response.json()
except Exception:
return None
def format_alert(feature: dict) -> str:
"""Format an alert feature into a readable string."""
props = feature["properties"]
return f"""
Event: {props.get("event", "Unknown")}
Area: {props.get("areaDesc", "Unknown")}
Severity: {props.get("severity", "Unknown")}
Description: {props.get("description", "No description available")}
Instructions: {props.get("instruction", "No specific instructions provided")}
"""
```
### Implementing tool execution
The tool execution handler is responsible for actually executing the logic of each tool. Let's add it:
```python theme={null}
@mcp.tool()
async def get_alerts(state: str) -> str:
"""Get weather alerts for a US state.
Args:
state: Two-letter US state code (e.g. CA, NY)
"""
url = f"{NWS_API_BASE}/alerts/active/area/{state}"
data = await make_nws_request(url)
if not data or "features" not in data:
return "Unable to fetch alerts or no alerts found."
if not data["features"]:
return "No active alerts for this state."
alerts = [format_alert(feature) for feature in data["features"]]
return "\n---\n".join(alerts)
@mcp.tool()
async def get_forecast(latitude: float, longitude: float) -> str:
"""Get weather forecast for a location.
Args:
latitude: Latitude of the location
longitude: Longitude of the location
"""
# First get the forecast grid endpoint
points_url = f"{NWS_API_BASE}/points/{latitude},{longitude}"
points_data = await make_nws_request(points_url)
if not points_data:
return "Unable to fetch forecast data for this location."
# Get the forecast URL from the points response
forecast_url = points_data["properties"]["forecast"]
forecast_data = await make_nws_request(forecast_url)
if not forecast_data:
return "Unable to fetch detailed forecast."
# Format the periods into a readable forecast
periods = forecast_data["properties"]["periods"]
forecasts = []
for period in periods[:5]: # Only show next 5 periods
forecast = f"""
{period["name"]}:
Temperature: {period["temperature"]}°{period["temperatureUnit"]}
Wind: {period["windSpeed"]} {period["windDirection"]}
Forecast: {period["detailedForecast"]}
"""
forecasts.append(forecast)
return "\n---\n".join(forecasts)
```
### Running the server
Finally, let's initialize and run the server:
```python theme={null}
def main():
# Initialize and run the server
mcp.run(transport="stdio")
if __name__ == "__main__":
main()
```
Your server is complete! Run `uv run weather.py` to start the MCP server, which will listen for messages from MCP hosts.
Let's now test your server from an existing MCP host, Claude for Desktop.
## Testing your server with Claude for Desktop
Claude for Desktop is not yet available on Linux. Linux users can proceed to the [Building a client](/docs/develop/build-client) tutorial to build an MCP client that connects to the server we just built.
First, make sure you have Claude for Desktop installed. [You can install the latest version
here.](https://claude.ai/download) If you already have Claude for Desktop, **make sure it's updated to the latest version.**
We'll need to configure Claude for Desktop for whichever MCP servers you want to use. To do this, open your Claude for Desktop App configuration at `~/Library/Application Support/Claude/claude_desktop_config.json` in a text editor. Make sure to create the file if it doesn't exist.
For example, if you have [VS Code](https://code.visualstudio.com/) installed:
```bash macOS/Linux theme={null}
code ~/Library/Application\ Support/Claude/claude_desktop_config.json
```
```powershell Windows theme={null}
code $env:AppData\Claude\claude_desktop_config.json
```
You'll then add your servers in the `mcpServers` key. The MCP UI elements will only show up in Claude for Desktop if at least one server is properly configured.
In this case, we'll add our single weather server like so:
```json macOS/Linux theme={null}
{
"mcpServers": {
"weather": {
"command": "uv",
"args": [
"--directory",
"/ABSOLUTE/PATH/TO/PARENT/FOLDER/weather",
"run",
"weather.py"
]
}
}
}
```
```json Windows theme={null}
{
"mcpServers": {
"weather": {
"command": "uv",
"args": [
"--directory",
"C:\\ABSOLUTE\\PATH\\TO\\PARENT\\FOLDER\\weather",
"run",
"weather.py"
]
}
}
}
```
You may need to put the full path to the `uv` executable in the `command` field. You can get this by running `which uv` on macOS/Linux or `where uv` on Windows.
Make sure you pass in the absolute path to your server. You can get this by running `pwd` on macOS/Linux or `cd` on Windows Command Prompt. On Windows, remember to use double backslashes (`\\`) or forward slashes (`/`) in the JSON path.
This tells Claude for Desktop:
1. There's an MCP server named "weather"
2. To launch it by running `uv --directory /ABSOLUTE/PATH/TO/PARENT/FOLDER/weather run weather.py`
Save the file, and restart **Claude for Desktop**.
Let's get started with building our weather server! [You can find the complete code for what we'll be building here.](https://github.com/modelcontextprotocol/quickstart-resources/tree/main/weather-server-typescript)
### Prerequisite knowledge
This quickstart assumes you have familiarity with:
* TypeScript
* LLMs like Claude
### Logging in MCP Servers
When implementing MCP servers, be careful about how you handle logging:
**For STDIO-based servers:** Never use `console.log()`, as it writes to standard output (stdout) by default. Writing to stdout will corrupt the JSON-RPC messages and break your server.
**For HTTP-based servers:** Standard output logging is fine since it doesn't interfere with HTTP responses.
### Best Practices
* Use `console.error()` which writes to stderr, or use a logging library that writes to stderr or files.
### Quick Examples
```javascript theme={null}
// ❌ Bad (STDIO)
console.log("Server started");
// ✅ Good (STDIO)
console.error("Server started"); // stderr is safe
```
### System requirements
For TypeScript, make sure you have the latest version of Node installed.
### Set up your environment
First, let's install Node.js and npm if you haven't already. You can download them from [nodejs.org](https://nodejs.org/).
Verify your Node.js installation:
```bash theme={null}
node --version
npm --version
```
For this tutorial, you'll need Node.js version 16 or higher.
Now, let's create and set up our project:
```bash macOS/Linux theme={null}
# Create a new directory for our project
mkdir weather
cd weather
# Initialize a new npm project
npm init -y
# Install dependencies
npm install @modelcontextprotocol/sdk zod@3
npm install -D @types/node typescript
# Create our files
mkdir src
touch src/index.ts
```
```powershell Windows theme={null}
# Create a new directory for our project
md weather
cd weather
# Initialize a new npm project
npm init -y
# Install dependencies
npm install @modelcontextprotocol/sdk zod@3
npm install -D @types/node typescript
# Create our files
md src
new-item src\index.ts
```
Update your package.json to add type: "module" and a build script:
```json package.json theme={null}
{
"type": "module",
"bin": {
"weather": "./build/index.js"
},
"scripts": {
"build": "tsc && chmod 755 build/index.js"
},
"files": ["build"]
}
```
Create a `tsconfig.json` in the root of your project:
```json tsconfig.json theme={null}
{
"compilerOptions": {
"target": "ES2022",
"module": "Node16",
"moduleResolution": "Node16",
"outDir": "./build",
"rootDir": "./src",
"strict": true,
"esModuleInterop": true,
"skipLibCheck": true,
"forceConsistentCasingInFileNames": true
},
"include": ["src/**/*"],
"exclude": ["node_modules"]
}
```
Now let's dive into building your server.
## Building your server
### Importing packages and setting up the instance
Add these to the top of your `src/index.ts`:
```typescript theme={null}
import { McpServer } from "@modelcontextprotocol/sdk/server/mcp.js";
import { StdioServerTransport } from "@modelcontextprotocol/sdk/server/stdio.js";
import { z } from "zod";
const NWS_API_BASE = "https://api.weather.gov";
const USER_AGENT = "weather-app/1.0";
// Create server instance
const server = new McpServer({
name: "weather",
version: "1.0.0",
});
```
### Helper functions
Next, let's add our helper functions for querying and formatting the data from the National Weather Service API:
```typescript theme={null}
// Helper function for making NWS API requests
async function makeNWSRequest(url: string): Promise {
const headers = {
"User-Agent": USER_AGENT,
Accept: "application/geo+json",
};
try {
const response = await fetch(url, { headers });
if (!response.ok) {
throw new Error(`HTTP error! status: ${response.status}`);
}
return (await response.json()) as T;
} catch (error) {
console.error("Error making NWS request:", error);
return null;
}
}
interface AlertFeature {
properties: {
event?: string;
areaDesc?: string;
severity?: string;
status?: string;
headline?: string;
};
}
// Format alert data
function formatAlert(feature: AlertFeature): string {
const props = feature.properties;
return [
`Event: ${props.event || "Unknown"}`,
`Area: ${props.areaDesc || "Unknown"}`,
`Severity: ${props.severity || "Unknown"}`,
`Status: ${props.status || "Unknown"}`,
`Headline: ${props.headline || "No headline"}`,
"---",
].join("\n");
}
interface ForecastPeriod {
name?: string;
temperature?: number;
temperatureUnit?: string;
windSpeed?: string;
windDirection?: string;
shortForecast?: string;
}
interface AlertsResponse {
features: AlertFeature[];
}
interface PointsResponse {
properties: {
forecast?: string;
};
}
interface ForecastResponse {
properties: {
periods: ForecastPeriod[];
};
}
```
### Implementing tool execution
The tool execution handler is responsible for actually executing the logic of each tool. Let's add it:
```typescript theme={null}
// Register weather tools
server.registerTool(
"get_alerts",
{
description: "Get weather alerts for a state",
inputSchema: {
state: z
.string()
.length(2)
.describe("Two-letter state code (e.g. CA, NY)"),
},
},
async ({ state }) => {
const stateCode = state.toUpperCase();
const alertsUrl = `${NWS_API_BASE}/alerts?area=${stateCode}`;
const alertsData = await makeNWSRequest(alertsUrl);
if (!alertsData) {
return {
content: [
{
type: "text",
text: "Failed to retrieve alerts data",
},
],
};
}
const features = alertsData.features || [];
if (features.length === 0) {
return {
content: [
{
type: "text",
text: `No active alerts for ${stateCode}`,
},
],
};
}
const formattedAlerts = features.map(formatAlert);
const alertsText = `Active alerts for ${stateCode}:\n\n${formattedAlerts.join("\n")}`;
return {
content: [
{
type: "text",
text: alertsText,
},
],
};
},
);
server.registerTool(
"get_forecast",
{
description: "Get weather forecast for a location",
inputSchema: {
latitude: z
.number()
.min(-90)
.max(90)
.describe("Latitude of the location"),
longitude: z
.number()
.min(-180)
.max(180)
.describe("Longitude of the location"),
},
},
async ({ latitude, longitude }) => {
// Get grid point data
const pointsUrl = `${NWS_API_BASE}/points/${latitude.toFixed(4)},${longitude.toFixed(4)}`;
const pointsData = await makeNWSRequest(pointsUrl);
if (!pointsData) {
return {
content: [
{
type: "text",
text: `Failed to retrieve grid point data for coordinates: ${latitude}, ${longitude}. This location may not be supported by the NWS API (only US locations are supported).`,
},
],
};
}
const forecastUrl = pointsData.properties?.forecast;
if (!forecastUrl) {
return {
content: [
{
type: "text",
text: "Failed to get forecast URL from grid point data",
},
],
};
}
// Get forecast data
const forecastData = await makeNWSRequest(forecastUrl);
if (!forecastData) {
return {
content: [
{
type: "text",
text: "Failed to retrieve forecast data",
},
],
};
}
const periods = forecastData.properties?.periods || [];
if (periods.length === 0) {
return {
content: [
{
type: "text",
text: "No forecast periods available",
},
],
};
}
// Format forecast periods
const formattedForecast = periods.map((period: ForecastPeriod) =>
[
`${period.name || "Unknown"}:`,
`Temperature: ${period.temperature || "Unknown"}°${period.temperatureUnit || "F"}`,
`Wind: ${period.windSpeed || "Unknown"} ${period.windDirection || ""}`,
`${period.shortForecast || "No forecast available"}`,
"---",
].join("\n"),
);
const forecastText = `Forecast for ${latitude}, ${longitude}:\n\n${formattedForecast.join("\n")}`;
return {
content: [
{
type: "text",
text: forecastText,
},
],
};
},
);
```
### Running the server
Finally, implement the main function to run the server:
```typescript theme={null}
async function main() {
const transport = new StdioServerTransport();
await server.connect(transport);
console.error("Weather MCP Server running on stdio");
}
main().catch((error) => {
console.error("Fatal error in main():", error);
process.exit(1);
});
```
Make sure to run `npm run build` to build your server! This is a very important step in getting your server to connect.
Let's now test your server from an existing MCP host, Claude for Desktop.
## Testing your server with Claude for Desktop
Claude for Desktop is not yet available on Linux. Linux users can proceed to the [Building a client](/docs/develop/build-client) tutorial to build an MCP client that connects to the server we just built.
First, make sure you have Claude for Desktop installed. [You can install the latest version
here.](https://claude.ai/download) If you already have Claude for Desktop, **make sure it's updated to the latest version.**
We'll need to configure Claude for Desktop for whichever MCP servers you want to use. To do this, open your Claude for Desktop App configuration at `~/Library/Application Support/Claude/claude_desktop_config.json` in a text editor. Make sure to create the file if it doesn't exist.
For example, if you have [VS Code](https://code.visualstudio.com/) installed:
```bash macOS/Linux theme={null}
code ~/Library/Application\ Support/Claude/claude_desktop_config.json
```
```powershell Windows theme={null}
code $env:AppData\Claude\claude_desktop_config.json
```
You'll then add your servers in the `mcpServers` key. The MCP UI elements will only show up in Claude for Desktop if at least one server is properly configured.
In this case, we'll add our single weather server like so:
```json macOS/Linux theme={null}
{
"mcpServers": {
"weather": {
"command": "node",
"args": ["/ABSOLUTE/PATH/TO/PARENT/FOLDER/weather/build/index.js"]
}
}
}
```
```json Windows theme={null}
{
"mcpServers": {
"weather": {
"command": "node",
"args": ["C:\\PATH\\TO\\PARENT\\FOLDER\\weather\\build\\index.js"]
}
}
}
```
This tells Claude for Desktop:
1. There's an MCP server named "weather"
2. Launch it by running `node /ABSOLUTE/PATH/TO/PARENT/FOLDER/weather/build/index.js`
Save the file, and restart **Claude for Desktop**.
This is a quickstart demo based on Spring AI MCP auto-configuration and boot starters.
To learn how to create sync and async MCP Servers, manually, consult the [Java SDK Server](/sdk/java/mcp-server) documentation.
Let's get started with building our weather server!
[You can find the complete code for what we'll be building here.](https://github.com/spring-projects/spring-ai-examples/tree/main/model-context-protocol/weather/starter-stdio-server)
For more information, see the [MCP Server Boot Starter](https://docs.spring.io/spring-ai/reference/api/mcp/mcp-server-boot-starter-docs.html) reference documentation.
For manual MCP Server implementation, refer to the [MCP Server Java SDK documentation](/sdk/java/mcp-server).
### Logging in MCP Servers
When implementing MCP servers, be careful about how you handle logging:
**For STDIO-based servers:** Never use `System.out.println()` or `System.out.print()`, as they write to standard output (stdout). Writing to stdout will corrupt the JSON-RPC messages and break your server.
**For HTTP-based servers:** Standard output logging is fine since it doesn't interfere with HTTP responses.
### Best Practices
* Use a logging library that writes to stderr or files.
* Ensure any configured logging library will not write to stdout.
### System requirements
* Java 17 or higher installed.
* [Spring Boot 3.3.x](https://docs.spring.io/spring-boot/installing.html) or higher
### Set up your environment
Use the [Spring Initializer](https://start.spring.io/) to bootstrap the project.
You will need to add the following dependencies:
```xml Maven theme={null}
org.springframework.ai
spring-ai-starter-mcp-server
org.springframework
spring-web
```
```groovy Gradle theme={null}
dependencies {
implementation platform("org.springframework.ai:spring-ai-starter-mcp-server")
implementation platform("org.springframework:spring-web")
}
```
Then configure your application by setting the application properties:
```bash application.properties theme={null}
spring.main.bannerMode=off
logging.pattern.console=
```
```yaml application.yml theme={null}
logging:
pattern:
console:
spring:
main:
banner-mode: off
```
The [Server Configuration Properties](https://docs.spring.io/spring-ai/reference/api/mcp/mcp-server-boot-starter-docs.html#_configuration_properties) documents all available properties.
Now let's dive into building your server.
## Building your server
### Weather Service
Let's implement a [WeatherService.java](https://github.com/spring-projects/spring-ai-examples/blob/main/model-context-protocol/weather/starter-stdio-server/src/main/java/org/springframework/ai/mcp/sample/server/WeatherService.java) that uses a REST client to query the data from the National Weather Service API:
```java theme={null}
@Service
public class WeatherService {
private final RestClient restClient;
public WeatherService() {
this.restClient = RestClient.builder()
.baseUrl("https://api.weather.gov")
.defaultHeader("Accept", "application/geo+json")
.defaultHeader("User-Agent", "WeatherApiClient/1.0 (your@email.com)")
.build();
}
@Tool(description = "Get weather forecast for a specific latitude/longitude")
public String getWeatherForecastByLocation(
double latitude, // Latitude coordinate
double longitude // Longitude coordinate
) {
// Returns detailed forecast including:
// - Temperature and unit
// - Wind speed and direction
// - Detailed forecast description
}
@Tool(description = "Get weather alerts for a US state")
public String getAlerts(
@ToolParam(description = "Two-letter US state code (e.g. CA, NY)") String state
) {
// Returns active alerts including:
// - Event type
// - Affected area
// - Severity
// - Description
// - Safety instructions
}
// ......
}
```
The `@Service` annotation will auto-register the service in your application context.
The Spring AI `@Tool` annotation makes it easy to create and maintain MCP tools.
The auto-configuration will automatically register these tools with the MCP server.
### Create your Boot Application
```java theme={null}
@SpringBootApplication
public class McpServerApplication {
public static void main(String[] args) {
SpringApplication.run(McpServerApplication.class, args);
}
@Bean
public ToolCallbackProvider weatherTools(WeatherService weatherService) {
return MethodToolCallbackProvider.builder().toolObjects(weatherService).build();
}
}
```
Uses the `MethodToolCallbackProvider` utils to convert the `@Tools` into actionable callbacks used by the MCP server.
### Running the server
Finally, let's build the server:
```bash theme={null}
./mvnw clean install
```
This will generate an `mcp-weather-stdio-server-0.0.1-SNAPSHOT.jar` file within the `target` folder.
Let's now test your server from an existing MCP host, Claude for Desktop.
## Testing your server with Claude for Desktop
Claude for Desktop is not yet available on Linux.
First, make sure you have Claude for Desktop installed.
[You can install the latest version here.](https://claude.ai/download) If you already have Claude for Desktop, **make sure it's updated to the latest version.**
We'll need to configure Claude for Desktop for whichever MCP servers you want to use.
To do this, open your Claude for Desktop App configuration at `~/Library/Application Support/Claude/claude_desktop_config.json` in a text editor.
Make sure to create the file if it doesn't exist.
For example, if you have [VS Code](https://code.visualstudio.com/) installed:
```bash macOS/Linux theme={null}
code ~/Library/Application\ Support/Claude/claude_desktop_config.json
```
```powershell Windows theme={null}
code $env:AppData\Claude\claude_desktop_config.json
```
You'll then add your servers in the `mcpServers` key.
The MCP UI elements will only show up in Claude for Desktop if at least one server is properly configured.
In this case, we'll add our single weather server like so:
```json macOS/Linux theme={null}
{
"mcpServers": {
"spring-ai-mcp-weather": {
"command": "java",
"args": [
"-Dspring.ai.mcp.server.stdio=true",
"-jar",
"/ABSOLUTE/PATH/TO/PARENT/FOLDER/mcp-weather-stdio-server-0.0.1-SNAPSHOT.jar"
]
}
}
}
```
```json Windows theme={null}
{
"mcpServers": {
"spring-ai-mcp-weather": {
"command": "java",
"args": [
"-Dspring.ai.mcp.server.transport=STDIO",
"-jar",
"C:\\ABSOLUTE\\PATH\\TO\\PARENT\\FOLDER\\weather\\mcp-weather-stdio-server-0.0.1-SNAPSHOT.jar"
]
}
}
}
```
Make sure you pass in the absolute path to your server.
This tells Claude for Desktop:
1. There's an MCP server named "my-weather-server"
2. To launch it by running `java -jar /ABSOLUTE/PATH/TO/PARENT/FOLDER/mcp-weather-stdio-server-0.0.1-SNAPSHOT.jar`
Save the file, and restart **Claude for Desktop**.
## Testing your server with Java client
### Create an MCP Client manually
Use the `McpClient` to connect to the server:
```java theme={null}
var stdioParams = ServerParameters.builder("java")
.args("-jar", "/ABSOLUTE/PATH/TO/PARENT/FOLDER/mcp-weather-stdio-server-0.0.1-SNAPSHOT.jar")
.build();
var stdioTransport = new StdioClientTransport(stdioParams);
var mcpClient = McpClient.sync(stdioTransport).build();
mcpClient.initialize();
ListToolsResult toolsList = mcpClient.listTools();
CallToolResult weather = mcpClient.callTool(
new CallToolRequest("getWeatherForecastByLocation",
Map.of("latitude", "47.6062", "longitude", "-122.3321")));
CallToolResult alert = mcpClient.callTool(
new CallToolRequest("getAlerts", Map.of("state", "NY")));
mcpClient.closeGracefully();
```
### Use MCP Client Boot Starter
Create a new boot starter application using the `spring-ai-starter-mcp-client` dependency:
```xml theme={null}
org.springframework.ai
spring-ai-starter-mcp-client
```
and set the `spring.ai.mcp.client.stdio.servers-configuration` property to point to your `claude_desktop_config.json`.
You can reuse the existing Anthropic Desktop configuration:
```properties theme={null}
spring.ai.mcp.client.stdio.servers-configuration=file:PATH/TO/claude_desktop_config.json
```
When you start your client application, the auto-configuration will automatically create MCP clients from the claude\_desktop\_config.json.
For more information, see the [MCP Client Boot Starters](https://docs.spring.io/spring-ai/reference/api/mcp/mcp-server-boot-client-docs.html) reference documentation.
## More Java MCP Server examples
The [starter-webflux-server](https://github.com/spring-projects/spring-ai-examples/tree/main/model-context-protocol/weather/starter-webflux-server) demonstrates how to create an MCP server using SSE transport.
It showcases how to define and register MCP Tools, Resources, and Prompts, using the Spring Boot's auto-configuration capabilities.
Let's get started with building our weather server! [You can find the complete code for what we'll be building here.](https://github.com/modelcontextprotocol/kotlin-sdk/tree/main/samples/weather-stdio-server)
### Prerequisite knowledge
This quickstart assumes you have familiarity with:
* Kotlin
* LLMs like Claude
### Logging in MCP Servers
When implementing MCP servers, be careful about how you handle logging:
**For STDIO-based servers:** Never use `println()`, as it writes to standard output (stdout) by default. Writing to stdout will corrupt the JSON-RPC messages and break your server.
**For HTTP-based servers:** Standard output logging is fine since it doesn't interfere with HTTP responses.
### Best Practices
* Use a logging library that writes to stderr or files.
### System requirements
* Java 17 or higher installed.
### Set up your environment
First, let's install `java` and `gradle` if you haven't already.
You can download `java` from [official Oracle JDK website](https://www.oracle.com/java/technologies/downloads/).
Verify your `java` installation:
```bash theme={null}
java --version
```
Now, let's create and set up your project:
```bash macOS/Linux theme={null}
# Create a new directory for our project
mkdir weather
cd weather
# Initialize a new kotlin project
gradle init
```
```powershell Windows theme={null}
# Create a new directory for our project
md weather
cd weather
# Initialize a new kotlin project
gradle init
```
After running `gradle init`, you will be presented with options for creating your project.
Select **Application** as the project type, **Kotlin** as the programming language, and **Java 17** as the Java version.
Alternatively, you can create a Kotlin application using the [IntelliJ IDEA project wizard](https://kotlinlang.org/docs/jvm-get-started.html).
After creating the project, add the following dependencies:
```kotlin build.gradle.kts theme={null}
val mcpVersion = "0.4.0"
val slf4jVersion = "2.0.9"
val ktorVersion = "3.1.1"
dependencies {
implementation("io.modelcontextprotocol:kotlin-sdk:$mcpVersion")
implementation("org.slf4j:slf4j-nop:$slf4jVersion")
implementation("io.ktor:ktor-client-content-negotiation:$ktorVersion")
implementation("io.ktor:ktor-serialization-kotlinx-json:$ktorVersion")
}
```
```groovy build.gradle theme={null}
def mcpVersion = '0.3.0'
def slf4jVersion = '2.0.9'
def ktorVersion = '3.1.1'
dependencies {
implementation "io.modelcontextprotocol:kotlin-sdk:$mcpVersion"
implementation "org.slf4j:slf4j-nop:$slf4jVersion"
implementation "io.ktor:ktor-client-content-negotiation:$ktorVersion"
implementation "io.ktor:ktor-serialization-kotlinx-json:$ktorVersion"
}
```
Also, add the following plugins to your build script:
```kotlin build.gradle.kts theme={null}
plugins {
kotlin("plugin.serialization") version "your_version_of_kotlin"
id("com.gradleup.shadow") version "8.3.9"
}
```
```groovy build.gradle theme={null}
plugins {
id 'org.jetbrains.kotlin.plugin.serialization' version 'your_version_of_kotlin'
id 'com.gradleup.shadow' version '8.3.9'
}
```
Now let’s dive into building your server.
## Building your server
### Setting up the instance
Add a server initialization function:
```kotlin theme={null}
// Main function to run the MCP server
fun `run mcp server`() {
// Create the MCP Server instance with a basic implementation
val server = Server(
Implementation(
name = "weather", // Tool name is "weather"
version = "1.0.0" // Version of the implementation
),
ServerOptions(
capabilities = ServerCapabilities(tools = ServerCapabilities.Tools(listChanged = true))
)
)
// Create a transport using standard IO for server communication
val transport = StdioServerTransport(
System.`in`.asInput(),
System.out.asSink().buffered()
)
runBlocking {
server.connect(transport)
val done = Job()
server.onClose {
done.complete()
}
done.join()
}
}
```
### Weather API helper functions
Next, let's add functions and data classes for querying and converting responses from the National Weather Service API:
```kotlin theme={null}
// Extension function to fetch forecast information for given latitude and longitude
suspend fun HttpClient.getForecast(latitude: Double, longitude: Double): List {
val points = this.get("/points/$latitude,$longitude").body()
val forecast = this.get(points.properties.forecast).body()
return forecast.properties.periods.map { period ->
"""
${period.name}:
Temperature: ${period.temperature} ${period.temperatureUnit}
Wind: ${period.windSpeed} ${period.windDirection}
Forecast: ${period.detailedForecast}
""".trimIndent()
}
}
// Extension function to fetch weather alerts for a given state
suspend fun HttpClient.getAlerts(state: String): List {
val alerts = this.get("/alerts/active/area/$state").body()
return alerts.features.map { feature ->
"""
Event: ${feature.properties.event}
Area: ${feature.properties.areaDesc}
Severity: ${feature.properties.severity}
Description: ${feature.properties.description}
Instruction: ${feature.properties.instruction}
""".trimIndent()
}
}
@Serializable
data class Points(
val properties: Properties
) {
@Serializable
data class Properties(val forecast: String)
}
@Serializable
data class Forecast(
val properties: Properties
) {
@Serializable
data class Properties(val periods: List)
@Serializable
data class Period(
val number: Int, val name: String, val startTime: String, val endTime: String,
val isDaytime: Boolean, val temperature: Int, val temperatureUnit: String,
val temperatureTrend: String, val probabilityOfPrecipitation: JsonObject,
val windSpeed: String, val windDirection: String,
val shortForecast: String, val detailedForecast: String,
)
}
@Serializable
data class Alert(
val features: List
) {
@Serializable
data class Feature(
val properties: Properties
)
@Serializable
data class Properties(
val event: String, val areaDesc: String, val severity: String,
val description: String, val instruction: String?,
)
}
```
### Implementing tool execution
The tool execution handler is responsible for actually executing the logic of each tool. Let's add it:
```kotlin theme={null}
// Create an HTTP client with a default request configuration and JSON content negotiation
val httpClient = HttpClient {
defaultRequest {
url("https://api.weather.gov")
headers {
append("Accept", "application/geo+json")
append("User-Agent", "WeatherApiClient/1.0")
}
contentType(ContentType.Application.Json)
}
// Install content negotiation plugin for JSON serialization/deserialization
install(ContentNegotiation) { json(Json { ignoreUnknownKeys = true }) }
}
// Register a tool to fetch weather alerts by state
server.addTool(
name = "get_alerts",
description = """
Get weather alerts for a US state. Input is Two-letter US state code (e.g. CA, NY)
""".trimIndent(),
inputSchema = Tool.Input(
properties = buildJsonObject {
putJsonObject("state") {
put("type", "string")
put("description", "Two-letter US state code (e.g. CA, NY)")
}
},
required = listOf("state")
)
) { request ->
val state = request.arguments["state"]?.jsonPrimitive?.content
if (state == null) {
return@addTool CallToolResult(
content = listOf(TextContent("The 'state' parameter is required."))
)
}
val alerts = httpClient.getAlerts(state)
CallToolResult(content = alerts.map { TextContent(it) })
}
// Register a tool to fetch weather forecast by latitude and longitude
server.addTool(
name = "get_forecast",
description = """
Get weather forecast for a specific latitude/longitude
""".trimIndent(),
inputSchema = Tool.Input(
properties = buildJsonObject {
putJsonObject("latitude") { put("type", "number") }
putJsonObject("longitude") { put("type", "number") }
},
required = listOf("latitude", "longitude")
)
) { request ->
val latitude = request.arguments["latitude"]?.jsonPrimitive?.doubleOrNull
val longitude = request.arguments["longitude"]?.jsonPrimitive?.doubleOrNull
if (latitude == null || longitude == null) {
return@addTool CallToolResult(
content = listOf(TextContent("The 'latitude' and 'longitude' parameters are required."))
)
}
val forecast = httpClient.getForecast(latitude, longitude)
CallToolResult(content = forecast.map { TextContent(it) })
}
```
### Running the server
Finally, implement the main function to run the server:
```kotlin theme={null}
fun main() = `run mcp server`()
```
Make sure to run `./gradlew build` to build your server. This is a very important step in getting your server to connect.
Let's now test your server from an existing MCP host, Claude for Desktop.
## Testing your server with Claude for Desktop
Claude for Desktop is not yet available on Linux. Linux users can proceed to the [Building a client](/docs/develop/build-client) tutorial to build an MCP client that connects to the server we just built.
First, make sure you have Claude for Desktop installed. [You can install the latest version
here.](https://claude.ai/download) If you already have Claude for Desktop, **make sure it's updated to the latest version.**
We'll need to configure Claude for Desktop for whichever MCP servers you want to use.
To do this, open your Claude for Desktop App configuration at `~/Library/Application Support/Claude/claude_desktop_config.json` in a text editor.
Make sure to create the file if it doesn't exist.
For example, if you have [VS Code](https://code.visualstudio.com/) installed:
```bash macOS/Linux theme={null}
code ~/Library/Application\ Support/Claude/claude_desktop_config.json
```
```powershell Windows theme={null}
code $env:AppData\Claude\claude_desktop_config.json
```
You'll then add your servers in the `mcpServers` key.
The MCP UI elements will only show up in Claude for Desktop if at least one server is properly configured.
In this case, we'll add our single weather server like so:
```json macOS/Linux theme={null}
{
"mcpServers": {
"weather": {
"command": "java",
"args": [
"-jar",
"/ABSOLUTE/PATH/TO/PARENT/FOLDER/weather/build/libs/weather-0.1.0-all.jar"
]
}
}
}
```
```json Windows theme={null}
{
"mcpServers": {
"weather": {
"command": "java",
"args": [
"-jar",
"C:\\PATH\\TO\\PARENT\\FOLDER\\weather\\build\\libs\\weather-0.1.0-all.jar"
]
}
}
}
```
This tells Claude for Desktop:
1. There's an MCP server named "weather"
2. Launch it by running `java -jar /ABSOLUTE/PATH/TO/PARENT/FOLDER/weather/build/libs/weather-0.1.0-all.jar`
Save the file, and restart **Claude for Desktop**.
Let's get started with building our weather server! [You can find the complete code for what we'll be building here.](https://github.com/modelcontextprotocol/csharp-sdk/tree/main/samples/QuickstartWeatherServer)
### Prerequisite knowledge
This quickstart assumes you have familiarity with:
* C#
* LLMs like Claude
* .NET 8 or higher
### Logging in MCP Servers
When implementing MCP servers, be careful about how you handle logging:
**For STDIO-based servers:** Never use `Console.WriteLine()` or `Console.Write()`, as they write to standard output (stdout). Writing to stdout will corrupt the JSON-RPC messages and break your server.
**For HTTP-based servers:** Standard output logging is fine since it doesn't interfere with HTTP responses.
### Best Practices
* Use a logging library that writes to stderr or files.
### System requirements
* [.NET 8 SDK](https://dotnet.microsoft.com/download/dotnet/8.0) or higher installed.
### Set up your environment
First, let's install `dotnet` if you haven't already. You can download `dotnet` from [official Microsoft .NET website](https://dotnet.microsoft.com/download/). Verify your `dotnet` installation:
```bash theme={null}
dotnet --version
```
Now, let's create and set up your project:
```bash macOS/Linux theme={null}
# Create a new directory for our project
mkdir weather
cd weather
# Initialize a new C# project
dotnet new console
```
```powershell Windows theme={null}
# Create a new directory for our project
mkdir weather
cd weather
# Initialize a new C# project
dotnet new console
```
After running `dotnet new console`, you will be presented with a new C# project.
You can open the project in your favorite IDE, such as [Visual Studio](https://visualstudio.microsoft.com/) or [Rider](https://www.jetbrains.com/rider/).
Alternatively, you can create a C# application using the [Visual Studio project wizard](https://learn.microsoft.com/en-us/visualstudio/get-started/csharp/tutorial-console?view=vs-2022).
After creating the project, add NuGet package for the Model Context Protocol SDK and hosting:
```bash theme={null}
# Add the Model Context Protocol SDK NuGet package
dotnet add package ModelContextProtocol --prerelease
# Add the .NET Hosting NuGet package
dotnet add package Microsoft.Extensions.Hosting
```
Now let’s dive into building your server.
## Building your server
Open the `Program.cs` file in your project and replace its contents with the following code:
```csharp theme={null}
using Microsoft.Extensions.DependencyInjection;
using Microsoft.Extensions.Hosting;
using ModelContextProtocol;
using System.Net.Http.Headers;
var builder = Host.CreateEmptyApplicationBuilder(settings: null);
builder.Services.AddMcpServer()
.WithStdioServerTransport()
.WithToolsFromAssembly();
builder.Services.AddSingleton(_ =>
{
var client = new HttpClient() { BaseAddress = new Uri("https://api.weather.gov") };
client.DefaultRequestHeaders.UserAgent.Add(new ProductInfoHeaderValue("weather-tool", "1.0"));
return client;
});
var app = builder.Build();
await app.RunAsync();
```
When creating the `ApplicationHostBuilder`, ensure you use `CreateEmptyApplicationBuilder` instead of `CreateDefaultBuilder`. This ensures that the server does not write any additional messages to the console. This is only necessary for servers using STDIO transport.
This code sets up a basic console application that uses the Model Context Protocol SDK to create an MCP server with standard I/O transport.
### Weather API helper functions
Create an extension class for `HttpClient` which helps simplify JSON request handling:
```csharp theme={null}
using System.Text.Json;
internal static class HttpClientExt
{
public static async Task ReadJsonDocumentAsync(this HttpClient client, string requestUri)
{
using var response = await client.GetAsync(requestUri);
response.EnsureSuccessStatusCode();
return await JsonDocument.ParseAsync(await response.Content.ReadAsStreamAsync());
}
}
```
Next, define a class with the tool execution handlers for querying and converting responses from the National Weather Service API:
```csharp theme={null}
using ModelContextProtocol.Server;
using System.ComponentModel;
using System.Globalization;
using System.Text.Json;
namespace QuickstartWeatherServer.Tools;
[McpServerToolType]
public static class WeatherTools
{
[McpServerTool, Description("Get weather alerts for a US state code.")]
public static async Task GetAlerts(
HttpClient client,
[Description("The US state code to get alerts for.")] string state)
{
using var jsonDocument = await client.ReadJsonDocumentAsync($"/alerts/active/area/{state}");
var jsonElement = jsonDocument.RootElement;
var alerts = jsonElement.GetProperty("features").EnumerateArray();
if (!alerts.Any())
{
return "No active alerts for this state.";
}
return string.Join("\n--\n", alerts.Select(alert =>
{
JsonElement properties = alert.GetProperty("properties");
return $"""
Event: {properties.GetProperty("event").GetString()}
Area: {properties.GetProperty("areaDesc").GetString()}
Severity: {properties.GetProperty("severity").GetString()}
Description: {properties.GetProperty("description").GetString()}
Instruction: {properties.GetProperty("instruction").GetString()}
""";
}));
}
[McpServerTool, Description("Get weather forecast for a location.")]
public static async Task GetForecast(
HttpClient client,
[Description("Latitude of the location.")] double latitude,
[Description("Longitude of the location.")] double longitude)
{
var pointUrl = string.Create(CultureInfo.InvariantCulture, $"/points/{latitude},{longitude}");
using var jsonDocument = await client.ReadJsonDocumentAsync(pointUrl);
var forecastUrl = jsonDocument.RootElement.GetProperty("properties").GetProperty("forecast").GetString()
?? throw new Exception($"No forecast URL provided by {client.BaseAddress}points/{latitude},{longitude}");
using var forecastDocument = await client.ReadJsonDocumentAsync(forecastUrl);
var periods = forecastDocument.RootElement.GetProperty("properties").GetProperty("periods").EnumerateArray();
return string.Join("\n---\n", periods.Select(period => $"""
{period.GetProperty("name").GetString()}
Temperature: {period.GetProperty("temperature").GetInt32()}°F
Wind: {period.GetProperty("windSpeed").GetString()} {period.GetProperty("windDirection").GetString()}
Forecast: {period.GetProperty("detailedForecast").GetString()}
"""));
}
}
```
### Running the server
Finally, run the server using the following command:
```bash theme={null}
dotnet run
```
This will start the server and listen for incoming requests on standard input/output.
## Testing your server with Claude for Desktop
Claude for Desktop is not yet available on Linux. Linux users can proceed to the [Building a client](/docs/develop/build-client) tutorial to build an MCP client that connects to the server we just built.
First, make sure you have Claude for Desktop installed. [You can install the latest version
here.](https://claude.ai/download) If you already have Claude for Desktop, **make sure it's updated to the latest version.**
We'll need to configure Claude for Desktop for whichever MCP servers you want to use. To do this, open your Claude for Desktop App configuration at `~/Library/Application Support/Claude/claude_desktop_config.json` in a text editor. Make sure to create the file if it doesn't exist.
For example, if you have [VS Code](https://code.visualstudio.com/) installed:
```bash macOS/Linux theme={null}
code ~/Library/Application\ Support/Claude/claude_desktop_config.json
```
```powershell Windows theme={null}
code $env:AppData\Claude\claude_desktop_config.json
```
You'll then add your servers in the `mcpServers` key. The MCP UI elements will only show up in Claude for Desktop if at least one server is properly configured.
In this case, we'll add our single weather server like so:
```json macOS/Linux theme={null}
{
"mcpServers": {
"weather": {
"command": "dotnet",
"args": ["run", "--project", "/ABSOLUTE/PATH/TO/PROJECT", "--no-build"]
}
}
}
```
```json Windows theme={null}
{
"mcpServers": {
"weather": {
"command": "dotnet",
"args": [
"run",
"--project",
"C:\\ABSOLUTE\\PATH\\TO\\PROJECT",
"--no-build"
]
}
}
}
```
This tells Claude for Desktop:
1. There's an MCP server named "weather"
2. Launch it by running `dotnet run /ABSOLUTE/PATH/TO/PROJECT`
Save the file, and restart **Claude for Desktop**.
Let's get started with building our weather server! [You can find the complete code for what we'll be building here.](https://github.com/modelcontextprotocol/quickstart-resources/tree/main/weather-server-rust)
### Prerequisite knowledge
This quickstart assumes you have familiarity with:
* Rust programming language
* Async/await in Rust
* LLMs like Claude
### Logging in MCP Servers
When implementing MCP servers, be careful about how you handle logging:
**For STDIO-based servers:** Never use `println!()` or `print!()`, as they write to standard output (stdout). Writing to stdout will corrupt the JSON-RPC messages and break your server.
**For HTTP-based servers:** Standard output logging is fine since it doesn't interfere with HTTP responses.
### Best Practices
* Use a logging library that writes to stderr or files, such as `tracing` or `log` in Rust.
* Configure your logging framework to avoid stdout output.
### Quick Examples
```rust theme={null}
// ❌ Bad (STDIO)
println!("Processing request");
// ✅ Good (STDIO)
eprintln!("Processing request"); // writes to stderr
```
### System requirements
* Rust 1.70 or higher installed.
* Cargo (comes with Rust installation).
### Set up your environment
First, let's install Rust if you haven't already. You can install Rust from [rust-lang.org](https://www.rust-lang.org/tools/install):
```bash macOS/Linux theme={null}
curl --proto '=https' --tlsv1.2 -sSf https://sh.rustup.rs | sh
```
```powershell Windows theme={null}
# Download and run rustup-init.exe from https://rustup.rs/
```
Verify your Rust installation:
```bash theme={null}
rustc --version
cargo --version
```
Now, let's create and set up our project:
```bash macOS/Linux theme={null}
# Create a new Rust project
cargo new weather
cd weather
```
```powershell Windows theme={null}
# Create a new Rust project
cargo new weather
cd weather
```
Update your `Cargo.toml` to add the required dependencies:
```toml Cargo.toml theme={null}
[package]
name = "weather"
version = "0.1.0"
edition = "2024"
[dependencies]
rmcp = { version = "0.3", features = ["server", "macros", "transport-io"] }
tokio = { version = "1.46", features = ["full"] }
reqwest = { version = "0.12", features = ["json"] }
serde = { version = "1.0", features = ["derive"] }
serde_json = "1.0"
anyhow = "1.0"
tracing = "0.1"
tracing-subscriber = { version = "0.3", features = ["env-filter", "std", "fmt"] }
```
Now let's dive into building your server.
## Building your server
### Importing packages and constants
Open `src/main.rs` and add these imports and constants at the top:
```rust theme={null}
use anyhow::Result;
use rmcp::{
ServerHandler, ServiceExt,
handler::server::{router::tool::ToolRouter, tool::Parameters},
model::*,
schemars, tool, tool_handler, tool_router,
};
use serde::Deserialize;
use serde::de::DeserializeOwned;
const NWS_API_BASE: &str = "https://api.weather.gov";
const USER_AGENT: &str = "weather-app/1.0";
```
The `rmcp` crate provides the Model Context Protocol SDK for Rust, with features for server implementation, procedural macros, and stdio transport.
### Data structures
Next, let's define the data structures for deserializing responses from the National Weather Service API:
```rust theme={null}
#[derive(Debug, Deserialize)]
struct AlertsResponse {
features: Vec,
}
#[derive(Debug, Deserialize)]
struct AlertFeature {
properties: AlertProperties,
}
#[derive(Debug, Deserialize)]
struct AlertProperties {
event: Option,
#[serde(rename = "areaDesc")]
area_desc: Option,
severity: Option,
description: Option,
instruction: Option,
}
#[derive(Debug, Deserialize)]
struct PointsResponse {
properties: PointsProperties,
}
#[derive(Debug, Deserialize)]
struct PointsProperties {
forecast: String,
}
#[derive(Debug, Deserialize)]
struct ForecastResponse {
properties: ForecastProperties,
}
#[derive(Debug, Deserialize)]
struct ForecastProperties {
periods: Vec,
}
#[derive(Debug, Deserialize)]
struct ForecastPeriod {
name: String,
temperature: i32,
#[serde(rename = "temperatureUnit")]
temperature_unit: String,
#[serde(rename = "windSpeed")]
wind_speed: String,
#[serde(rename = "windDirection")]
wind_direction: String,
#[serde(rename = "detailedForecast")]
detailed_forecast: String,
}
```
Now define the request types that MCP clients will send:
```rust theme={null}
#[derive(serde::Deserialize, schemars::JsonSchema)]
pub struct MCPForecastRequest {
latitude: f32,
longitude: f32,
}
#[derive(serde::Deserialize, schemars::JsonSchema)]
pub struct MCPAlertRequest {
state: String,
}
```
### Helper functions
Add helper functions for making API requests and formatting responses:
```rust theme={null}
async fn make_nws_request(url: &str) -> Result {
let client = reqwest::Client::new();
let rsp = client
.get(url)
.header(reqwest::header::USER_AGENT, USER_AGENT)
.header(reqwest::header::ACCEPT, "application/geo+json")
.send()
.await?
.error_for_status()?;
Ok(rsp.json::().await?)
}
fn format_alert(feature: &AlertFeature) -> String {
let props = &feature.properties;
format!(
"Event: {}\nArea: {}\nSeverity: {}\nDescription: {}\nInstructions: {}",
props.event.as_deref().unwrap_or("Unknown"),
props.area_desc.as_deref().unwrap_or("Unknown"),
props.severity.as_deref().unwrap_or("Unknown"),
props
.description
.as_deref()
.unwrap_or("No description available"),
props
.instruction
.as_deref()
.unwrap_or("No specific instructions provided")
)
}
fn format_period(period: &ForecastPeriod) -> String {
format!(
"{}:\nTemperature: {}°{}\nWind: {} {}\nForecast: {}",
period.name,
period.temperature,
period.temperature_unit,
period.wind_speed,
period.wind_direction,
period.detailed_forecast
)
}
```
### Implementing the Weather server and tools
Now let's implement the main Weather server struct with the tool handlers:
```rust theme={null}
pub struct Weather {
tool_router: ToolRouter,
}
#[tool_router]
impl Weather {
fn new() -> Self {
Self {
tool_router: Self::tool_router(),
}
}
#[tool(description = "Get weather alerts for a US state.")]
async fn get_alerts(
&self,
Parameters(MCPAlertRequest { state }): Parameters,
) -> String {
let url = format!(
"{}/alerts/active/area/{}",
NWS_API_BASE,
state.to_uppercase()
);
match make_nws_request::(&url).await {
Ok(data) => {
if data.features.is_empty() {
"No active alerts for this state.".to_string()
} else {
data.features
.iter()
.map(format_alert)
.collect::>()
.join("\n---\n")
}
}
Err(_) => "Unable to fetch alerts or no alerts found.".to_string(),
}
}
#[tool(description = "Get weather forecast for a location.")]
async fn get_forecast(
&self,
Parameters(MCPForecastRequest {
latitude,
longitude,
}): Parameters,
) -> String {
let points_url = format!("{NWS_API_BASE}/points/{latitude},{longitude}");
let Ok(points_data) = make_nws_request::(&points_url).await else {
return "Unable to fetch forecast data for this location.".to_string();
};
let forecast_url = points_data.properties.forecast;
let Ok(forecast_data) = make_nws_request::(&forecast_url).await else {
return "Unable to fetch forecast data for this location.".to_string();
};
let periods = &forecast_data.properties.periods;
let forecast_summary: String = periods
.iter()
.take(5) // Next 5 periods only
.map(format_period)
.collect::>()
.join("\n---\n");
forecast_summary
}
}
```
The `#[tool_router]` macro automatically generates the routing logic, and the `#[tool]` attribute marks methods as MCP tools.
### Implementing the ServerHandler
Implement the `ServerHandler` trait to define server capabilities:
```rust theme={null}
#[tool_handler]
impl ServerHandler for Weather {
fn get_info(&self) -> ServerInfo {
ServerInfo {
capabilities: ServerCapabilities::builder().enable_tools().build(),
..Default::default()
}
}
}
```
### Running the server
Finally, implement the main function to run the server with stdio transport:
```rust theme={null}
#[tokio::main]
async fn main() -> Result<()> {
let transport = (tokio::io::stdin(), tokio::io::stdout());
let service = Weather::new().serve(transport).await?;
service.waiting().await?;
Ok(())
}
```
Build your server with:
```bash theme={null}
cargo build --release
```
The compiled binary will be in `target/release/weather`.
Let's now test your server from an existing MCP host, Claude for Desktop.
## Testing your server with Claude for Desktop
Claude for Desktop is not yet available on Linux. Linux users can proceed to the [Building a client](/docs/develop/build-client) tutorial to build an MCP client that connects to the server we just built.
First, make sure you have Claude for Desktop installed. [You can install the latest version here.](https://claude.ai/download) If you already have Claude for Desktop, **make sure it's updated to the latest version.**
We'll need to configure Claude for Desktop for whichever MCP servers you want to use. To do this, open your Claude for Desktop App configuration at `~/Library/Application Support/Claude/claude_desktop_config.json` in a text editor. Make sure to create the file if it doesn't exist.
For example, if you have [VS Code](https://code.visualstudio.com/) installed:
```bash macOS/Linux theme={null}
code ~/Library/Application\ Support/Claude/claude_desktop_config.json
```
```powershell Windows theme={null}
code $env:AppData\Claude\claude_desktop_config.json
```
You'll then add your servers in the `mcpServers` key. The MCP UI elements will only show up in Claude for Desktop if at least one server is properly configured.
In this case, we'll add our single weather server like so:
```json macOS/Linux theme={null}
{
"mcpServers": {
"weather": {
"command": "/ABSOLUTE/PATH/TO/PARENT/FOLDER/weather/target/release/weather"
}
}
}
```
```json Windows theme={null}
{
"mcpServers": {
"weather": {
"command": "C:\\ABSOLUTE\\PATH\\TO\\PARENT\\FOLDER\\weather\\target\\release\\weather.exe"
}
}
}
```
Make sure you pass in the absolute path to your compiled binary. You can get this by running `pwd` on macOS/Linux or `cd` on Windows Command Prompt from your project directory. On Windows, remember to use double backslashes (`\\`) or forward slashes (`/`) in the JSON path, and add the `.exe` extension.
This tells Claude for Desktop:
1. There's an MCP server named "weather"
2. Launch it by running the compiled binary at the specified path
Save the file, and restart **Claude for Desktop**.
### Test with commands
Let's make sure Claude for Desktop is picking up the two tools we've exposed in our `weather` server. You can do this by looking for the "Add files, connectors, and more /"
Servers can connect to any client. We've chosen Claude for Desktop here for simplicity, but we also have guides on [building your own client](/docs/develop/build-client) as well as a [list of other clients here](/clients).
### Core MCP Concepts
MCP servers can provide three main types of capabilities:
1. **[Resources](/docs/learn/server-concepts#resources)**: File-like data that can be read by clients (like API responses or file contents)
2. **[Tools](/docs/learn/server-concepts#tools)**: Functions that can be called by the LLM (with user approval)
3. **[Prompts](/docs/learn/server-concepts#prompts)**: Pre-written templates that help users accomplish specific tasks
This tutorial will primarily focus on tools.
Let's get started with building our weather server! [You can find the complete code for what we'll be building here.](https://github.com/modelcontextprotocol/quickstart-resources/tree/main/weather-server-python)
### Prerequisite knowledge
This quickstart assumes you have familiarity with:
* Python
* LLMs like Claude
### Logging in MCP Servers
When implementing MCP servers, be careful about how you handle logging:
**For STDIO-based servers:** Never write to stdout. Writing to stdout will corrupt the JSON-RPC messages and break your server. The `print()` function writes to stdout by default, but can be used safely with `file=sys.stderr`.
**For HTTP-based servers:** Standard output logging is fine since it doesn't interfere with HTTP responses.
### Best Practices
* Use a logging library that writes to stderr or files.
### Quick Examples
```python theme={null}
import sys
import logging
# ❌ Bad (STDIO)
print("Processing request")
# ✅ Good (STDIO)
print("Processing request", file=sys.stderr)
# ✅ Good (STDIO)
logging.info("Processing request")
```
### System requirements
* Python 3.10 or higher installed.
* You must use the Python MCP SDK 1.2.0 or higher.
### Set up your environment
First, let's install `uv` and set up our Python project and environment:
```bash macOS/Linux theme={null}
curl -LsSf https://astral.sh/uv/install.sh | sh
```
```powershell Windows theme={null}
powershell -ExecutionPolicy ByPass -c "irm https://astral.sh/uv/install.ps1 | iex"
```
Make sure to restart your terminal afterwards to ensure that the `uv` command gets picked up.
Now, let's create and set up our project:
```bash macOS/Linux theme={null}
# Create a new directory for our project
uv init weather
cd weather
# Create virtual environment and activate it
uv venv
source .venv/bin/activate
# Install dependencies
uv add "mcp[cli]" httpx
# Create our server file
touch weather.py
```
```powershell Windows theme={null}
# Create a new directory for our project
uv init weather
cd weather
# Create virtual environment and activate it
uv venv
.venv\Scripts\activate
# Install dependencies
uv add mcp[cli] httpx
# Create our server file
new-item weather.py
```
Now let's dive into building your server.
## Building your server
### Importing packages and setting up the instance
Add these to the top of your `weather.py`:
```python theme={null}
from typing import Any
import httpx
from mcp.server.fastmcp import FastMCP
# Initialize FastMCP server
mcp = FastMCP("weather")
# Constants
NWS_API_BASE = "https://api.weather.gov"
USER_AGENT = "weather-app/1.0"
```
The FastMCP class uses Python type hints and docstrings to automatically generate tool definitions, making it easy to create and maintain MCP tools.
### Helper functions
Next, let's add our helper functions for querying and formatting the data from the National Weather Service API:
```python theme={null}
async def make_nws_request(url: str) -> dict[str, Any] | None:
"""Make a request to the NWS API with proper error handling."""
headers = {"User-Agent": USER_AGENT, "Accept": "application/geo+json"}
async with httpx.AsyncClient() as client:
try:
response = await client.get(url, headers=headers, timeout=30.0)
response.raise_for_status()
return response.json()
except Exception:
return None
def format_alert(feature: dict) -> str:
"""Format an alert feature into a readable string."""
props = feature["properties"]
return f"""
Event: {props.get("event", "Unknown")}
Area: {props.get("areaDesc", "Unknown")}
Severity: {props.get("severity", "Unknown")}
Description: {props.get("description", "No description available")}
Instructions: {props.get("instruction", "No specific instructions provided")}
"""
```
### Implementing tool execution
The tool execution handler is responsible for actually executing the logic of each tool. Let's add it:
```python theme={null}
@mcp.tool()
async def get_alerts(state: str) -> str:
"""Get weather alerts for a US state.
Args:
state: Two-letter US state code (e.g. CA, NY)
"""
url = f"{NWS_API_BASE}/alerts/active/area/{state}"
data = await make_nws_request(url)
if not data or "features" not in data:
return "Unable to fetch alerts or no alerts found."
if not data["features"]:
return "No active alerts for this state."
alerts = [format_alert(feature) for feature in data["features"]]
return "\n---\n".join(alerts)
@mcp.tool()
async def get_forecast(latitude: float, longitude: float) -> str:
"""Get weather forecast for a location.
Args:
latitude: Latitude of the location
longitude: Longitude of the location
"""
# First get the forecast grid endpoint
points_url = f"{NWS_API_BASE}/points/{latitude},{longitude}"
points_data = await make_nws_request(points_url)
if not points_data:
return "Unable to fetch forecast data for this location."
# Get the forecast URL from the points response
forecast_url = points_data["properties"]["forecast"]
forecast_data = await make_nws_request(forecast_url)
if not forecast_data:
return "Unable to fetch detailed forecast."
# Format the periods into a readable forecast
periods = forecast_data["properties"]["periods"]
forecasts = []
for period in periods[:5]: # Only show next 5 periods
forecast = f"""
{period["name"]}:
Temperature: {period["temperature"]}°{period["temperatureUnit"]}
Wind: {period["windSpeed"]} {period["windDirection"]}
Forecast: {period["detailedForecast"]}
"""
forecasts.append(forecast)
return "\n---\n".join(forecasts)
```
### Running the server
Finally, let's initialize and run the server:
```python theme={null}
def main():
# Initialize and run the server
mcp.run(transport="stdio")
if __name__ == "__main__":
main()
```
Your server is complete! Run `uv run weather.py` to start the MCP server, which will listen for messages from MCP hosts.
Let's now test your server from an existing MCP host, Claude for Desktop.
## Testing your server with Claude for Desktop
Claude for Desktop is not yet available on Linux. Linux users can proceed to the [Building a client](/docs/develop/build-client) tutorial to build an MCP client that connects to the server we just built.
First, make sure you have Claude for Desktop installed. [You can install the latest version
here.](https://claude.ai/download) If you already have Claude for Desktop, **make sure it's updated to the latest version.**
We'll need to configure Claude for Desktop for whichever MCP servers you want to use. To do this, open your Claude for Desktop App configuration at `~/Library/Application Support/Claude/claude_desktop_config.json` in a text editor. Make sure to create the file if it doesn't exist.
For example, if you have [VS Code](https://code.visualstudio.com/) installed:
```bash macOS/Linux theme={null}
code ~/Library/Application\ Support/Claude/claude_desktop_config.json
```
```powershell Windows theme={null}
code $env:AppData\Claude\claude_desktop_config.json
```
You'll then add your servers in the `mcpServers` key. The MCP UI elements will only show up in Claude for Desktop if at least one server is properly configured.
In this case, we'll add our single weather server like so:
```json macOS/Linux theme={null}
{
"mcpServers": {
"weather": {
"command": "uv",
"args": [
"--directory",
"/ABSOLUTE/PATH/TO/PARENT/FOLDER/weather",
"run",
"weather.py"
]
}
}
}
```
```json Windows theme={null}
{
"mcpServers": {
"weather": {
"command": "uv",
"args": [
"--directory",
"C:\\ABSOLUTE\\PATH\\TO\\PARENT\\FOLDER\\weather",
"run",
"weather.py"
]
}
}
}
```
You may need to put the full path to the `uv` executable in the `command` field. You can get this by running `which uv` on macOS/Linux or `where uv` on Windows.
Make sure you pass in the absolute path to your server. You can get this by running `pwd` on macOS/Linux or `cd` on Windows Command Prompt. On Windows, remember to use double backslashes (`\\`) or forward slashes (`/`) in the JSON path.
This tells Claude for Desktop:
1. There's an MCP server named "weather"
2. To launch it by running `uv --directory /ABSOLUTE/PATH/TO/PARENT/FOLDER/weather run weather.py`
Save the file, and restart **Claude for Desktop**.
Let's get started with building our weather server! [You can find the complete code for what we'll be building here.](https://github.com/modelcontextprotocol/quickstart-resources/tree/main/weather-server-typescript)
### Prerequisite knowledge
This quickstart assumes you have familiarity with:
* TypeScript
* LLMs like Claude
### Logging in MCP Servers
When implementing MCP servers, be careful about how you handle logging:
**For STDIO-based servers:** Never use `console.log()`, as it writes to standard output (stdout) by default. Writing to stdout will corrupt the JSON-RPC messages and break your server.
**For HTTP-based servers:** Standard output logging is fine since it doesn't interfere with HTTP responses.
### Best Practices
* Use `console.error()` which writes to stderr, or use a logging library that writes to stderr or files.
### Quick Examples
```javascript theme={null}
// ❌ Bad (STDIO)
console.log("Server started");
// ✅ Good (STDIO)
console.error("Server started"); // stderr is safe
```
### System requirements
For TypeScript, make sure you have the latest version of Node installed.
### Set up your environment
First, let's install Node.js and npm if you haven't already. You can download them from [nodejs.org](https://nodejs.org/).
Verify your Node.js installation:
```bash theme={null}
node --version
npm --version
```
For this tutorial, you'll need Node.js version 16 or higher.
Now, let's create and set up our project:
```bash macOS/Linux theme={null}
# Create a new directory for our project
mkdir weather
cd weather
# Initialize a new npm project
npm init -y
# Install dependencies
npm install @modelcontextprotocol/sdk zod@3
npm install -D @types/node typescript
# Create our files
mkdir src
touch src/index.ts
```
```powershell Windows theme={null}
# Create a new directory for our project
md weather
cd weather
# Initialize a new npm project
npm init -y
# Install dependencies
npm install @modelcontextprotocol/sdk zod@3
npm install -D @types/node typescript
# Create our files
md src
new-item src\index.ts
```
Update your package.json to add type: "module" and a build script:
```json package.json theme={null}
{
"type": "module",
"bin": {
"weather": "./build/index.js"
},
"scripts": {
"build": "tsc && chmod 755 build/index.js"
},
"files": ["build"]
}
```
Create a `tsconfig.json` in the root of your project:
```json tsconfig.json theme={null}
{
"compilerOptions": {
"target": "ES2022",
"module": "Node16",
"moduleResolution": "Node16",
"outDir": "./build",
"rootDir": "./src",
"strict": true,
"esModuleInterop": true,
"skipLibCheck": true,
"forceConsistentCasingInFileNames": true
},
"include": ["src/**/*"],
"exclude": ["node_modules"]
}
```
Now let's dive into building your server.
## Building your server
### Importing packages and setting up the instance
Add these to the top of your `src/index.ts`:
```typescript theme={null}
import { McpServer } from "@modelcontextprotocol/sdk/server/mcp.js";
import { StdioServerTransport } from "@modelcontextprotocol/sdk/server/stdio.js";
import { z } from "zod";
const NWS_API_BASE = "https://api.weather.gov";
const USER_AGENT = "weather-app/1.0";
// Create server instance
const server = new McpServer({
name: "weather",
version: "1.0.0",
});
```
### Helper functions
Next, let's add our helper functions for querying and formatting the data from the National Weather Service API:
```typescript theme={null}
// Helper function for making NWS API requests
async function makeNWSRequest(url: string): Promise {
const headers = {
"User-Agent": USER_AGENT,
Accept: "application/geo+json",
};
try {
const response = await fetch(url, { headers });
if (!response.ok) {
throw new Error(`HTTP error! status: ${response.status}`);
}
return (await response.json()) as T;
} catch (error) {
console.error("Error making NWS request:", error);
return null;
}
}
interface AlertFeature {
properties: {
event?: string;
areaDesc?: string;
severity?: string;
status?: string;
headline?: string;
};
}
// Format alert data
function formatAlert(feature: AlertFeature): string {
const props = feature.properties;
return [
`Event: ${props.event || "Unknown"}`,
`Area: ${props.areaDesc || "Unknown"}`,
`Severity: ${props.severity || "Unknown"}`,
`Status: ${props.status || "Unknown"}`,
`Headline: ${props.headline || "No headline"}`,
"---",
].join("\n");
}
interface ForecastPeriod {
name?: string;
temperature?: number;
temperatureUnit?: string;
windSpeed?: string;
windDirection?: string;
shortForecast?: string;
}
interface AlertsResponse {
features: AlertFeature[];
}
interface PointsResponse {
properties: {
forecast?: string;
};
}
interface ForecastResponse {
properties: {
periods: ForecastPeriod[];
};
}
```
### Implementing tool execution
The tool execution handler is responsible for actually executing the logic of each tool. Let's add it:
```typescript theme={null}
// Register weather tools
server.registerTool(
"get_alerts",
{
description: "Get weather alerts for a state",
inputSchema: {
state: z
.string()
.length(2)
.describe("Two-letter state code (e.g. CA, NY)"),
},
},
async ({ state }) => {
const stateCode = state.toUpperCase();
const alertsUrl = `${NWS_API_BASE}/alerts?area=${stateCode}`;
const alertsData = await makeNWSRequest(alertsUrl);
if (!alertsData) {
return {
content: [
{
type: "text",
text: "Failed to retrieve alerts data",
},
],
};
}
const features = alertsData.features || [];
if (features.length === 0) {
return {
content: [
{
type: "text",
text: `No active alerts for ${stateCode}`,
},
],
};
}
const formattedAlerts = features.map(formatAlert);
const alertsText = `Active alerts for ${stateCode}:\n\n${formattedAlerts.join("\n")}`;
return {
content: [
{
type: "text",
text: alertsText,
},
],
};
},
);
server.registerTool(
"get_forecast",
{
description: "Get weather forecast for a location",
inputSchema: {
latitude: z
.number()
.min(-90)
.max(90)
.describe("Latitude of the location"),
longitude: z
.number()
.min(-180)
.max(180)
.describe("Longitude of the location"),
},
},
async ({ latitude, longitude }) => {
// Get grid point data
const pointsUrl = `${NWS_API_BASE}/points/${latitude.toFixed(4)},${longitude.toFixed(4)}`;
const pointsData = await makeNWSRequest(pointsUrl);
if (!pointsData) {
return {
content: [
{
type: "text",
text: `Failed to retrieve grid point data for coordinates: ${latitude}, ${longitude}. This location may not be supported by the NWS API (only US locations are supported).`,
},
],
};
}
const forecastUrl = pointsData.properties?.forecast;
if (!forecastUrl) {
return {
content: [
{
type: "text",
text: "Failed to get forecast URL from grid point data",
},
],
};
}
// Get forecast data
const forecastData = await makeNWSRequest(forecastUrl);
if (!forecastData) {
return {
content: [
{
type: "text",
text: "Failed to retrieve forecast data",
},
],
};
}
const periods = forecastData.properties?.periods || [];
if (periods.length === 0) {
return {
content: [
{
type: "text",
text: "No forecast periods available",
},
],
};
}
// Format forecast periods
const formattedForecast = periods.map((period: ForecastPeriod) =>
[
`${period.name || "Unknown"}:`,
`Temperature: ${period.temperature || "Unknown"}°${period.temperatureUnit || "F"}`,
`Wind: ${period.windSpeed || "Unknown"} ${period.windDirection || ""}`,
`${period.shortForecast || "No forecast available"}`,
"---",
].join("\n"),
);
const forecastText = `Forecast for ${latitude}, ${longitude}:\n\n${formattedForecast.join("\n")}`;
return {
content: [
{
type: "text",
text: forecastText,
},
],
};
},
);
```
### Running the server
Finally, implement the main function to run the server:
```typescript theme={null}
async function main() {
const transport = new StdioServerTransport();
await server.connect(transport);
console.error("Weather MCP Server running on stdio");
}
main().catch((error) => {
console.error("Fatal error in main():", error);
process.exit(1);
});
```
Make sure to run `npm run build` to build your server! This is a very important step in getting your server to connect.
Let's now test your server from an existing MCP host, Claude for Desktop.
## Testing your server with Claude for Desktop
Claude for Desktop is not yet available on Linux. Linux users can proceed to the [Building a client](/docs/develop/build-client) tutorial to build an MCP client that connects to the server we just built.
First, make sure you have Claude for Desktop installed. [You can install the latest version
here.](https://claude.ai/download) If you already have Claude for Desktop, **make sure it's updated to the latest version.**
We'll need to configure Claude for Desktop for whichever MCP servers you want to use. To do this, open your Claude for Desktop App configuration at `~/Library/Application Support/Claude/claude_desktop_config.json` in a text editor. Make sure to create the file if it doesn't exist.
For example, if you have [VS Code](https://code.visualstudio.com/) installed:
```bash macOS/Linux theme={null}
code ~/Library/Application\ Support/Claude/claude_desktop_config.json
```
```powershell Windows theme={null}
code $env:AppData\Claude\claude_desktop_config.json
```
You'll then add your servers in the `mcpServers` key. The MCP UI elements will only show up in Claude for Desktop if at least one server is properly configured.
In this case, we'll add our single weather server like so:
```json macOS/Linux theme={null}
{
"mcpServers": {
"weather": {
"command": "node",
"args": ["/ABSOLUTE/PATH/TO/PARENT/FOLDER/weather/build/index.js"]
}
}
}
```
```json Windows theme={null}
{
"mcpServers": {
"weather": {
"command": "node",
"args": ["C:\\PATH\\TO\\PARENT\\FOLDER\\weather\\build\\index.js"]
}
}
}
```
This tells Claude for Desktop:
1. There's an MCP server named "weather"
2. Launch it by running `node /ABSOLUTE/PATH/TO/PARENT/FOLDER/weather/build/index.js`
Save the file, and restart **Claude for Desktop**.
This is a quickstart demo based on Spring AI MCP auto-configuration and boot starters.
To learn how to create sync and async MCP Servers, manually, consult the [Java SDK Server](/sdk/java/mcp-server) documentation.
Let's get started with building our weather server!
[You can find the complete code for what we'll be building here.](https://github.com/spring-projects/spring-ai-examples/tree/main/model-context-protocol/weather/starter-stdio-server)
For more information, see the [MCP Server Boot Starter](https://docs.spring.io/spring-ai/reference/api/mcp/mcp-server-boot-starter-docs.html) reference documentation.
For manual MCP Server implementation, refer to the [MCP Server Java SDK documentation](/sdk/java/mcp-server).
### Logging in MCP Servers
When implementing MCP servers, be careful about how you handle logging:
**For STDIO-based servers:** Never use `System.out.println()` or `System.out.print()`, as they write to standard output (stdout). Writing to stdout will corrupt the JSON-RPC messages and break your server.
**For HTTP-based servers:** Standard output logging is fine since it doesn't interfere with HTTP responses.
### Best Practices
* Use a logging library that writes to stderr or files.
* Ensure any configured logging library will not write to stdout.
### System requirements
* Java 17 or higher installed.
* [Spring Boot 3.3.x](https://docs.spring.io/spring-boot/installing.html) or higher
### Set up your environment
Use the [Spring Initializer](https://start.spring.io/) to bootstrap the project.
You will need to add the following dependencies:
```xml Maven theme={null}
org.springframework.ai
spring-ai-starter-mcp-server
org.springframework
spring-web
```
```groovy Gradle theme={null}
dependencies {
implementation platform("org.springframework.ai:spring-ai-starter-mcp-server")
implementation platform("org.springframework:spring-web")
}
```
Then configure your application by setting the application properties:
```bash application.properties theme={null}
spring.main.bannerMode=off
logging.pattern.console=
```
```yaml application.yml theme={null}
logging:
pattern:
console:
spring:
main:
banner-mode: off
```
The [Server Configuration Properties](https://docs.spring.io/spring-ai/reference/api/mcp/mcp-server-boot-starter-docs.html#_configuration_properties) documents all available properties.
Now let's dive into building your server.
## Building your server
### Weather Service
Let's implement a [WeatherService.java](https://github.com/spring-projects/spring-ai-examples/blob/main/model-context-protocol/weather/starter-stdio-server/src/main/java/org/springframework/ai/mcp/sample/server/WeatherService.java) that uses a REST client to query the data from the National Weather Service API:
```java theme={null}
@Service
public class WeatherService {
private final RestClient restClient;
public WeatherService() {
this.restClient = RestClient.builder()
.baseUrl("https://api.weather.gov")
.defaultHeader("Accept", "application/geo+json")
.defaultHeader("User-Agent", "WeatherApiClient/1.0 (your@email.com)")
.build();
}
@Tool(description = "Get weather forecast for a specific latitude/longitude")
public String getWeatherForecastByLocation(
double latitude, // Latitude coordinate
double longitude // Longitude coordinate
) {
// Returns detailed forecast including:
// - Temperature and unit
// - Wind speed and direction
// - Detailed forecast description
}
@Tool(description = "Get weather alerts for a US state")
public String getAlerts(
@ToolParam(description = "Two-letter US state code (e.g. CA, NY)") String state
) {
// Returns active alerts including:
// - Event type
// - Affected area
// - Severity
// - Description
// - Safety instructions
}
// ......
}
```
The `@Service` annotation will auto-register the service in your application context.
The Spring AI `@Tool` annotation makes it easy to create and maintain MCP tools.
The auto-configuration will automatically register these tools with the MCP server.
### Create your Boot Application
```java theme={null}
@SpringBootApplication
public class McpServerApplication {
public static void main(String[] args) {
SpringApplication.run(McpServerApplication.class, args);
}
@Bean
public ToolCallbackProvider weatherTools(WeatherService weatherService) {
return MethodToolCallbackProvider.builder().toolObjects(weatherService).build();
}
}
```
Uses the `MethodToolCallbackProvider` utils to convert the `@Tools` into actionable callbacks used by the MCP server.
### Running the server
Finally, let's build the server:
```bash theme={null}
./mvnw clean install
```
This will generate an `mcp-weather-stdio-server-0.0.1-SNAPSHOT.jar` file within the `target` folder.
Let's now test your server from an existing MCP host, Claude for Desktop.
## Testing your server with Claude for Desktop
Claude for Desktop is not yet available on Linux.
First, make sure you have Claude for Desktop installed.
[You can install the latest version here.](https://claude.ai/download) If you already have Claude for Desktop, **make sure it's updated to the latest version.**
We'll need to configure Claude for Desktop for whichever MCP servers you want to use.
To do this, open your Claude for Desktop App configuration at `~/Library/Application Support/Claude/claude_desktop_config.json` in a text editor.
Make sure to create the file if it doesn't exist.
For example, if you have [VS Code](https://code.visualstudio.com/) installed:
```bash macOS/Linux theme={null}
code ~/Library/Application\ Support/Claude/claude_desktop_config.json
```
```powershell Windows theme={null}
code $env:AppData\Claude\claude_desktop_config.json
```
You'll then add your servers in the `mcpServers` key.
The MCP UI elements will only show up in Claude for Desktop if at least one server is properly configured.
In this case, we'll add our single weather server like so:
```json macOS/Linux theme={null}
{
"mcpServers": {
"spring-ai-mcp-weather": {
"command": "java",
"args": [
"-Dspring.ai.mcp.server.stdio=true",
"-jar",
"/ABSOLUTE/PATH/TO/PARENT/FOLDER/mcp-weather-stdio-server-0.0.1-SNAPSHOT.jar"
]
}
}
}
```
```json Windows theme={null}
{
"mcpServers": {
"spring-ai-mcp-weather": {
"command": "java",
"args": [
"-Dspring.ai.mcp.server.transport=STDIO",
"-jar",
"C:\\ABSOLUTE\\PATH\\TO\\PARENT\\FOLDER\\weather\\mcp-weather-stdio-server-0.0.1-SNAPSHOT.jar"
]
}
}
}
```
Make sure you pass in the absolute path to your server.
This tells Claude for Desktop:
1. There's an MCP server named "my-weather-server"
2. To launch it by running `java -jar /ABSOLUTE/PATH/TO/PARENT/FOLDER/mcp-weather-stdio-server-0.0.1-SNAPSHOT.jar`
Save the file, and restart **Claude for Desktop**.
## Testing your server with Java client
### Create an MCP Client manually
Use the `McpClient` to connect to the server:
```java theme={null}
var stdioParams = ServerParameters.builder("java")
.args("-jar", "/ABSOLUTE/PATH/TO/PARENT/FOLDER/mcp-weather-stdio-server-0.0.1-SNAPSHOT.jar")
.build();
var stdioTransport = new StdioClientTransport(stdioParams);
var mcpClient = McpClient.sync(stdioTransport).build();
mcpClient.initialize();
ListToolsResult toolsList = mcpClient.listTools();
CallToolResult weather = mcpClient.callTool(
new CallToolRequest("getWeatherForecastByLocation",
Map.of("latitude", "47.6062", "longitude", "-122.3321")));
CallToolResult alert = mcpClient.callTool(
new CallToolRequest("getAlerts", Map.of("state", "NY")));
mcpClient.closeGracefully();
```
### Use MCP Client Boot Starter
Create a new boot starter application using the `spring-ai-starter-mcp-client` dependency:
```xml theme={null}
org.springframework.ai
spring-ai-starter-mcp-client
```
and set the `spring.ai.mcp.client.stdio.servers-configuration` property to point to your `claude_desktop_config.json`.
You can reuse the existing Anthropic Desktop configuration:
```properties theme={null}
spring.ai.mcp.client.stdio.servers-configuration=file:PATH/TO/claude_desktop_config.json
```
When you start your client application, the auto-configuration will automatically create MCP clients from the claude\_desktop\_config.json.
For more information, see the [MCP Client Boot Starters](https://docs.spring.io/spring-ai/reference/api/mcp/mcp-server-boot-client-docs.html) reference documentation.
## More Java MCP Server examples
The [starter-webflux-server](https://github.com/spring-projects/spring-ai-examples/tree/main/model-context-protocol/weather/starter-webflux-server) demonstrates how to create an MCP server using SSE transport.
It showcases how to define and register MCP Tools, Resources, and Prompts, using the Spring Boot's auto-configuration capabilities.
Let's get started with building our weather server! [You can find the complete code for what we'll be building here.](https://github.com/modelcontextprotocol/kotlin-sdk/tree/main/samples/weather-stdio-server)
### Prerequisite knowledge
This quickstart assumes you have familiarity with:
* Kotlin
* LLMs like Claude
### Logging in MCP Servers
When implementing MCP servers, be careful about how you handle logging:
**For STDIO-based servers:** Never use `println()`, as it writes to standard output (stdout) by default. Writing to stdout will corrupt the JSON-RPC messages and break your server.
**For HTTP-based servers:** Standard output logging is fine since it doesn't interfere with HTTP responses.
### Best Practices
* Use a logging library that writes to stderr or files.
### System requirements
* Java 17 or higher installed.
### Set up your environment
First, let's install `java` and `gradle` if you haven't already.
You can download `java` from [official Oracle JDK website](https://www.oracle.com/java/technologies/downloads/).
Verify your `java` installation:
```bash theme={null}
java --version
```
Now, let's create and set up your project:
```bash macOS/Linux theme={null}
# Create a new directory for our project
mkdir weather
cd weather
# Initialize a new kotlin project
gradle init
```
```powershell Windows theme={null}
# Create a new directory for our project
md weather
cd weather
# Initialize a new kotlin project
gradle init
```
After running `gradle init`, you will be presented with options for creating your project.
Select **Application** as the project type, **Kotlin** as the programming language, and **Java 17** as the Java version.
Alternatively, you can create a Kotlin application using the [IntelliJ IDEA project wizard](https://kotlinlang.org/docs/jvm-get-started.html).
After creating the project, add the following dependencies:
```kotlin build.gradle.kts theme={null}
val mcpVersion = "0.4.0"
val slf4jVersion = "2.0.9"
val ktorVersion = "3.1.1"
dependencies {
implementation("io.modelcontextprotocol:kotlin-sdk:$mcpVersion")
implementation("org.slf4j:slf4j-nop:$slf4jVersion")
implementation("io.ktor:ktor-client-content-negotiation:$ktorVersion")
implementation("io.ktor:ktor-serialization-kotlinx-json:$ktorVersion")
}
```
```groovy build.gradle theme={null}
def mcpVersion = '0.3.0'
def slf4jVersion = '2.0.9'
def ktorVersion = '3.1.1'
dependencies {
implementation "io.modelcontextprotocol:kotlin-sdk:$mcpVersion"
implementation "org.slf4j:slf4j-nop:$slf4jVersion"
implementation "io.ktor:ktor-client-content-negotiation:$ktorVersion"
implementation "io.ktor:ktor-serialization-kotlinx-json:$ktorVersion"
}
```
Also, add the following plugins to your build script:
```kotlin build.gradle.kts theme={null}
plugins {
kotlin("plugin.serialization") version "your_version_of_kotlin"
id("com.gradleup.shadow") version "8.3.9"
}
```
```groovy build.gradle theme={null}
plugins {
id 'org.jetbrains.kotlin.plugin.serialization' version 'your_version_of_kotlin'
id 'com.gradleup.shadow' version '8.3.9'
}
```
Now let’s dive into building your server.
## Building your server
### Setting up the instance
Add a server initialization function:
```kotlin theme={null}
// Main function to run the MCP server
fun `run mcp server`() {
// Create the MCP Server instance with a basic implementation
val server = Server(
Implementation(
name = "weather", // Tool name is "weather"
version = "1.0.0" // Version of the implementation
),
ServerOptions(
capabilities = ServerCapabilities(tools = ServerCapabilities.Tools(listChanged = true))
)
)
// Create a transport using standard IO for server communication
val transport = StdioServerTransport(
System.`in`.asInput(),
System.out.asSink().buffered()
)
runBlocking {
server.connect(transport)
val done = Job()
server.onClose {
done.complete()
}
done.join()
}
}
```
### Weather API helper functions
Next, let's add functions and data classes for querying and converting responses from the National Weather Service API:
```kotlin theme={null}
// Extension function to fetch forecast information for given latitude and longitude
suspend fun HttpClient.getForecast(latitude: Double, longitude: Double): List {
val points = this.get("/points/$latitude,$longitude").body()
val forecast = this.get(points.properties.forecast).body()
return forecast.properties.periods.map { period ->
"""
${period.name}:
Temperature: ${period.temperature} ${period.temperatureUnit}
Wind: ${period.windSpeed} ${period.windDirection}
Forecast: ${period.detailedForecast}
""".trimIndent()
}
}
// Extension function to fetch weather alerts for a given state
suspend fun HttpClient.getAlerts(state: String): List {
val alerts = this.get("/alerts/active/area/$state").body()
return alerts.features.map { feature ->
"""
Event: ${feature.properties.event}
Area: ${feature.properties.areaDesc}
Severity: ${feature.properties.severity}
Description: ${feature.properties.description}
Instruction: ${feature.properties.instruction}
""".trimIndent()
}
}
@Serializable
data class Points(
val properties: Properties
) {
@Serializable
data class Properties(val forecast: String)
}
@Serializable
data class Forecast(
val properties: Properties
) {
@Serializable
data class Properties(val periods: List)
@Serializable
data class Period(
val number: Int, val name: String, val startTime: String, val endTime: String,
val isDaytime: Boolean, val temperature: Int, val temperatureUnit: String,
val temperatureTrend: String, val probabilityOfPrecipitation: JsonObject,
val windSpeed: String, val windDirection: String,
val shortForecast: String, val detailedForecast: String,
)
}
@Serializable
data class Alert(
val features: List
) {
@Serializable
data class Feature(
val properties: Properties
)
@Serializable
data class Properties(
val event: String, val areaDesc: String, val severity: String,
val description: String, val instruction: String?,
)
}
```
### Implementing tool execution
The tool execution handler is responsible for actually executing the logic of each tool. Let's add it:
```kotlin theme={null}
// Create an HTTP client with a default request configuration and JSON content negotiation
val httpClient = HttpClient {
defaultRequest {
url("https://api.weather.gov")
headers {
append("Accept", "application/geo+json")
append("User-Agent", "WeatherApiClient/1.0")
}
contentType(ContentType.Application.Json)
}
// Install content negotiation plugin for JSON serialization/deserialization
install(ContentNegotiation) { json(Json { ignoreUnknownKeys = true }) }
}
// Register a tool to fetch weather alerts by state
server.addTool(
name = "get_alerts",
description = """
Get weather alerts for a US state. Input is Two-letter US state code (e.g. CA, NY)
""".trimIndent(),
inputSchema = Tool.Input(
properties = buildJsonObject {
putJsonObject("state") {
put("type", "string")
put("description", "Two-letter US state code (e.g. CA, NY)")
}
},
required = listOf("state")
)
) { request ->
val state = request.arguments["state"]?.jsonPrimitive?.content
if (state == null) {
return@addTool CallToolResult(
content = listOf(TextContent("The 'state' parameter is required."))
)
}
val alerts = httpClient.getAlerts(state)
CallToolResult(content = alerts.map { TextContent(it) })
}
// Register a tool to fetch weather forecast by latitude and longitude
server.addTool(
name = "get_forecast",
description = """
Get weather forecast for a specific latitude/longitude
""".trimIndent(),
inputSchema = Tool.Input(
properties = buildJsonObject {
putJsonObject("latitude") { put("type", "number") }
putJsonObject("longitude") { put("type", "number") }
},
required = listOf("latitude", "longitude")
)
) { request ->
val latitude = request.arguments["latitude"]?.jsonPrimitive?.doubleOrNull
val longitude = request.arguments["longitude"]?.jsonPrimitive?.doubleOrNull
if (latitude == null || longitude == null) {
return@addTool CallToolResult(
content = listOf(TextContent("The 'latitude' and 'longitude' parameters are required."))
)
}
val forecast = httpClient.getForecast(latitude, longitude)
CallToolResult(content = forecast.map { TextContent(it) })
}
```
### Running the server
Finally, implement the main function to run the server:
```kotlin theme={null}
fun main() = `run mcp server`()
```
Make sure to run `./gradlew build` to build your server. This is a very important step in getting your server to connect.
Let's now test your server from an existing MCP host, Claude for Desktop.
## Testing your server with Claude for Desktop
Claude for Desktop is not yet available on Linux. Linux users can proceed to the [Building a client](/docs/develop/build-client) tutorial to build an MCP client that connects to the server we just built.
First, make sure you have Claude for Desktop installed. [You can install the latest version
here.](https://claude.ai/download) If you already have Claude for Desktop, **make sure it's updated to the latest version.**
We'll need to configure Claude for Desktop for whichever MCP servers you want to use.
To do this, open your Claude for Desktop App configuration at `~/Library/Application Support/Claude/claude_desktop_config.json` in a text editor.
Make sure to create the file if it doesn't exist.
For example, if you have [VS Code](https://code.visualstudio.com/) installed:
```bash macOS/Linux theme={null}
code ~/Library/Application\ Support/Claude/claude_desktop_config.json
```
```powershell Windows theme={null}
code $env:AppData\Claude\claude_desktop_config.json
```
You'll then add your servers in the `mcpServers` key.
The MCP UI elements will only show up in Claude for Desktop if at least one server is properly configured.
In this case, we'll add our single weather server like so:
```json macOS/Linux theme={null}
{
"mcpServers": {
"weather": {
"command": "java",
"args": [
"-jar",
"/ABSOLUTE/PATH/TO/PARENT/FOLDER/weather/build/libs/weather-0.1.0-all.jar"
]
}
}
}
```
```json Windows theme={null}
{
"mcpServers": {
"weather": {
"command": "java",
"args": [
"-jar",
"C:\\PATH\\TO\\PARENT\\FOLDER\\weather\\build\\libs\\weather-0.1.0-all.jar"
]
}
}
}
```
This tells Claude for Desktop:
1. There's an MCP server named "weather"
2. Launch it by running `java -jar /ABSOLUTE/PATH/TO/PARENT/FOLDER/weather/build/libs/weather-0.1.0-all.jar`
Save the file, and restart **Claude for Desktop**.
Let's get started with building our weather server! [You can find the complete code for what we'll be building here.](https://github.com/modelcontextprotocol/csharp-sdk/tree/main/samples/QuickstartWeatherServer)
### Prerequisite knowledge
This quickstart assumes you have familiarity with:
* C#
* LLMs like Claude
* .NET 8 or higher
### Logging in MCP Servers
When implementing MCP servers, be careful about how you handle logging:
**For STDIO-based servers:** Never use `Console.WriteLine()` or `Console.Write()`, as they write to standard output (stdout). Writing to stdout will corrupt the JSON-RPC messages and break your server.
**For HTTP-based servers:** Standard output logging is fine since it doesn't interfere with HTTP responses.
### Best Practices
* Use a logging library that writes to stderr or files.
### System requirements
* [.NET 8 SDK](https://dotnet.microsoft.com/download/dotnet/8.0) or higher installed.
### Set up your environment
First, let's install `dotnet` if you haven't already. You can download `dotnet` from [official Microsoft .NET website](https://dotnet.microsoft.com/download/). Verify your `dotnet` installation:
```bash theme={null}
dotnet --version
```
Now, let's create and set up your project:
```bash macOS/Linux theme={null}
# Create a new directory for our project
mkdir weather
cd weather
# Initialize a new C# project
dotnet new console
```
```powershell Windows theme={null}
# Create a new directory for our project
mkdir weather
cd weather
# Initialize a new C# project
dotnet new console
```
After running `dotnet new console`, you will be presented with a new C# project.
You can open the project in your favorite IDE, such as [Visual Studio](https://visualstudio.microsoft.com/) or [Rider](https://www.jetbrains.com/rider/).
Alternatively, you can create a C# application using the [Visual Studio project wizard](https://learn.microsoft.com/en-us/visualstudio/get-started/csharp/tutorial-console?view=vs-2022).
After creating the project, add NuGet package for the Model Context Protocol SDK and hosting:
```bash theme={null}
# Add the Model Context Protocol SDK NuGet package
dotnet add package ModelContextProtocol --prerelease
# Add the .NET Hosting NuGet package
dotnet add package Microsoft.Extensions.Hosting
```
Now let’s dive into building your server.
## Building your server
Open the `Program.cs` file in your project and replace its contents with the following code:
```csharp theme={null}
using Microsoft.Extensions.DependencyInjection;
using Microsoft.Extensions.Hosting;
using ModelContextProtocol;
using System.Net.Http.Headers;
var builder = Host.CreateEmptyApplicationBuilder(settings: null);
builder.Services.AddMcpServer()
.WithStdioServerTransport()
.WithToolsFromAssembly();
builder.Services.AddSingleton(_ =>
{
var client = new HttpClient() { BaseAddress = new Uri("https://api.weather.gov") };
client.DefaultRequestHeaders.UserAgent.Add(new ProductInfoHeaderValue("weather-tool", "1.0"));
return client;
});
var app = builder.Build();
await app.RunAsync();
```
When creating the `ApplicationHostBuilder`, ensure you use `CreateEmptyApplicationBuilder` instead of `CreateDefaultBuilder`. This ensures that the server does not write any additional messages to the console. This is only necessary for servers using STDIO transport.
This code sets up a basic console application that uses the Model Context Protocol SDK to create an MCP server with standard I/O transport.
### Weather API helper functions
Create an extension class for `HttpClient` which helps simplify JSON request handling:
```csharp theme={null}
using System.Text.Json;
internal static class HttpClientExt
{
public static async Task ReadJsonDocumentAsync(this HttpClient client, string requestUri)
{
using var response = await client.GetAsync(requestUri);
response.EnsureSuccessStatusCode();
return await JsonDocument.ParseAsync(await response.Content.ReadAsStreamAsync());
}
}
```
Next, define a class with the tool execution handlers for querying and converting responses from the National Weather Service API:
```csharp theme={null}
using ModelContextProtocol.Server;
using System.ComponentModel;
using System.Globalization;
using System.Text.Json;
namespace QuickstartWeatherServer.Tools;
[McpServerToolType]
public static class WeatherTools
{
[McpServerTool, Description("Get weather alerts for a US state code.")]
public static async Task GetAlerts(
HttpClient client,
[Description("The US state code to get alerts for.")] string state)
{
using var jsonDocument = await client.ReadJsonDocumentAsync($"/alerts/active/area/{state}");
var jsonElement = jsonDocument.RootElement;
var alerts = jsonElement.GetProperty("features").EnumerateArray();
if (!alerts.Any())
{
return "No active alerts for this state.";
}
return string.Join("\n--\n", alerts.Select(alert =>
{
JsonElement properties = alert.GetProperty("properties");
return $"""
Event: {properties.GetProperty("event").GetString()}
Area: {properties.GetProperty("areaDesc").GetString()}
Severity: {properties.GetProperty("severity").GetString()}
Description: {properties.GetProperty("description").GetString()}
Instruction: {properties.GetProperty("instruction").GetString()}
""";
}));
}
[McpServerTool, Description("Get weather forecast for a location.")]
public static async Task GetForecast(
HttpClient client,
[Description("Latitude of the location.")] double latitude,
[Description("Longitude of the location.")] double longitude)
{
var pointUrl = string.Create(CultureInfo.InvariantCulture, $"/points/{latitude},{longitude}");
using var jsonDocument = await client.ReadJsonDocumentAsync(pointUrl);
var forecastUrl = jsonDocument.RootElement.GetProperty("properties").GetProperty("forecast").GetString()
?? throw new Exception($"No forecast URL provided by {client.BaseAddress}points/{latitude},{longitude}");
using var forecastDocument = await client.ReadJsonDocumentAsync(forecastUrl);
var periods = forecastDocument.RootElement.GetProperty("properties").GetProperty("periods").EnumerateArray();
return string.Join("\n---\n", periods.Select(period => $"""
{period.GetProperty("name").GetString()}
Temperature: {period.GetProperty("temperature").GetInt32()}°F
Wind: {period.GetProperty("windSpeed").GetString()} {period.GetProperty("windDirection").GetString()}
Forecast: {period.GetProperty("detailedForecast").GetString()}
"""));
}
}
```
### Running the server
Finally, run the server using the following command:
```bash theme={null}
dotnet run
```
This will start the server and listen for incoming requests on standard input/output.
## Testing your server with Claude for Desktop
Claude for Desktop is not yet available on Linux. Linux users can proceed to the [Building a client](/docs/develop/build-client) tutorial to build an MCP client that connects to the server we just built.
First, make sure you have Claude for Desktop installed. [You can install the latest version
here.](https://claude.ai/download) If you already have Claude for Desktop, **make sure it's updated to the latest version.**
We'll need to configure Claude for Desktop for whichever MCP servers you want to use. To do this, open your Claude for Desktop App configuration at `~/Library/Application Support/Claude/claude_desktop_config.json` in a text editor. Make sure to create the file if it doesn't exist.
For example, if you have [VS Code](https://code.visualstudio.com/) installed:
```bash macOS/Linux theme={null}
code ~/Library/Application\ Support/Claude/claude_desktop_config.json
```
```powershell Windows theme={null}
code $env:AppData\Claude\claude_desktop_config.json
```
You'll then add your servers in the `mcpServers` key. The MCP UI elements will only show up in Claude for Desktop if at least one server is properly configured.
In this case, we'll add our single weather server like so:
```json macOS/Linux theme={null}
{
"mcpServers": {
"weather": {
"command": "dotnet",
"args": ["run", "--project", "/ABSOLUTE/PATH/TO/PROJECT", "--no-build"]
}
}
}
```
```json Windows theme={null}
{
"mcpServers": {
"weather": {
"command": "dotnet",
"args": [
"run",
"--project",
"C:\\ABSOLUTE\\PATH\\TO\\PROJECT",
"--no-build"
]
}
}
}
```
This tells Claude for Desktop:
1. There's an MCP server named "weather"
2. Launch it by running `dotnet run /ABSOLUTE/PATH/TO/PROJECT`
Save the file, and restart **Claude for Desktop**.
Let's get started with building our weather server! [You can find the complete code for what we'll be building here.](https://github.com/modelcontextprotocol/quickstart-resources/tree/main/weather-server-rust)
### Prerequisite knowledge
This quickstart assumes you have familiarity with:
* Rust programming language
* Async/await in Rust
* LLMs like Claude
### Logging in MCP Servers
When implementing MCP servers, be careful about how you handle logging:
**For STDIO-based servers:** Never use `println!()` or `print!()`, as they write to standard output (stdout). Writing to stdout will corrupt the JSON-RPC messages and break your server.
**For HTTP-based servers:** Standard output logging is fine since it doesn't interfere with HTTP responses.
### Best Practices
* Use a logging library that writes to stderr or files, such as `tracing` or `log` in Rust.
* Configure your logging framework to avoid stdout output.
### Quick Examples
```rust theme={null}
// ❌ Bad (STDIO)
println!("Processing request");
// ✅ Good (STDIO)
eprintln!("Processing request"); // writes to stderr
```
### System requirements
* Rust 1.70 or higher installed.
* Cargo (comes with Rust installation).
### Set up your environment
First, let's install Rust if you haven't already. You can install Rust from [rust-lang.org](https://www.rust-lang.org/tools/install):
```bash macOS/Linux theme={null}
curl --proto '=https' --tlsv1.2 -sSf https://sh.rustup.rs | sh
```
```powershell Windows theme={null}
# Download and run rustup-init.exe from https://rustup.rs/
```
Verify your Rust installation:
```bash theme={null}
rustc --version
cargo --version
```
Now, let's create and set up our project:
```bash macOS/Linux theme={null}
# Create a new Rust project
cargo new weather
cd weather
```
```powershell Windows theme={null}
# Create a new Rust project
cargo new weather
cd weather
```
Update your `Cargo.toml` to add the required dependencies:
```toml Cargo.toml theme={null}
[package]
name = "weather"
version = "0.1.0"
edition = "2024"
[dependencies]
rmcp = { version = "0.3", features = ["server", "macros", "transport-io"] }
tokio = { version = "1.46", features = ["full"] }
reqwest = { version = "0.12", features = ["json"] }
serde = { version = "1.0", features = ["derive"] }
serde_json = "1.0"
anyhow = "1.0"
tracing = "0.1"
tracing-subscriber = { version = "0.3", features = ["env-filter", "std", "fmt"] }
```
Now let's dive into building your server.
## Building your server
### Importing packages and constants
Open `src/main.rs` and add these imports and constants at the top:
```rust theme={null}
use anyhow::Result;
use rmcp::{
ServerHandler, ServiceExt,
handler::server::{router::tool::ToolRouter, tool::Parameters},
model::*,
schemars, tool, tool_handler, tool_router,
};
use serde::Deserialize;
use serde::de::DeserializeOwned;
const NWS_API_BASE: &str = "https://api.weather.gov";
const USER_AGENT: &str = "weather-app/1.0";
```
The `rmcp` crate provides the Model Context Protocol SDK for Rust, with features for server implementation, procedural macros, and stdio transport.
### Data structures
Next, let's define the data structures for deserializing responses from the National Weather Service API:
```rust theme={null}
#[derive(Debug, Deserialize)]
struct AlertsResponse {
features: Vec,
}
#[derive(Debug, Deserialize)]
struct AlertFeature {
properties: AlertProperties,
}
#[derive(Debug, Deserialize)]
struct AlertProperties {
event: Option,
#[serde(rename = "areaDesc")]
area_desc: Option,
severity: Option,
description: Option,
instruction: Option,
}
#[derive(Debug, Deserialize)]
struct PointsResponse {
properties: PointsProperties,
}
#[derive(Debug, Deserialize)]
struct PointsProperties {
forecast: String,
}
#[derive(Debug, Deserialize)]
struct ForecastResponse {
properties: ForecastProperties,
}
#[derive(Debug, Deserialize)]
struct ForecastProperties {
periods: Vec,
}
#[derive(Debug, Deserialize)]
struct ForecastPeriod {
name: String,
temperature: i32,
#[serde(rename = "temperatureUnit")]
temperature_unit: String,
#[serde(rename = "windSpeed")]
wind_speed: String,
#[serde(rename = "windDirection")]
wind_direction: String,
#[serde(rename = "detailedForecast")]
detailed_forecast: String,
}
```
Now define the request types that MCP clients will send:
```rust theme={null}
#[derive(serde::Deserialize, schemars::JsonSchema)]
pub struct MCPForecastRequest {
latitude: f32,
longitude: f32,
}
#[derive(serde::Deserialize, schemars::JsonSchema)]
pub struct MCPAlertRequest {
state: String,
}
```
### Helper functions
Add helper functions for making API requests and formatting responses:
```rust theme={null}
async fn make_nws_request(url: &str) -> Result {
let client = reqwest::Client::new();
let rsp = client
.get(url)
.header(reqwest::header::USER_AGENT, USER_AGENT)
.header(reqwest::header::ACCEPT, "application/geo+json")
.send()
.await?
.error_for_status()?;
Ok(rsp.json::().await?)
}
fn format_alert(feature: &AlertFeature) -> String {
let props = &feature.properties;
format!(
"Event: {}\nArea: {}\nSeverity: {}\nDescription: {}\nInstructions: {}",
props.event.as_deref().unwrap_or("Unknown"),
props.area_desc.as_deref().unwrap_or("Unknown"),
props.severity.as_deref().unwrap_or("Unknown"),
props
.description
.as_deref()
.unwrap_or("No description available"),
props
.instruction
.as_deref()
.unwrap_or("No specific instructions provided")
)
}
fn format_period(period: &ForecastPeriod) -> String {
format!(
"{}:\nTemperature: {}°{}\nWind: {} {}\nForecast: {}",
period.name,
period.temperature,
period.temperature_unit,
period.wind_speed,
period.wind_direction,
period.detailed_forecast
)
}
```
### Implementing the Weather server and tools
Now let's implement the main Weather server struct with the tool handlers:
```rust theme={null}
pub struct Weather {
tool_router: ToolRouter,
}
#[tool_router]
impl Weather {
fn new() -> Self {
Self {
tool_router: Self::tool_router(),
}
}
#[tool(description = "Get weather alerts for a US state.")]
async fn get_alerts(
&self,
Parameters(MCPAlertRequest { state }): Parameters,
) -> String {
let url = format!(
"{}/alerts/active/area/{}",
NWS_API_BASE,
state.to_uppercase()
);
match make_nws_request::(&url).await {
Ok(data) => {
if data.features.is_empty() {
"No active alerts for this state.".to_string()
} else {
data.features
.iter()
.map(format_alert)
.collect::>()
.join("\n---\n")
}
}
Err(_) => "Unable to fetch alerts or no alerts found.".to_string(),
}
}
#[tool(description = "Get weather forecast for a location.")]
async fn get_forecast(
&self,
Parameters(MCPForecastRequest {
latitude,
longitude,
}): Parameters,
) -> String {
let points_url = format!("{NWS_API_BASE}/points/{latitude},{longitude}");
let Ok(points_data) = make_nws_request::(&points_url).await else {
return "Unable to fetch forecast data for this location.".to_string();
};
let forecast_url = points_data.properties.forecast;
let Ok(forecast_data) = make_nws_request::(&forecast_url).await else {
return "Unable to fetch forecast data for this location.".to_string();
};
let periods = &forecast_data.properties.periods;
let forecast_summary: String = periods
.iter()
.take(5) // Next 5 periods only
.map(format_period)
.collect::>()
.join("\n---\n");
forecast_summary
}
}
```
The `#[tool_router]` macro automatically generates the routing logic, and the `#[tool]` attribute marks methods as MCP tools.
### Implementing the ServerHandler
Implement the `ServerHandler` trait to define server capabilities:
```rust theme={null}
#[tool_handler]
impl ServerHandler for Weather {
fn get_info(&self) -> ServerInfo {
ServerInfo {
capabilities: ServerCapabilities::builder().enable_tools().build(),
..Default::default()
}
}
}
```
### Running the server
Finally, implement the main function to run the server with stdio transport:
```rust theme={null}
#[tokio::main]
async fn main() -> Result<()> {
let transport = (tokio::io::stdin(), tokio::io::stdout());
let service = Weather::new().serve(transport).await?;
service.waiting().await?;
Ok(())
}
```
Build your server with:
```bash theme={null}
cargo build --release
```
The compiled binary will be in `target/release/weather`.
Let's now test your server from an existing MCP host, Claude for Desktop.
## Testing your server with Claude for Desktop
Claude for Desktop is not yet available on Linux. Linux users can proceed to the [Building a client](/docs/develop/build-client) tutorial to build an MCP client that connects to the server we just built.
First, make sure you have Claude for Desktop installed. [You can install the latest version here.](https://claude.ai/download) If you already have Claude for Desktop, **make sure it's updated to the latest version.**
We'll need to configure Claude for Desktop for whichever MCP servers you want to use. To do this, open your Claude for Desktop App configuration at `~/Library/Application Support/Claude/claude_desktop_config.json` in a text editor. Make sure to create the file if it doesn't exist.
For example, if you have [VS Code](https://code.visualstudio.com/) installed:
```bash macOS/Linux theme={null}
code ~/Library/Application\ Support/Claude/claude_desktop_config.json
```
```powershell Windows theme={null}
code $env:AppData\Claude\claude_desktop_config.json
```
You'll then add your servers in the `mcpServers` key. The MCP UI elements will only show up in Claude for Desktop if at least one server is properly configured.
In this case, we'll add our single weather server like so:
```json macOS/Linux theme={null}
{
"mcpServers": {
"weather": {
"command": "/ABSOLUTE/PATH/TO/PARENT/FOLDER/weather/target/release/weather"
}
}
}
```
```json Windows theme={null}
{
"mcpServers": {
"weather": {
"command": "C:\\ABSOLUTE\\PATH\\TO\\PARENT\\FOLDER\\weather\\target\\release\\weather.exe"
}
}
}
```
Make sure you pass in the absolute path to your compiled binary. You can get this by running `pwd` on macOS/Linux or `cd` on Windows Command Prompt from your project directory. On Windows, remember to use double backslashes (`\\`) or forward slashes (`/`) in the JSON path, and add the `.exe` extension.
This tells Claude for Desktop:
1. There's an MCP server named "weather"
2. Launch it by running the compiled binary at the specified path
Save the file, and restart **Claude for Desktop**.
### Test with commands
Let's make sure Claude for Desktop is picking up the two tools we've exposed in our `weather` server. You can do this by looking for the "Add files, connectors, and more /"  icon:
icon:
 After clicking on the plus icon, hover over the "Connectors" menu. You should see the `weather` servers listed:
 If your server isn't being picked up by Claude for Desktop, proceed to the [Troubleshooting](#troubleshooting) section for debugging tips.
If the server has shown up in the "Connectors" menu, you can now test your server by running the following commands in Claude for Desktop:
* What's the weather in Sacramento?
* What are the active weather alerts in Texas?
If your server isn't being picked up by Claude for Desktop, proceed to the [Troubleshooting](#troubleshooting) section for debugging tips.
If the server has shown up in the "Connectors" menu, you can now test your server by running the following commands in Claude for Desktop:
* What's the weather in Sacramento?
* What are the active weather alerts in Texas?
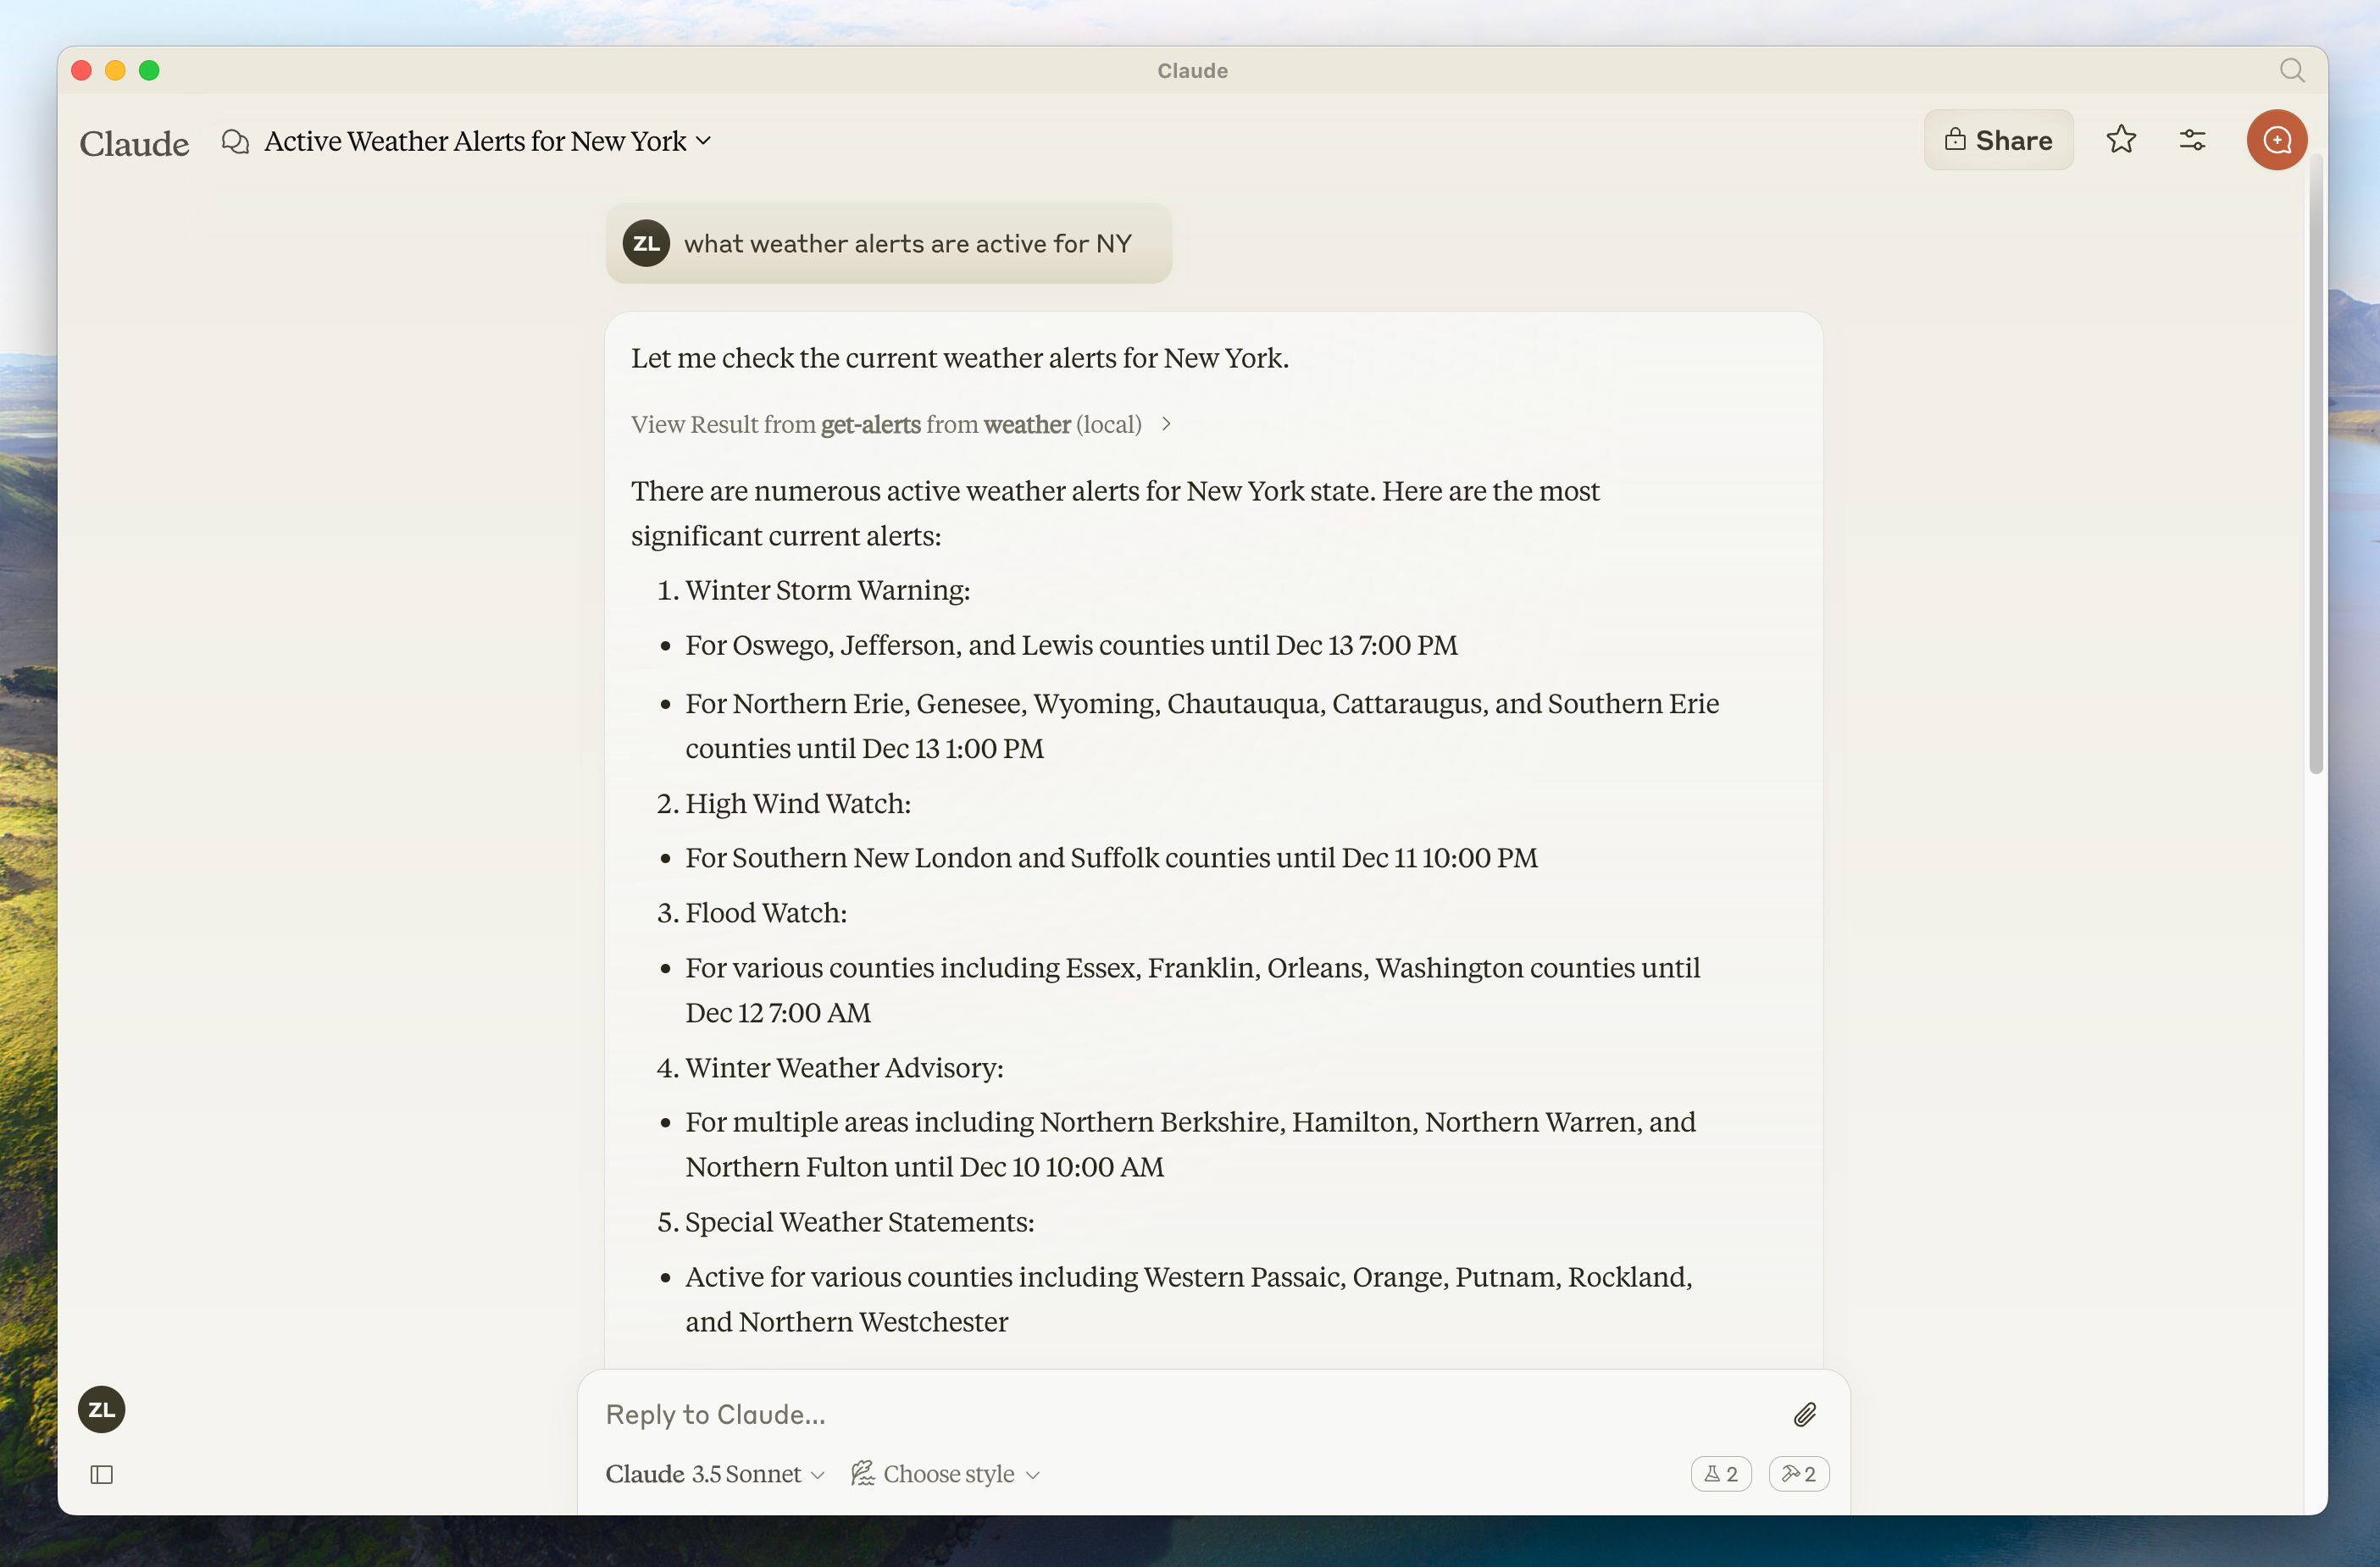 Since this is the US National Weather service, the queries will only work for US locations.
## What's happening under the hood
When you ask a question:
1. The client sends your question to Claude
2. Claude analyzes the available tools and decides which one(s) to use
3. The client executes the chosen tool(s) through the MCP server
4. The results are sent back to Claude
5. Claude formulates a natural language response
6. The response is displayed to you!
## Troubleshooting
**Getting logs from Claude for Desktop**
Claude.app logging related to MCP is written to log files in `~/Library/Logs/Claude`:
* `mcp.log` will contain general logging about MCP connections and connection failures.
* Files named `mcp-server-SERVERNAME.log` will contain error (stderr) logging from the named server.
You can run the following command to list recent logs and follow along with any new ones:
```bash theme={null}
# Check Claude's logs for errors
tail -n 20 -f ~/Library/Logs/Claude/mcp*.log
```
**Server not showing up in Claude**
1. Check your `claude_desktop_config.json` file syntax
2. Make sure the path to your project is absolute and not relative
3. Restart Claude for Desktop completely
To properly restart Claude for Desktop, you must fully quit the application:
* **Windows**: Right-click the Claude icon in the system tray (which may be hidden in the "hidden icons" menu) and select "Quit" or "Exit".
* **macOS**: Use Cmd+Q or select "Quit Claude" from the menu bar.
Simply closing the window does not fully quit the application, and your MCP server configuration changes will not take effect.
**Tool calls failing silently**
If Claude attempts to use the tools but they fail:
1. Check Claude's logs for errors
2. Verify your server builds and runs without errors
3. Try restarting Claude for Desktop
**None of this is working. What do I do?**
Please refer to our [debugging guide](/legacy/tools/debugging) for better debugging tools and more detailed guidance.
**Error: Failed to retrieve grid point data**
This usually means either:
1. The coordinates are outside the US
2. The NWS API is having issues
3. You're being rate limited
Fix:
* Verify you're using US coordinates
* Add a small delay between requests
* Check the NWS API status page
**Error: No active alerts for \[STATE]**
This isn't an error - it just means there are no current weather alerts for that state. Try a different state or check during severe weather.
For more advanced troubleshooting, check out our guide on [Debugging MCP](/legacy/tools/debugging)
## Next steps
Learn how to build your own MCP client that can connect to your server
Check out our gallery of official MCP servers and implementations
Learn how to effectively debug MCP servers and integrations
Learn how to use LLMs like Claude to speed up your MCP development
Since this is the US National Weather service, the queries will only work for US locations.
## What's happening under the hood
When you ask a question:
1. The client sends your question to Claude
2. Claude analyzes the available tools and decides which one(s) to use
3. The client executes the chosen tool(s) through the MCP server
4. The results are sent back to Claude
5. Claude formulates a natural language response
6. The response is displayed to you!
## Troubleshooting
**Getting logs from Claude for Desktop**
Claude.app logging related to MCP is written to log files in `~/Library/Logs/Claude`:
* `mcp.log` will contain general logging about MCP connections and connection failures.
* Files named `mcp-server-SERVERNAME.log` will contain error (stderr) logging from the named server.
You can run the following command to list recent logs and follow along with any new ones:
```bash theme={null}
# Check Claude's logs for errors
tail -n 20 -f ~/Library/Logs/Claude/mcp*.log
```
**Server not showing up in Claude**
1. Check your `claude_desktop_config.json` file syntax
2. Make sure the path to your project is absolute and not relative
3. Restart Claude for Desktop completely
To properly restart Claude for Desktop, you must fully quit the application:
* **Windows**: Right-click the Claude icon in the system tray (which may be hidden in the "hidden icons" menu) and select "Quit" or "Exit".
* **macOS**: Use Cmd+Q or select "Quit Claude" from the menu bar.
Simply closing the window does not fully quit the application, and your MCP server configuration changes will not take effect.
**Tool calls failing silently**
If Claude attempts to use the tools but they fail:
1. Check Claude's logs for errors
2. Verify your server builds and runs without errors
3. Try restarting Claude for Desktop
**None of this is working. What do I do?**
Please refer to our [debugging guide](/legacy/tools/debugging) for better debugging tools and more detailed guidance.
**Error: Failed to retrieve grid point data**
This usually means either:
1. The coordinates are outside the US
2. The NWS API is having issues
3. You're being rate limited
Fix:
* Verify you're using US coordinates
* Add a small delay between requests
* Check the NWS API status page
**Error: No active alerts for \[STATE]**
This isn't an error - it just means there are no current weather alerts for that state. Try a different state or check during severe weather.
For more advanced troubleshooting, check out our guide on [Debugging MCP](/legacy/tools/debugging)
## Next steps
Learn how to build your own MCP client that can connect to your server
Check out our gallery of official MCP servers and implementations
Learn how to effectively debug MCP servers and integrations
Learn how to use LLMs like Claude to speed up your MCP development