Authorization in the Model Context Protocol (MCP) secures access to sensitive resources and operations exposed by MCP servers. If your MCP server handles user data or administrative actions, authorization ensures only permitted users can access its endpoints. MCP uses standardized authorization flows to build trust between MCP clients and MCP servers. Its design doesn’t focus on one specific authorization or identity system, but rather follows the conventions outlined for OAuth 2.1. For detailed information, see the Authorization specification.

When Should You Use Authorization?

While authorization for MCP servers is optional, it is strongly recommended when:
  • Your server accesses user-specific data (emails, documents, databases)
  • You need to audit who performed which actions
  • Your server grants access to its APIs that require user consent
  • You’re building for enterprise environments with strict access controls
  • You want to implement rate limiting or usage tracking per user
Authorization for Local MCP ServersFor MCP servers using the STDIO transport, you can use environment-based credentials or credentials provided by third-party libraries embedded directly in the MCP server instead. Because a STDIO-built MCP server runs locally, it has access to a range of flexible options when it comes to acquiring user credentials that may or may not rely on in-browser authentication and authorization flows.OAuth flows, in turn, are designed for HTTP-based transports where the MCP server is remotely-hosted and the client uses OAuth to establish that a user is authorized to access said remote server.

The Authorization Flow: Step by Step

Let’s walk through what happens when a client wants to connect to your protected MCP server:
1

Initial Handshake

When your MCP client first tries to connect, your server responds with a 401 Unauthorized and tells the client where to find authorization information, captured in a Protected Resource Metadata (PRM) document. The document is hosted by the MCP server, follows a predictable path pattern, and is provided to the client in the resource_metadata parameter within the WWW-Authenticate header.
HTTP/1.1 401 Unauthorized
WWW-Authenticate: Bearer realm="mcp",
  resource_metadata="https://your-server.com/.well-known/oauth-protected-resource"
This tells the client that authorization is required for the MCP server and where to get the necessary information to kickstart the authorization flow.
2

Protected Resource Metadata Discovery

With the URI pointer to the PRM document, the client will fetch the metadata to learn about the authorization server, supported scopes, and other resource information. The data is typically encapsulated in a JSON blob, similar to the one below.
{
  "resource": "https://your-server.com/mcp",
  "authorization_servers": ["https://auth.your-server.com"],
  "scopes_supported": ["mcp:tools", "mcp:resources"]
}
You can see a more comprehensive example in RFC 9278 Section 3.2.
3

Authorization Server Discovery

Next, the client discovers what the authorization server can do by fetching its metadata. If the PRM document lists more than one authorization server, the client can decide which one to use.With an authorization server selected, the client will then construct a standard metadata URI and issue a request to the OpenID Connect (OIDC) Discovery or OAuth 2.0 Auth Server Metadata endpoints (depending on authorization server support) and retrieve another set of metadata properties that will allow it to know the endpoints it needs to complete the authorization flow.
{
  "issuer": "https://auth.your-server.com",
  "authorization_endpoint": "https://auth.your-server.com/authorize",
  "token_endpoint": "https://auth.your-server.com/token",
  "registration_endpoint": "https://auth.your-server.com/register"
}
4

Client Registration

With all the metadata out of the way, the client now needs to make sure that it’s registered with the authorization server. This can be done in two ways.First, the client can be pre-registered with a given authorization server, in which case it can have embedded client registration information that it uses to complete the authorization flow.Alternatively, the client can use Dynamic Client Registration (DCR) to dynamically register itself with the authorization server. The latter scenario requires the authorization server to support DCR. If the authorization server does support DCR, the client will send a request to the registration_endpoint with its information:
{
  "client_name": "My MCP Client",
  "redirect_uris": ["http://localhost:3000/callback"],
  "grant_types": ["authorization_code", "refresh_token"],
  "response_types": ["code"]
}
If the registration succeeds, the authorization server will return a JSON blob with client registration information.
No DCR or Pre-RegistrationIn case a MCP client connects to a MCP server that doesn’t use an authorization server that supports DCR and the client is not pre-registered with said authorization server, it’s the responsibility of the client developer to provide an affordance for the end-user to enter client information manually.
5

User Authorization

The client will now need to open a browser to the /authorize endpoint, where the user can log in and grant the required permissions. The authorization server will then redirect back to the client with an authorization code that the client exchanges for tokens:
{
  "access_token": "eyJhbGciOiJSUzI1NiIs...",
  "refresh_token": "def502...",
  "token_type": "Bearer",
  "expires_in": 3600
}
The access token is what the client will use to authenticate requests to the MCP server. This step follows standard OAuth 2.1 authorization code with PKCE conventions.
6

Making Authenticated Requests

Finally, the client can make requests to your MCP server using the access token embedded in the Authorization header:
GET /mcp HTTP/1.1
Host: your-server.com
Authorization: Bearer eyJhbGciOiJSUzI1NiIs...
The MCP server will need to validate the token and process the request if the token is valid and has the required permissions.

Implementation Example

To get started with a practical implementation, we will use a Keycloak authorization server hosted in a Docker container. Keycloak is an open-source authorization server that can be easily deployed locally for testing and experimentation. Make sure that you download and install Docker Desktop. We will need it to deploy Keycloak on our development machine.

Keycloak Setup

From your terminal application, run the following command to start the Keycloak container:
docker run -p 127.0.0.1:8080:8080 -e KC_BOOTSTRAP_ADMIN_USERNAME=admin -e KC_BOOTSTRAP_ADMIN_PASSWORD=admin quay.io/keycloak/keycloak start-dev
This command will pull the Keycloak container image locally and bootstrap the basic configuration. It will run on port 8080 and have an admin user with admin password.
Not for ProductionThe configuration above may be suitable for testing and experimentation; however, you should never use it in production. Refer to the Configuring Keycloak for production guide for additional details on how to deploy the authorization server for scenarios that require reliability, security, and high availability.
You will be able to access the Keycloak authorization server from your browser at http://localhost:8080.
Keycloak admin dashboard authentication dialog.
When running with the default configuration, Keycloak will already support many of the capabilities that we need for MCP servers, including Dynamic Client Registration. You can check this by looking at the OIDC configuration, available at:
http://localhost:8080/realms/master/.well-known/openid-configuration
We will also need to set up Keycloak to support our scopes and allow our host (local machine) to dynamically register clients, as the default policies restrict anonymous dynamic client registration. Go to Client scopes in the Keycloak dashboard and create a new mcp:tools scope. We will use this to access all of the tools on our MCP server.
Configuring Keycloak scopes.
After creating the scope, make sure that you assign its type to Default and have flipped the Include in token scope switch, as this will be needed for token validation. Let’s now also set up an audience for our Keycloak-issued tokens. An audience is important to configure because it embeds the intended destination directly into the issued access token. This helps your MCP server to verify that the token it got was actually meant for it rather than some other API. This is key to help avoid token passthrough scenarios. To do this, open your 
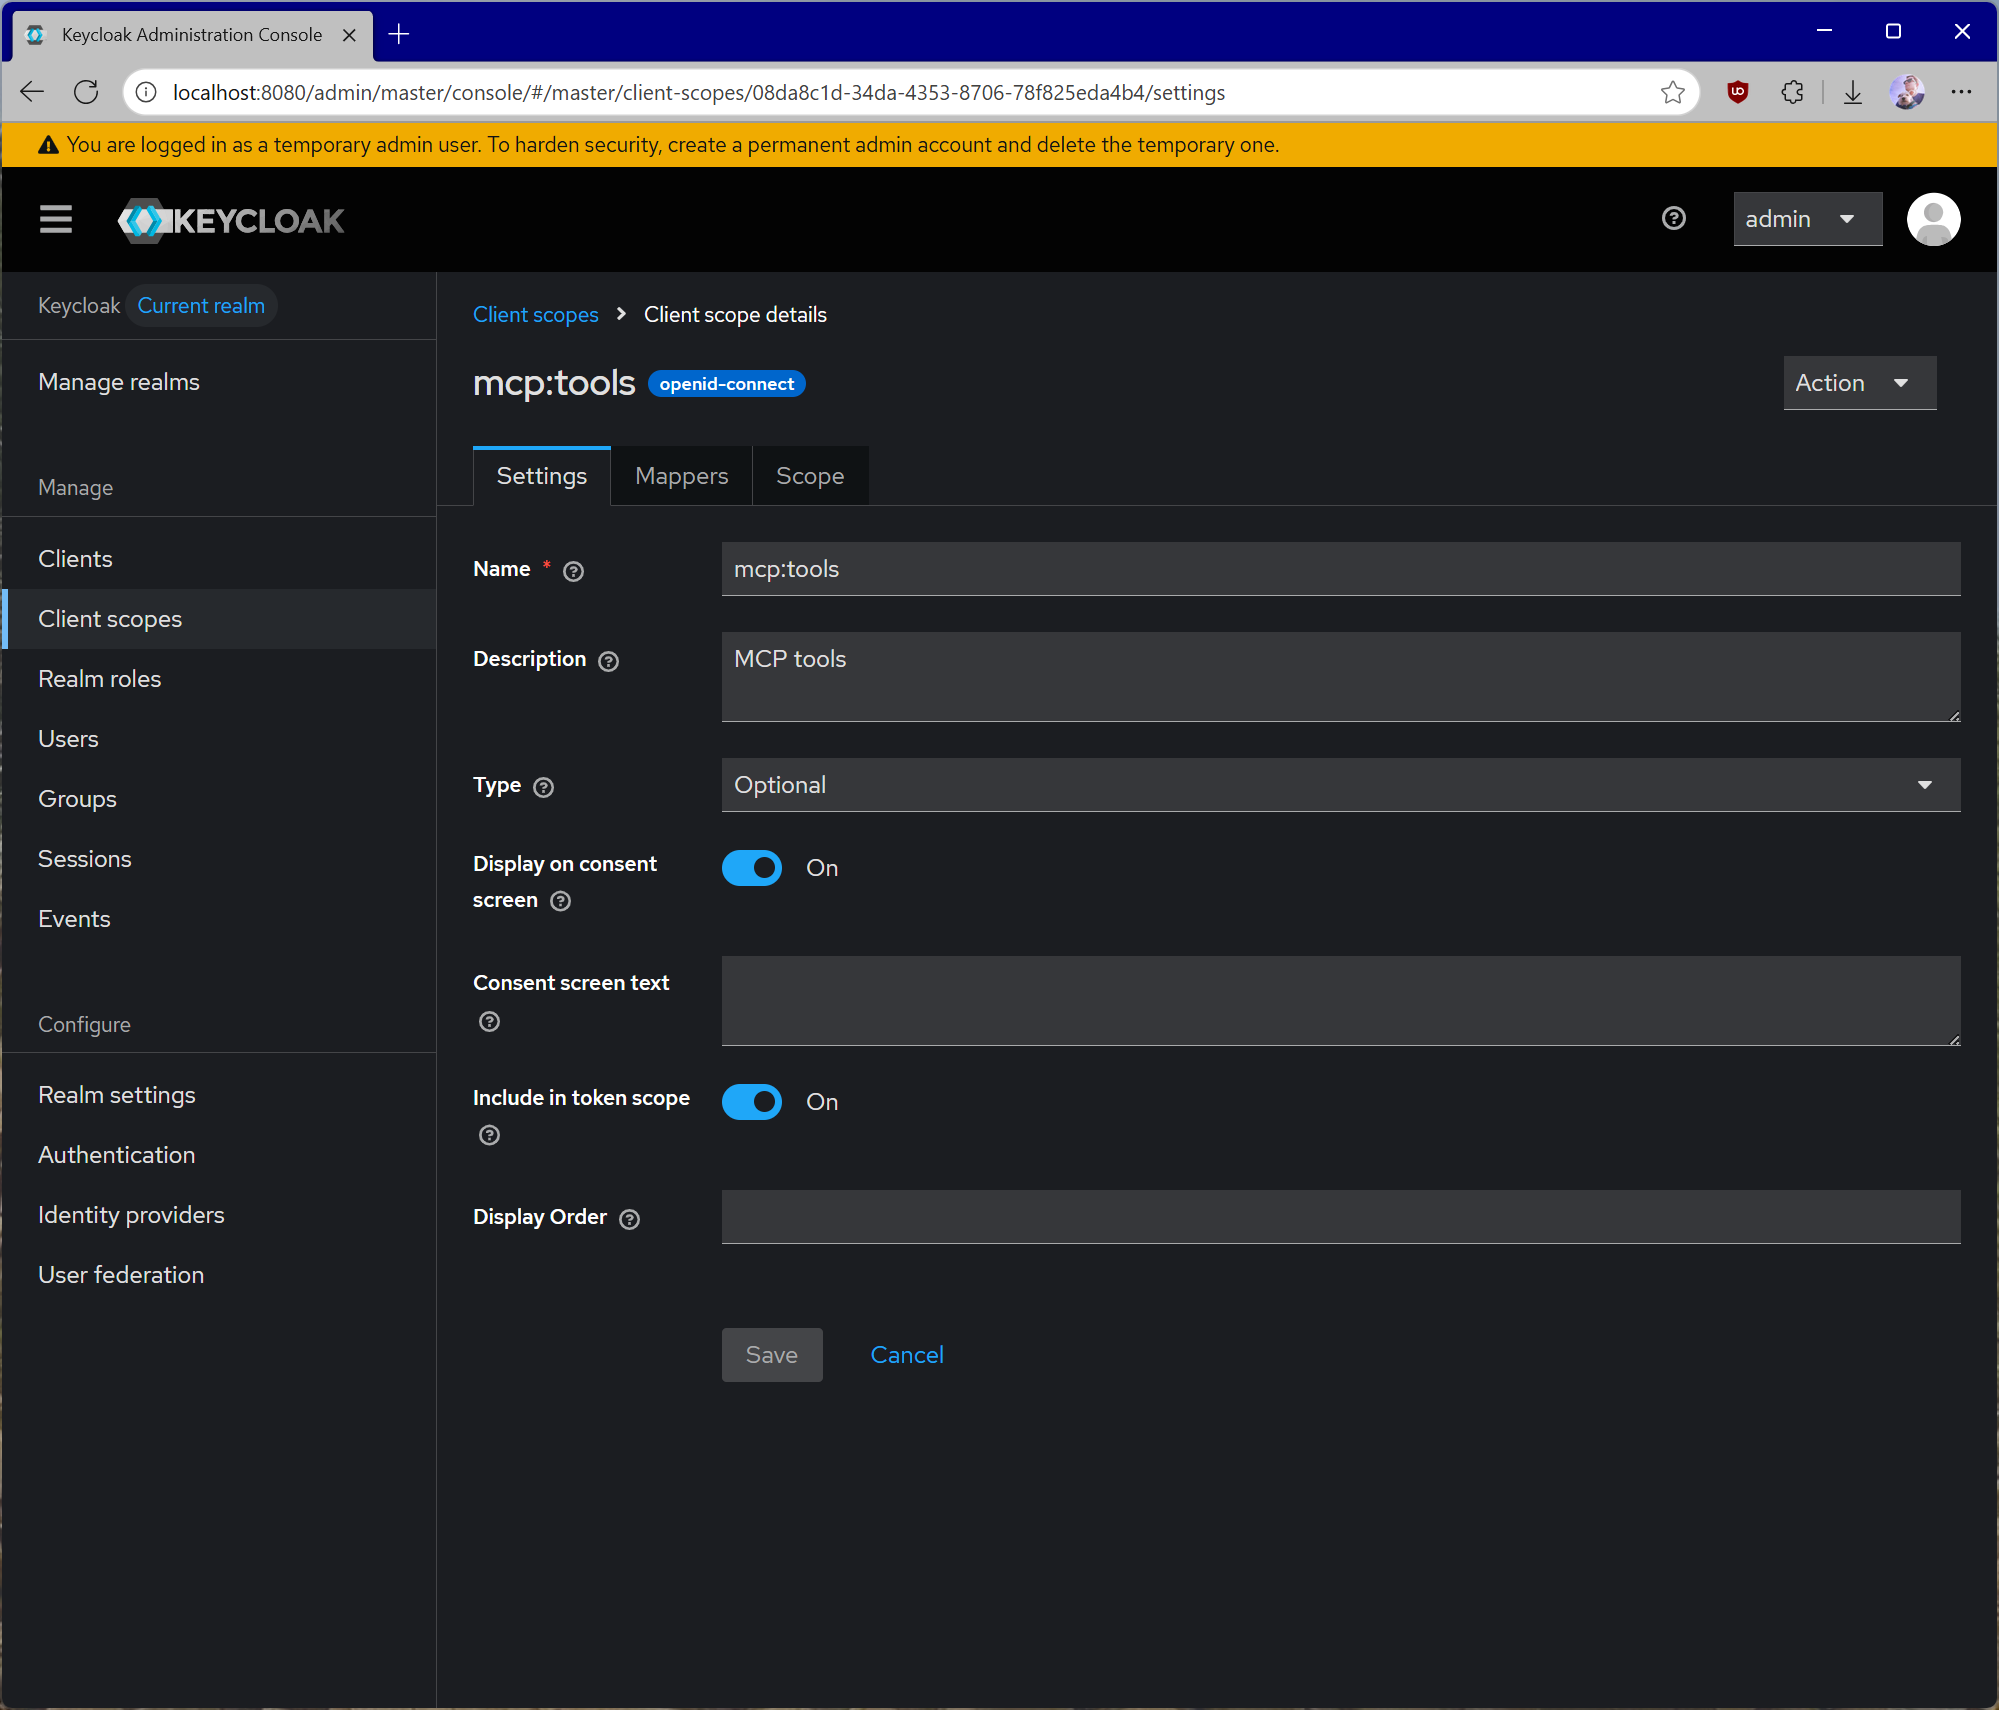
mcp:tools client scope and click on Mappers, followed by Configure a new mapper. Select Audience.
Configuring an audience for a token in Keycloak.
For Name, use audience-config. Add a value for Included Custom Audience, set to http://localhost:3000. This will be the URI of our test server.
Not for ProductionThe audience configuration above is meant for testing. For production scenarios, additional set-up and configuration will be required to ensure that audiences are properly constrained for issued tokens. Specifically, the audience needs to be based on the resource parameter passed from the client, not a fixed value.
Now, navigate to Clients, then Client registration, and then Trusted Hosts. Disable the Client URIs Must Match setting and add the hosts from which you’re testing. You can get your current host IP by running the ifconfig command on Linux or macOS, or ipconfig on Windows. You can see the IP address you need to add by looking at the keycloak logs for a line that looks like Failed to verify remote host : 192.168.215.1. Check that the IP address is associated with your host. This may be for a bridge network depending on your docker setup.
Setting up client registration details in Keycloak.
Getting the HostIf you are running Keycloak from a container, you will also be able to see the host IP from the Terminal in the container logs.
Lastly, we need to register a new client that we can use with the MCP server itself to talk to Keycloak for things like token introspection. To do that:
  1. Go to Clients.
  2. Click Create client.
  3. Give your client a unique Client ID and click Next.
  4. Enable Client authentication and click Next.
  5. Click Save.
Worth noting that token introspection is just one of the available approaches to validate tokens. This can also be done with the help of standalone libraries, specific to each language and platform. When you open the client details, go to Credentials and take note of the Client Secret.
Creating a new client in Keycloak.
Handling SecretsNever embed client credentials directly in your code. We recommend using environment variables or specialized solutions for secret storage.
With Keycloak configured, every time the authorization flow is triggered, your MCP server will receive a token like this:
eyJhbGciOiJSUzI1NiIsInR5cCIgOiAiSldUIiwia2lkIiA6ICI1TjcxMGw1WW5MWk13WGZ1VlJKWGtCS3ZZMzZzb3JnRG5scmlyZ2tlTHlzIn0.eyJleHAiOjE3NTU1NDA4MTcsImlhdCI6MTc1NTU0MDc1NywiYXV0aF90aW1lIjoxNzU1NTM4ODg4LCJqdGkiOiJvbnJ0YWM6YjM0MDgwZmYtODQwNC02ODY3LTgxYmUtMTIzMWI1MDU5M2E4IiwiaXNzIjoiaHR0cDovL2xvY2FsaG9zdDo4MDgwL3JlYWxtcy9tYXN0ZXIiLCJhdWQiOiJodHRwOi8vbG9jYWxob3N0OjMwMDAiLCJzdWIiOiIzM2VkNmM2Yi1jNmUwLTQ5MjgtYTE2MS1mMmY2OWM3YTAzYjkiLCJ0eXAiOiJCZWFyZXIiLCJhenAiOiI3OTc1YTViNi04YjU5LTRhODUtOWNiYS04ZmFlYmRhYjg5NzQiLCJzaWQiOiI4ZjdlYzI3Ni0zNThmLTRjY2MtYjMxMy1kYjA4MjkwZjM3NmYiLCJzY29wZSI6Im1jcDp0b29scyJ9.P5xCRtXORly0R0EXjyqRCUx-z3J4uAOWNAvYtLPXroykZuVCCJ-K1haiQSwbURqfsVOMbL7jiV-sD6miuPzI1tmKOkN_Yct0Vp-azvj7U5rEj7U6tvPfMkg2Uj_jrIX0KOskyU2pVvGZ-5BgqaSvwTEdsGu_V3_E0xDuSBq2uj_wmhqiyTFm5lJ1WkM3Hnxxx1_AAnTj7iOKMFZ4VCwMmk8hhSC7clnDauORc0sutxiJuYUZzxNiNPkmNeQtMCGqWdP1igcbWbrfnNXhJ6NswBOuRbh97_QraET3hl-CNmyS6C72Xc0aOwR_uJ7xVSBTD02OaQ1JA6kjCATz30kGYg
Decoded, it will look like this:
{
  "alg": "RS256",
  "typ": "JWT",
  "kid": "5N710l5YnLZMwXfuVRJXkBKvY36sorgDnlrirgkeLys"
}.{
  "exp": 1755540817,
  "iat": 1755540757,
  "auth_time": 1755538888,
  "jti": "onrtac:b34080ff-8404-6867-81be-1231b50593a8",
  "iss": "http://localhost:8080/realms/master",
  "aud": "http://localhost:3000",
  "sub": "33ed6c6b-c6e0-4928-a161-f2f69c7a03b9",
  "typ": "Bearer",
  "azp": "7975a5b6-8b59-4a85-9cba-8faebdab8974",
  "sid": "8f7ec276-358f-4ccc-b313-db08290f376f",
  "scope": "mcp:tools"
}.[Signature]
Embedded AudienceNotice the aud claim embedded in the token - it’s currently set to be the URI of the test MCP server and it’s inferred from the scope that we’ve previously configured. This will be important in our implementation to validate.

MCP Server Setup

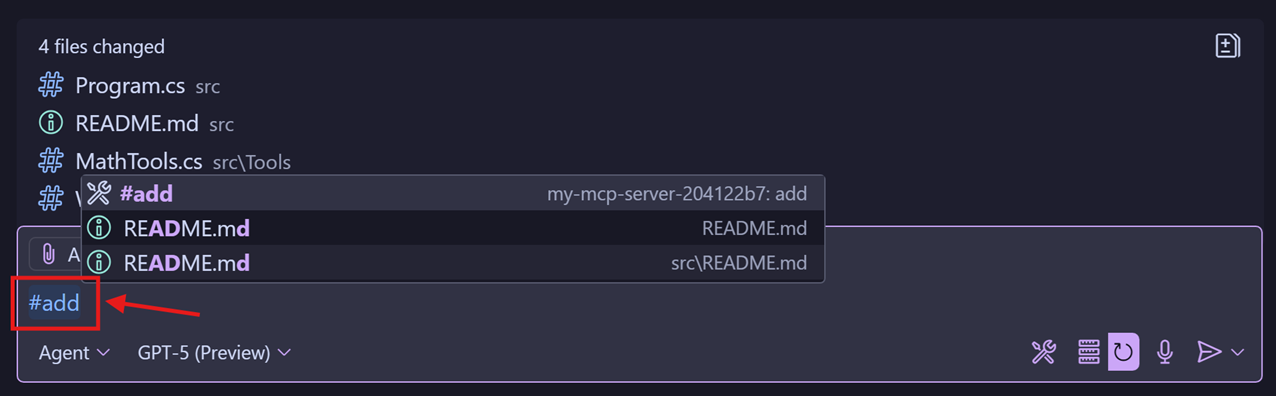
We will now set up our MCP server to use the locally-running Keycloak authorization server. Depending on your programming language preference, you can use one of the supported MCP SDKs. For our testing purposes, we will create an extremely simple MCP server that exposes two tools - one for addition and another for multiplication. The server will require authorization to access these.
  • TypeScript
  • Python
  • C#
You can see the complete TypeScript project in the sample repository.Prior to running the code below, ensure that you have a .env file with the following content:
# Server host/port
HOST=localhost
PORT=3000

# Auth server location
AUTH_HOST=localhost
AUTH_PORT=8080
AUTH_REALM=master

# Keycloak OAuth client credentials
OAUTH_CLIENT_ID=<YOUR_SERVER_CLIENT_ID>
OAUTH_CLIENT_SECRET=<YOUR_SERVER_CLIENT_SECRET>
OAUTH_CLIENT_ID and OAUTH_CLIENT_SECRET are associated with the MCP server client we created earlier.In addition to implementing the MCP authorization specification, the server below also does token introspection via Keycloak to make sure that the token it receives from the client is valid. It also implements basic logging to allow you to easily diagnose any issues.
import "dotenv/config";
import express from "express";
import { randomUUID } from "node:crypto";
import { McpServer } from "@modelcontextprotocol/sdk/server/mcp.js";
import { StreamableHTTPServerTransport } from "@modelcontextprotocol/sdk/server/streamableHttp.js";
import { isInitializeRequest } from "@modelcontextprotocol/sdk/types.js";
import { z } from "zod";
import cors from "cors";
import {
  mcpAuthMetadataRouter,
  getOAuthProtectedResourceMetadataUrl,
} from "@modelcontextprotocol/sdk/server/auth/router.js";
import { requireBearerAuth } from "@modelcontextprotocol/sdk/server/auth/middleware/bearerAuth.js";
import { OAuthMetadata } from "@modelcontextprotocol/sdk/shared/auth.js";
import { checkResourceAllowed } from "@modelcontextprotocol/sdk/shared/auth-utils.js";
const CONFIG = {
  host: process.env.HOST || "localhost",
  port: Number(process.env.PORT) || 3000,
  auth: {
    host: process.env.AUTH_HOST || process.env.HOST || "localhost",
    port: Number(process.env.AUTH_PORT) || 8080,
    realm: process.env.AUTH_REALM || "master",
    clientId: process.env.OAUTH_CLIENT_ID || "mcp-server",
    clientSecret: process.env.OAUTH_CLIENT_SECRET || "",
  },
};

function createOAuthUrls() {
  const authBaseUrl = new URL(
    `http://${CONFIG.auth.host}:${CONFIG.auth.port}/realms/${CONFIG.auth.realm}/`,
  );
  return {
    issuer: authBaseUrl.toString(),
    introspection_endpoint: new URL(
      "protocol/openid-connect/token/introspect",
      authBaseUrl,
    ).toString(),
    authorization_endpoint: new URL(
      "protocol/openid-connect/auth",
      authBaseUrl,
    ).toString(),
    token_endpoint: new URL(
      "protocol/openid-connect/token",
      authBaseUrl,
    ).toString(),
  };
}

function createRequestLogger() {
  return (req: any, res: any, next: any) => {
    const start = Date.now();
    res.on("finish", () => {
      const ms = Date.now() - start;
      console.log(
        `${req.method} ${req.originalUrl} -> ${res.statusCode} ${ms}ms`,
      );
    });
    next();
  };
}

const app = express();

app.use(
  express.json({
    verify: (req: any, _res, buf) => {
      req.rawBody = buf?.toString() ?? "";
    },
  }),
);

app.use(
  cors({
    origin: "*",
    exposedHeaders: ["Mcp-Session-Id"],
  }),
);

app.use(createRequestLogger());

const mcpServerUrl = new URL(`http://${CONFIG.host}:${CONFIG.port}`);
const oauthUrls = createOAuthUrls();

const oauthMetadata: OAuthMetadata = {
  ...oauthUrls,
  response_types_supported: ["code"],
};

const tokenVerifier = {
  verifyAccessToken: async (token: string) => {
    const endpoint = oauthMetadata.introspection_endpoint;

    if (!endpoint) {
      console.error("[auth] no introspection endpoint in metadata");
      throw new Error("No token verification endpoint available in metadata");
    }

    const params = new URLSearchParams({
      token: token,
      client_id: CONFIG.auth.clientId,
    });

    if (CONFIG.auth.clientSecret) {
      params.set("client_secret", CONFIG.auth.clientSecret);
    }

    let response: Response;
    try {
      response = await fetch(endpoint, {
        method: "POST",
        headers: {
          "Content-Type": "application/x-www-form-urlencoded",
        },
        body: params.toString(),
      });
    } catch (e) {
      console.error("[auth] introspection fetch threw", e);
      throw e;
    }

    if (!response.ok) {
      const txt = await response.text();
      console.error("[auth] introspection non-OK", { status: response.status });

      try {
        const obj = JSON.parse(txt);
        console.log(JSON.stringify(obj, null, 2));
      } catch {
        console.error(txt);
      }
      throw new Error(`Invalid or expired token: ${txt}`);
    }

    let data: any;
    try {
      data = await response.json();
    } catch (e) {
      const txt = await response.text();
      console.error("[auth] failed to parse introspection JSON", {
        error: String(e),
        body: txt,
      });
      throw e;
    }

    if (data.active === false) {
      throw new Error("Inactive token");
    }

    if (!data.aud) {
      throw new Error("Resource indicator (aud) missing");
    }

    const audiences: string[] = Array.isArray(data.aud) ? data.aud : [data.aud];
    const allowed = audiences.some((a) =>
      checkResourceAllowed({
        requestedResource: a,
        configuredResource: mcpServerUrl,
      }),
    );
    if (!allowed) {
      throw new Error(
        `None of the provided audiences are allowed. Expected ${mcpServerUrl}, got: ${audiences.join(", ")}`,
      );
    }

    return {
      token,
      clientId: data.client_id,
      scopes: data.scope ? data.scope.split(" ") : [],
      expiresAt: data.exp,
    };
  },
};
app.use(
  mcpAuthMetadataRouter({
    oauthMetadata,
    resourceServerUrl: mcpServerUrl,
    scopesSupported: ["mcp:tools"],
    resourceName: "MCP Demo Server",
  }),
);

const authMiddleware = requireBearerAuth({
  verifier: tokenVerifier,
  requiredScopes: [],
  resourceMetadataUrl: getOAuthProtectedResourceMetadataUrl(mcpServerUrl),
});

const transports: { [sessionId: string]: StreamableHTTPServerTransport } = {};

function createMcpServer() {
  const server = new McpServer({
    name: "example-server",
    version: "1.0.0",
  });

  server.registerTool(
    "add",
    {
      title: "Addition Tool",
      description: "Add two numbers together",
      inputSchema: {
        a: z.number().describe("First number to add"),
        b: z.number().describe("Second number to add"),
      },
    },
    async ({ a, b }) => ({
      content: [{ type: "text", text: `${a} + ${b} = ${a + b}` }],
    }),
  );

  server.registerTool(
    "multiply",
    {
      title: "Multiplication Tool",
      description: "Multiply two numbers together",
      inputSchema: {
        x: z.number().describe("First number to multiply"),
        y: z.number().describe("Second number to multiply"),
      },
    },
    async ({ x, y }) => ({
      content: [{ type: "text", text: `${x} × ${y} = ${x * y}` }],
    }),
  );

  return server;
}

const mcpPostHandler = async (req: express.Request, res: express.Response) => {
  const sessionId = req.headers["mcp-session-id"] as string | undefined;
  let transport: StreamableHTTPServerTransport;

  if (sessionId && transports[sessionId]) {
    transport = transports[sessionId];
  } else if (!sessionId && isInitializeRequest(req.body)) {
    transport = new StreamableHTTPServerTransport({
      sessionIdGenerator: () => randomUUID(),
      onsessioninitialized: (sessionId) => {
        transports[sessionId] = transport;
      },
    });

    transport.onclose = () => {
      if (transport.sessionId) {
        delete transports[transport.sessionId];
      }
    };

    const server = createMcpServer();
    await server.connect(transport);
  } else {
    res.status(400).json({
      jsonrpc: "2.0",
      error: {
        code: -32000,
        message: "Bad Request: No valid session ID provided",
      },
      id: null,
    });
    return;
  }

  await transport.handleRequest(req, res, req.body);
};

const handleSessionRequest = async (
  req: express.Request,
  res: express.Response,
) => {
  const sessionId = req.headers["mcp-session-id"] as string | undefined;
  if (!sessionId || !transports[sessionId]) {
    res.status(400).send("Invalid or missing session ID");
    return;
  }

  const transport = transports[sessionId];
  await transport.handleRequest(req, res);
};

app.post("/", authMiddleware, mcpPostHandler);
app.get("/", authMiddleware, handleSessionRequest);
app.delete("/", authMiddleware, handleSessionRequest);

app.listen(CONFIG.port, CONFIG.host, () => {
  console.log(`🚀 MCP Server running on ${mcpServerUrl.origin}`);
  console.log(`📡 MCP endpoint available at ${mcpServerUrl.origin}`);
  console.log(
    `🔐 OAuth metadata available at ${getOAuthProtectedResourceMetadataUrl(mcpServerUrl)}`,
  );
});
When you run the server, you can add it to your MCP client, such as Visual Studio Code, by providing the MCP server endpoint.For more details about implementing MCP servers in TypeScript, refer to the TypeScript SDK documentation.

Testing the MCP Server

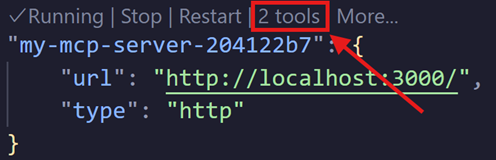
For testing purposes, we will be using Visual Studio Code, but any client that supports MCP and the new authorization specification will fit. Press Cmd + Shift + P and select MCP: Add server…. Select HTTP and enter http://localhost:3000. Give the server a unique name to be used inside Visual Studio Code. In mcp.json you should now see an entry like this:
"my-mcp-server-18676652": {
  "url": "http://localhost:3000",
  "type": "http"
}
On connection, you will be taken to the browser, where you will be prompted to consent to Visual Studio Code having access to the mcp:tools scope.
Keycloak consent form for VS Code.
After consenting, you will see the tools listed right above the server entry in mcp.json.
Tools listed in VS Code.
You will be able to invoke individual tools with the help of the # sign in the chat view.
Invoking MCP tools in VS Code.

Common Pitfalls and How to Avoid Them

For comprehensive security guidance, including attack vectors, mitigation strategies, and implementation best practices, make sure to read through Security Best Practices. A few key issues are called out below.
  • Do not implement token validation or authorization logic by yourself. Use off-the-shelf, well-tested, and secure libraries for things like token validation or authorization decisions. Doing everything from scratch means that you’re more likely to implement things incorrectly unless you are a security expert.
  • Use short-lived access tokens. Depending on the authorization server used, this setting might be customizable. We recommend to not use long-lived tokens - if a malicious actor steals them, they will be able to maintain their access for longer periods.
  • Always validate tokens. Just because your server received a token does not mean that the token is valid or that it’s meant for your server. Always verify that what your MCP server is getting from the client matches the required constraints.
  • Store tokens in secure, encrypted storage. In certain scenarios, you might need to cache tokens server-side. If that is the case, ensure that the storage has the right access controls and cannot be easily exfiltrated by malicious parties with access to your server. You should also implement robust cache eviction policies to ensure that your MCP server is not re-using expired or otherwise invalid tokens.
  • Enforce HTTPS in production. Do not accept tokens or redirect callbacks over plain HTTP except for localhost during development.
  • Least-privilege scopes. Don’t use catch‑all scopes. Split access per tool or capability where possible and verify required scopes per route/tool on the resource server.
  • Don’t log credentials. Never log Authorization headers, tokens, codes, or secrets. Scrub query strings and headers. Redact sensitive fields in structured logs.
  • Separate app vs. resource server credentials. Don’t reuse your MCP server’s client secret for end‑user flows. Store all secrets in a proper secret manager, not in source control.
  • Return proper challenges. On 401, include WWW-Authenticate with Bearer, realm, and resource_metadata so clients can discover how to authenticate.
  • DCR (Dynamic Client Registration) controls. If enabled, be aware of constraints specific to your organization, such as trusted hosts, required vetting, and audited registrations. Unauthenticated DCR means that anyone can register any client with your authorization server.
  • Multi‑tenant/realm mix-ups. Pin to a single issuer/tenant unless explicitly multi‑tenant. Reject tokens from other realms even if signed by the same authorization server.
  • Audience/resource indicator misuse. Don’t configure or accept generic audiences (like api) or unrelated resources. Require the audience/resource to match your configured server.
  • Error detail leakage. Return generic messages to clients, but log detailed reasons with correlation IDs internally to aid troubleshooting without exposing internals.
  • Session identifier hardening. Treat Mcp-Session-Id as untrusted input; never tie authorization to it. Regenerate on auth changes and validate lifecycle server‑side.
MCP authorization builds on these well-established standards: For additional details, refer to: Understanding these standards will help you implement authorization correctly and troubleshoot issues when they arise.
I